Algeria Shapefile Download Map – Free Polygon Administrative Download. Shapefiles showing Districts , Municipalities and Town and Cities.
Have you been searching too long for accurate GIS data for your country of interest? Well the wait is over with MAPOG, your one-stop destination for comprehensive GIS data covering 150+ countries. You can find more than 150 GIS data for each nation in MAPOG GIS Data Collection. The distinctive feature of MAPOG GIS data collection lies in its commitment to providing highly accurate GIS data of the administrative divisions. Users can also find data of other natural and man made geographic features such as river, roads, railway lines, airport locations etc. that are represented in appropriate geometric structures (point, line and polygon). MAPOG provides two important tools for accessing these GIS datasets – Download GIS Data and Add GIS Data.
We offer an extensive array of data formats, including KML, SHP, CSV, GeoJSON, Tab, SQL, Tiff, GML, KMZ, GPKZ, SQLITE, Dxf, MIF, TOPOJSON, XLSX, GPX, ODS, MID, and GPS, ensuring compatibility and accessibility for various applications and analyses.
Note:
All data available are in GCS datum EPSG:4326 WGS84 CRS (Coordinate Reference System).
You need to login for downloading the shapefile.
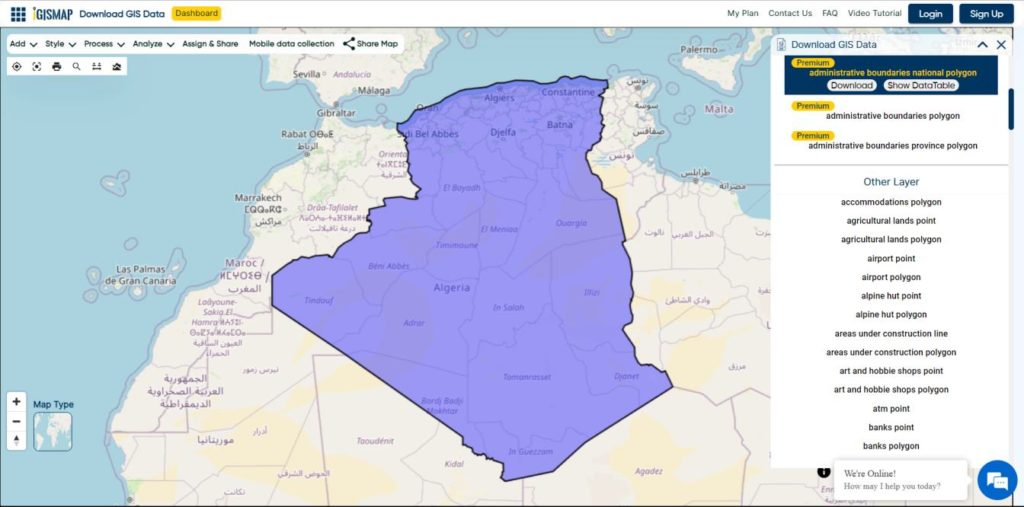
Download Shapefile Data of Algeria
Algeria is bordered to the northeast by Tunisia; to the east by Libya; to the southeast by Niger; to the southwest by Mali, Mauritania, and Western Sahara; to the west by Morocco; and to the north by the Mediterranean Sea. It is considered part of the Maghreb region of North Africa. It has a semi-arid geography, with most of the population living in the fertile north and the Sahara dominating the geography of the south. Algeria covers an area of 2,381,741 square kilometres (919,595 sq mi), making it the world’s, tenth largest nation by area and the largest nation in Africa, more than 200 times as large as the continent’s smallest country, The Gambia. With a population of 44 million, Algeria is the tenth-most populous country in Africa, and the 32nd most populous country in the world. The capital and largest city is Algiers, located in the far north on the Mediterranean coast.
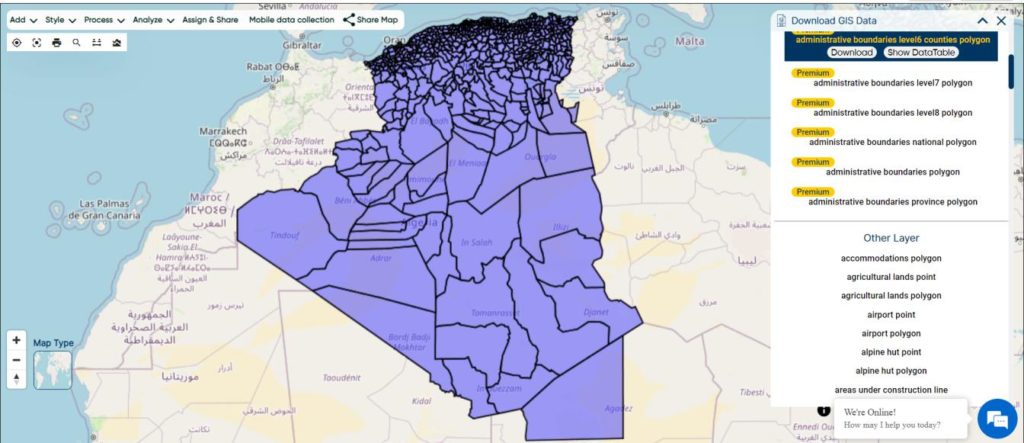
Algeria’s districts were created as arrondissements when Algeria was a colony of France and they had a status equal to those of mainland France. They were, like France’s arrondissements, part of departements, which are further part of a région (which was called a territory, territoire, in French Algeria). They were maintained 6 years after the country’s independence (until 1968) when they were renamed “daïras” and had their functions slightly changed.
The municipalities of Algeria form the third level of administrative subdivisions of Algeria. As of 2002, there were 1,541 municipalities in the country.
Disclaimer : If you find any shapefile data of country provided is incorrect do contact us or comment below, so that we will correct the same in our system as well we will try to correct the same in openstreetmap.
In our previous articles we went through how vector and raster data can be publish on Geoserver using stores. Here, in this article we would be discussing what is importer and how this extension can be used to upload and publish the data i.e with Geoserver Importer Extension API. If you haven’t looked over how to install geoserver, here is the article to install geoserver in linux or install geoserver in windows.
Geoserver Importer Extension API – Upload and Publish Data
Download the extension from given website according to your geoserver version.
Extract the archive in WEB-INF/lib directory.
After this, restart the Geoserver.
To check the availability of extension, open the geoserver in browser and check the Data section and find import data.
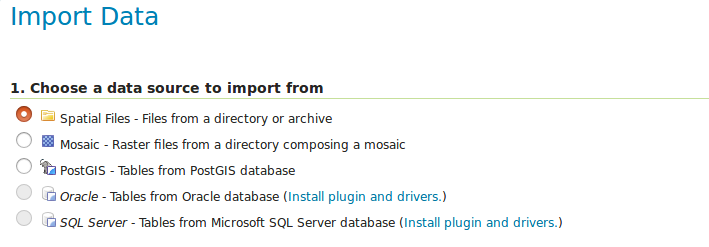
Supported Data format by Importer Extension GeoServer
For spatial data it supports
Shapefile and
GeoTiff
For DataBases it supports
PostGIS
Oracle
Microsoft SQL Server
Upload and Publish Data – Geoserver Importer Extension API
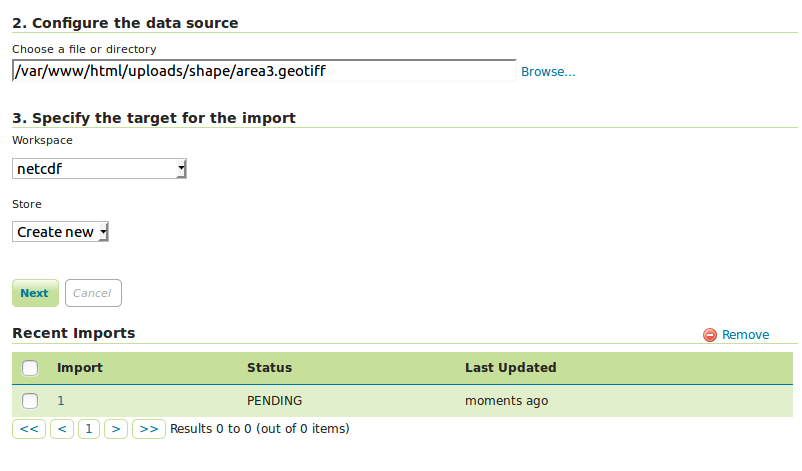
There are two simple steps to upload and publish data. To upload data you can click on browse and find the file to upload, select workspace and store then click to next . If data is successfully uploaded an import id is generated with status pending. The status shows that data has been added but it is not published.
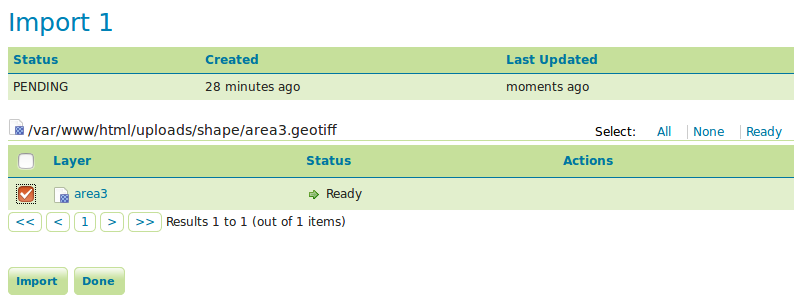
To publish data you can click on import id. New page will open. Here you can click on layer name to change any setting or style.
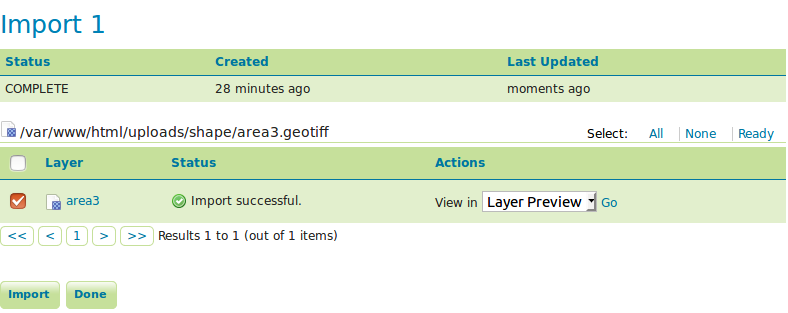
To publish click on check box and hit import button. Now published data is available to you to view in layer preview and google earth. Select the desired option and click to go.
Publish Data using REST API- Geoserver Importer Extension
To upload and import data we can also use REST API (Representational state transfer Application programming interface). For this you need to follow the code.
After publishing your data, you can also look for how to style your raster layer in geoserver and how to style vector layer in geoserver. Simultaneously you can check the data on geoserver. In this way you can upload and publish the data on geoserver with importer api. For any help and suggestions you can comment us in given box.
GoeServer is one of the best server for storing Vector data. Geoserver is open source software and free to use. To know how to publish vector data and style it on Geoserver you can follow this tutorial. Before this you need to install Geoserver on your system for that read out our previous tutorial, install first GeoServer on Windows or Ubuntu operating system. You can also look for publish and style raster dataset in GeoServer.
GeoServer supports various Vector DataSet:
Shapefile
Directory of spatial files
Java Properties
GeoPackage
GML
Here we will use Shapefile as vector dataset as an example to publish and style in map in geoserver.
A shapefile stores non-topological geometry and attribute information for the spatial features in a data set. The geometry for a feature is stored as a shape comprising a set of vector coordinates whereas attribute information can be seen in the attribute table.
GeoServer has been optimized for serving large shapefile (GB size) with good speed. We need to publish shapefile and then using WMS service we can use data with high speed. The OGC Web Map Service (WMS) specification defines an HTTP interface for requesting georeferenced map images from a server.
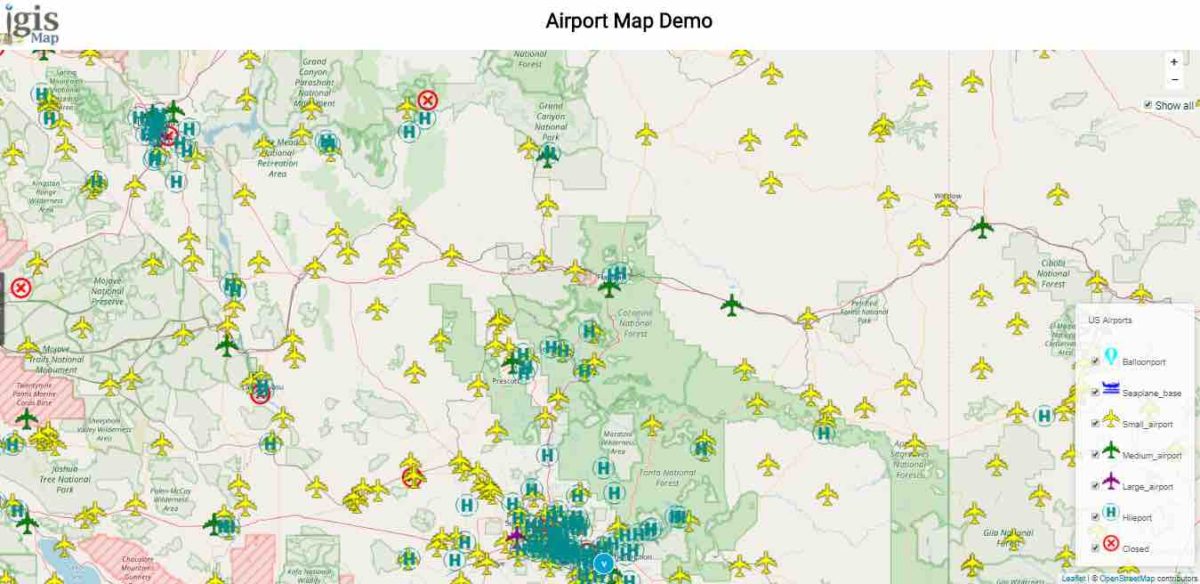
How a shapefile can be published on geoserver is described below. The published and styled data will look something like image showed as feauregiven in the post . This geometry for shapefile is point and icon based styling has used.
Publish Style Vector Dataset on GeoServer
Publish Vector Data on GeoServer – Host Shapefile SHP
We can publish many type of files on geoserver that can be in raster or vector format. In this tutorial we will see how we can publish shape file on GeoServer.
Start GeoServer application in your computer. It will run in command prompt then in web browser search localhost:8080/geoserver/web. Provide the Username and Password and click login to login as administrator of GeoServer.
Step 1 to publish vector data in geoserver:
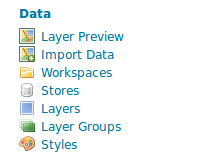
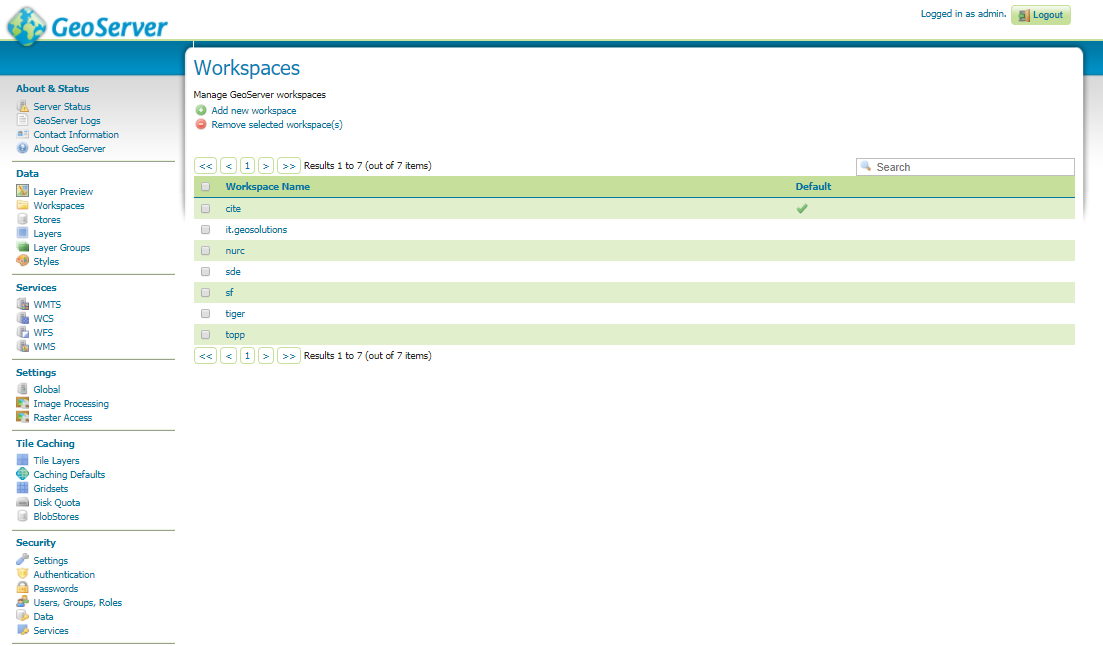
First of all you need to login to GeoServer then create a workspace, which can be done by selecting workspace option on the right side of screen under data section. Add the new workspace give a name and URI. In information technology, a Uniform Resource Identifier (URI) is a string of characters used to identify a resource, which can be same as name and submit the information.
Step 2:
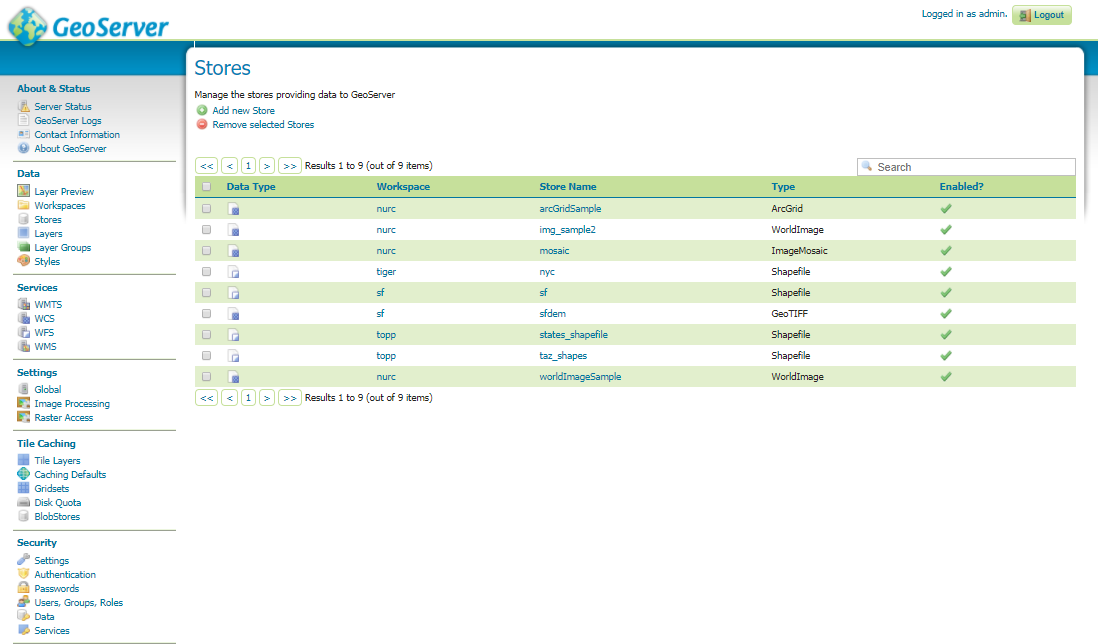
Now add the store by selecting stores option under same section. Click Add new store and select shapefile or directory of spatial files. Under directory of spatial file add your work space and data source name. Under connection parameters browse your file location then click save option. After saving you will be able to publish the layer. Click publish option.
Step 3 to publish vector data in geoserver:
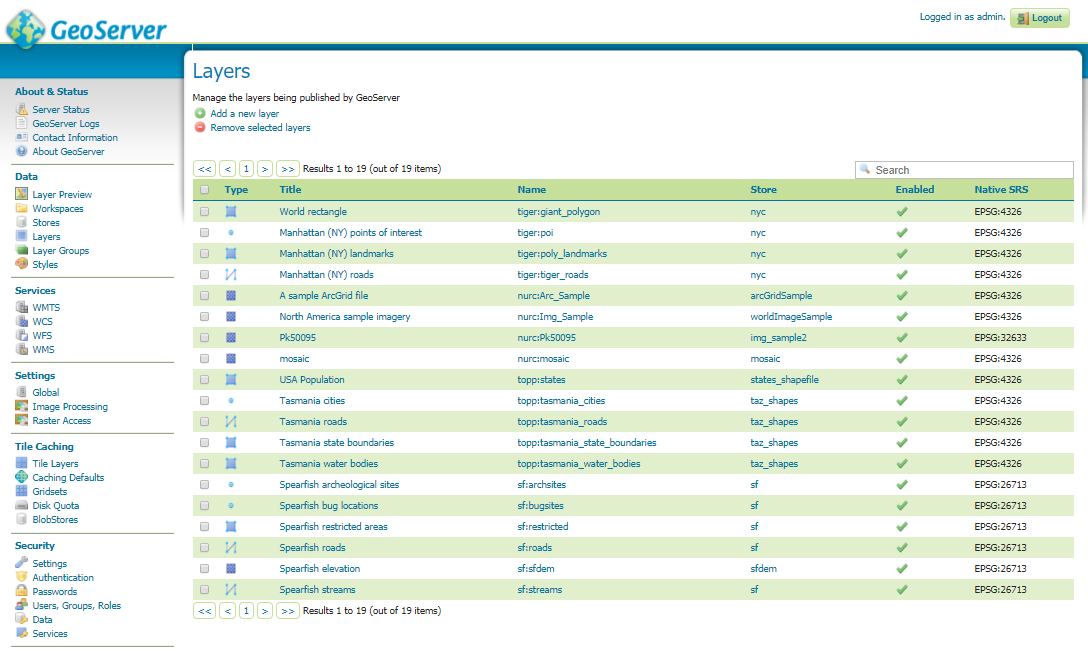
after selecting publish option check the name of shape file. Under Coordinate Reference Systems heading check the coordinate system of your shape file. Under bounding boxes select Computes from SRS (spatial reference system) bound and in the next part select compute from native bound. Then save the information. After saving you will be able to see the shapefile name with your workspace and store name.
Publish Style Vector Dataset on GeoServer
Step 4:
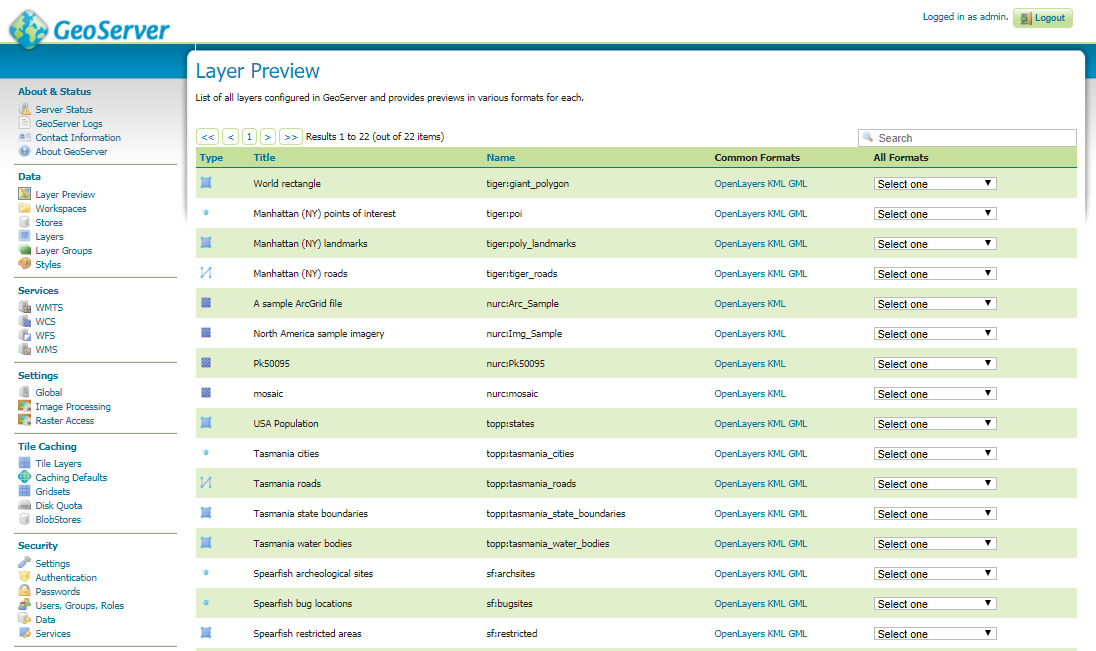
Now select the Layer Preview option under same section. And open your shape file using openLayer option in Command format column.
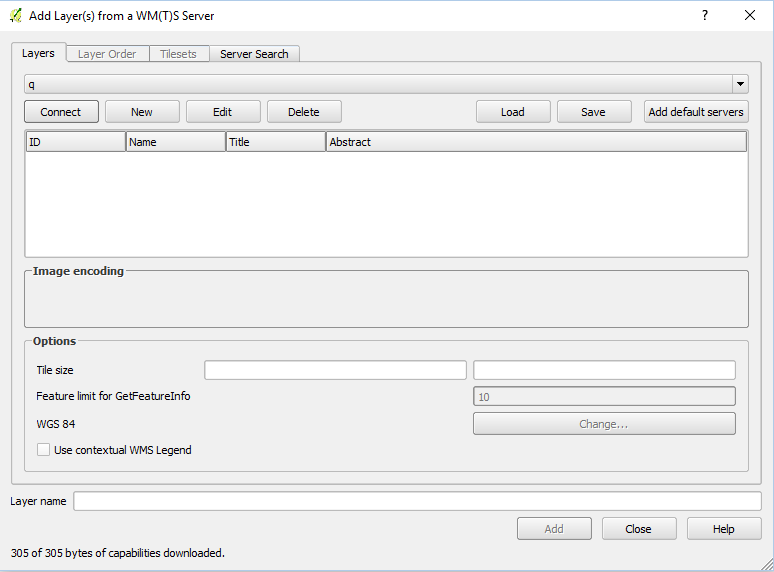
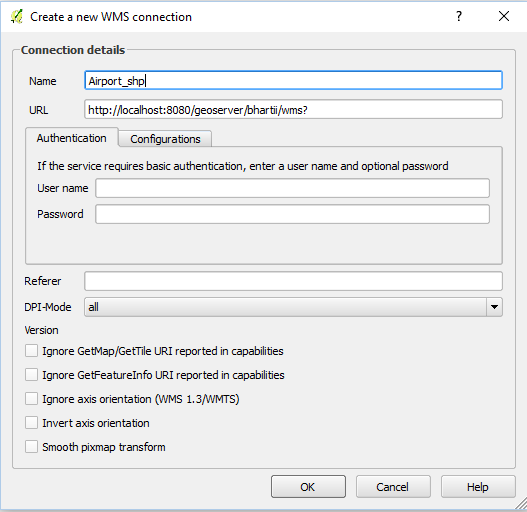
As the layer is visible now you have a link in URL bar. You can add this link in QGIS using add WMS/WMTS layer and see the shape file.
Open QGIS and click the add WMS/WMTS layer option and then click new button to add new WMS layer.
Publish Style Vector Dataset on GeoServer
Add the URL and click ok.
Then connect the layer and add to display.
Shape file can contain point, line or polygon, which can be styled on geoServer. To style any feature on geoserver we required to add style name. This style can be customised. Some styling is already given in style option under Data section.
To add built in style to your shapefile follow the given steps-
Step 1:
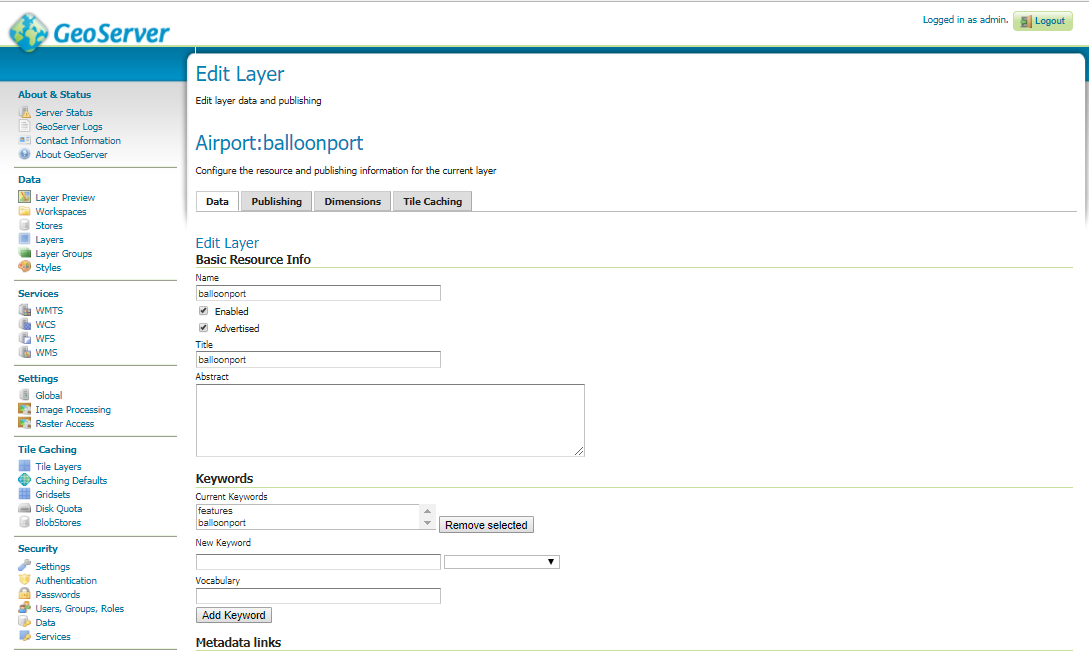
First of all make sure your file has been added on server. Then open that layer using layer option in data section.
Step 2:
There will be 4 tabs as data, publishing, dimensions and tile caching. As on adding layer you already have visited data tab and set SRS coordinates. Now click publishing tab.
In publishing tab find the WMS setting option, under that option check the Queryable checkbox and select style in default style dropdown.
There are styles for point, line, polygon and raster.
1. Burg: point
2. Dem: raster
3. Capitals: points
4. Roads: line
5. Lakes: polygon
6. Raster: raster
7. Point: point
8. Line: line
9. Polygon: polygon
10. Rain: raster
11. Population: raster
According to your shape file you can add the style and click to save.
Step 3 of style vector dataset in geoserver:
Now to check the styling click the layer preview option under same data section. Open as openLayer.
For more details you can visit http://docs.geoserver.org/latest/en/user/data/webadmin/layers.html website.
Styling Based on Attributes: Sometimes we need to style according to attributes. For example population greater than 5000, population equal to 5000 and population less than 5000 so we need some coding to define all these.
The Styled Layer Descriptor (SLD) Profile of the Web Map Service (WMS) Encoding Standard defines an encoding that extends the WMS standard to allow user-defined symbolization and colouring of geographic feature (vector data) and coverage data (raster data).
SLD (Styled Layer Descriptor ) has some elements in geoserver for vector dataset as :
The root element for an SLD is <StyledLayerDescriptor>. It contains a Layers and Styles elements which describe how a map is to be composed and styled.
<NamedLayer>: A reference to a named layer in the server catalogue
<UserLayer>: A layer defined in the style itself
<FeatureTypeStyle>: The FeatureTypeStyle element specifies the styling that is applied to a single feature type of a layer. It contains a list of rules which determine the symbology to be applied to each feature of a layer.
Under Rule element we specified filter with binary comparison operators PropertyIsEqualTo. Where property name is the attribute column you want to perform operation on and literal is the attribute value.
<ogc:Filter>
<ogc:PropertyIsEqualTo>
<ogc:PropertyName>type</ogc:PropertyName>
<ogc:Literal>balloonport</ogc:Literal>
In this article we have used Airport shape file, containing attributes as name and type of airports as point feature. So here we have styled this data based on type of airport.
PointSymbolizer: which styles features as points
LineSymbolizer: which styles features as lines
PolygonSymbolizer: which styles features as polygons
TextSymbolizer: which styles text labels for features
RasterSymbolizer: which styles raster coverages
<PointSymbolizer> in geoserver for vector dataset:
contains an optional <Geometry> element, and a required <Graphic> element specifying the point symbology. So as we want to change the point with icons so graphic element is used. <ExternalGraphic> element specifies an external image file to use as the symbol. Then using onlineResource define the path of graphic and format. The xlink:href attribute specifies the location of the image file. The value can be either a URL or a local pathname relative to the SLD directory. The value can contain CQL expressions delimited by ${ }. The attribute xlink:type=”simple” is also required. The graphic size can be by using size element. Then close all the elements by using “/”.
To apply this code open the style option, add a new style and give name and workspace. After that select SLD ( Styled Layer Descriptor ) from format drop down and copy this code in editor. Validate apply and submit this.
After this open your shape file and repeat the steps described above. In the last open this layer as Openlayer from layer preview section.
Publish Style Raster Dataset On GeoServer. Do you have raster data and want to host the data on geoserver and create a proper map with styling according to dataset? Well GeoServer gives you a direct and simple method to create a styled map. Before implementing steps to publish and sytle raster dataset on geoserver you need to install first GeoServer on Windows, mac or Ubuntu Pc or Server. If you are looking for publish and style vector dataset on geoserver, you can check this link.
Raster Dataset GeoServer coverage:
Coverage/raster data that geoserver can access are,
1. GeoTIFF (Tagged Image File Format with Geographic information)
2. GTOPO30
3. WorldImage
4. ImageMosaic
5. GeoPackage
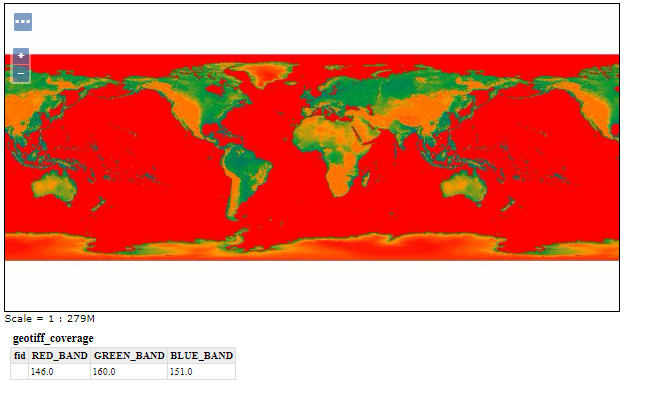
In this article we will discuss how we can publish GeoTIFF (.tiff/.tfw format) data on server. The data for this article has been downloaded from the links provided in this article. The raster data contains 3 bands (red, blue, green) information. Here we will use GeoTiff data to demonstrating raster dataset to publish and style in GeoServer.
To publish Raster Dataset data – Steps – Publish Style Raster Dataset
Here we will first publish the geotiff raster dataset in geoserver as an example:
Step 1:
First of all you need to login to GeoServer then create a workspace, which can be done by selecting workspace option on the right side of screen under data section. Add the new workspace give a name and URI. In information technology, a Uniform Resource Identifier (URI) is a string of characters used to identify a resource, which can be same as name and submit the information.
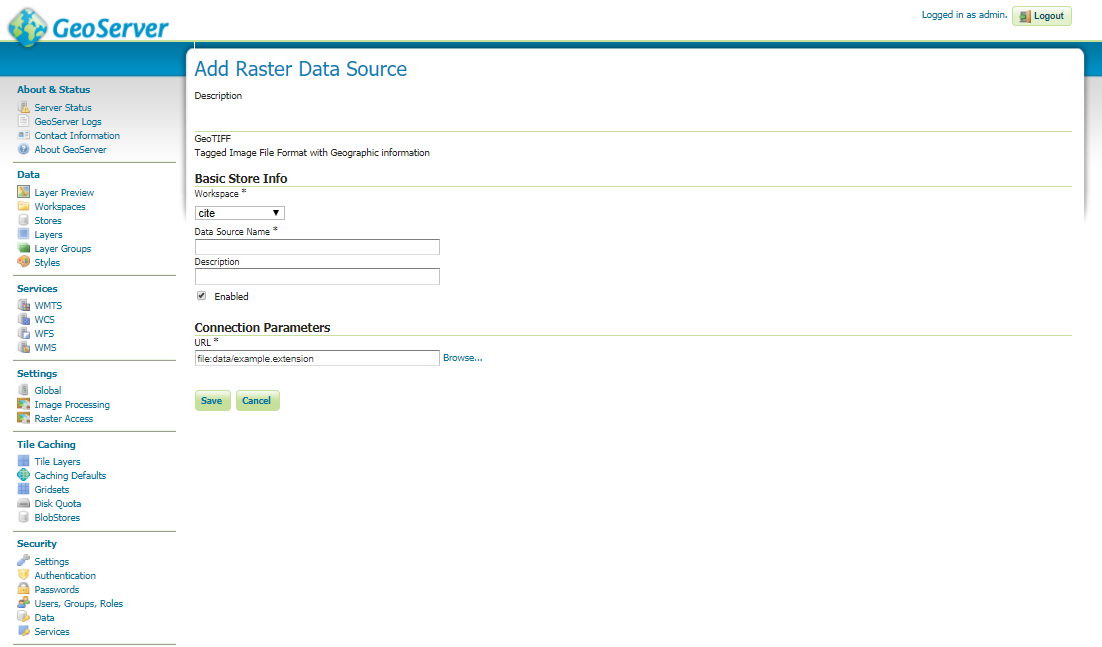
Step 2 of Publish Raster Dataset on GeoServer:
Now add the store by selecting stores option under same section. Click Add new store and select GeoTIFF option in Raster Data Sources list.
Publish and Style Raster Dataset On GeoServer
Under this option add the workspace, you created and give data source name. Provide the description about your data. Now browse the GeoTIFF file to add and publish this data.
Step 3:
Check the Coordinate Reference Systems and the Bounding Boxes fields are properly set and click on Save.
Step 4 of publish raster dataset on geoserver:
Now you can see the layer and get the WMS link. For this go to Layer Preview option in data section and open the published data as OpenLayer option.
To Style Raster Dataset on GeoServer Steps – Publish Style Raster Dataset
To add built in style to your GeoTIFF file follow the given steps.
Step 1:
First of all make sure your file has been added on server. Then open that layer using layer option in data section.
Step 2 to style raster dataset in geoserver:
There will be 4 tabs as data, publishing, dimensions and tile caching. As on adding layer you already have visited data tab and set SRS coordinates. Now click publishing tab.
Publish and Style Raster Dataset On GeoServer
In publishing tab find the WMS setting option, under that option check the Queryable check box and select style in default style drop down.
There are styles for point, line, polygon and raster in Geoserver:
1. Burg: point
2. Dem: raster
3. Capitals: points
4. Roads: line
5. Lakes: polygon
6. Raster: raster
7. Point: point
8. Line: line
9. Polygon: polygon
10. Rain: raster
11. Population: raster
According to your shape file you can add the style and click to save.
Step 3:
Now to check the styling, add Raster option as style and click the layer preview option under same data section. Open as openLayer.
You can add your own SLD (Styled Layer Descriptor) profile to style the GeoTiff data. For this you can follow this article and for more information you can visit http://docs.geoserver.org/latest/en/user/styling/sld/reference/rastersymbolizer.html link.
The Styled Layer Descriptor (SLD) supported in geoserver raster dataset:
Profile of the Web Map Service (WMS) Encoding Standard defines an encoding that extends the WMS standard to allow user-defined symbolisation and colouring of geographic feature (vector data) and coverage data (raster data).
SLD has some elements as:
<StyledLayerDescriptor> Which is the root element for an SLD. It contains a Layers and Styles elements which describe how a map is to be composed and styled. <NamedLayer>: A reference to a named layer in the server catalogue
<UserLayer>: A layer defined in the style itself
<FeatureTypeStyle>: The FeatureTypeStyle element specifies the styling that is applied to a single feature type of a layer. It contains a list of rules which determine the symbology to be applied to each feature of a layer.
<Rule>: Styling rules define the portrayal of features. A rule combines a filter with any number of symbolizers. Features for which the filter condition evaluates as true are rendered using the symbolizers in the rule.
<RasterSymbolizer>: styles raster coverages.
The <Opacity> element sets the transparency level for the entire rendered image. As is standard, the values range from zero (0) to one (1), with zero being transparent, and one being opaque.
The <ChannelSelection> element specifies how dataset bands are mapped to image colour channels. Named dataset bands may be mapped to red, green and blue channels, or a single named band may be mapped to a grayscale channel.
Here we can select any of the band or all three band. But particularly in this article we have selected a single band of an RGB image as a grayscale channel and re-colorizing it via a ColorMap.
A color map is defined by a sequence of <ColorMapEntry> elements. Each <ColorMapEntry> element specifies a color and a quantity attribute. The quantity refers to the value of a raster pixel. The color value is denoted in standard hexadecimal RGB format (#RRGGBB). <ColorMapEntry> elements can also have opacity and label attributes. As in the code quantity is given as 0, 150, 200 and 255. Then the pixels having other values get interpolated range of color.
In the last close all the elements and save the style.
After that open the layer option and select the geotiff file. Add the style in publishing tab and save the layer. To view this style over layer, open layer preview option and open this layer as Openlayer option.
Full length code Publish Style Raster Dataset On GeoServer
Hope this article to Publish Style Raster Dataset On GeoServer is helpful for you and you might be easily able to create a beautiful colour map with the help of geoserver. If you find any problem in following the steps to style and publish the raster layer of geoserver do comment below with the problem in the box provided below.
Loading Comments...
We use cookies to ensure that we give you the best experience on our website. If you continue to use this site we will assume that you are happy with it.