Install PostGIS and PostgreSQL in Linux Ubuntu 16.4

In this post we are going to talk about How to install PostGIS and PostgreSQL in ubuntu 16.4 (LTS) or Linux system. As we know geographic information system (GIS) is a system designed to capture, store, manipulate, manage, and present spatial or geographic data. And PostGIS adds support for geographic objects allowing location queries to be run in SQL database. As PostGIS is a spatial database extender for PostgreSQL object-relational database. So without wasting time, Let’s start the post to know How to install PostGIS and PostgreSQL in your system.

Intro to PostGIS and PostgreSQL – Install

What is PostGIS?

PostGIS is an open source software program that adds support for geographic objects to the PostgreSQL object-relational database. PostGIS follows the Simple Features for SQL specification from the Open Geospatial Consortium (OGC).

Technically PostGIS was implemented as a PostgreSQL’s extension. And There are a large number of software products that can use PostGIS as a database backend.

The PostGIS implementation is based on “light-weight” geometries and indexes optimized to reduce disk and memory footprint. Using light-weight geometries helps servers increase the amount of data migrated up from physical disk storage into RAM, improving query performance substantially.

PostGIS is registered as “implements the specified standard” for “Simple Features for SQL” by the OGC. PostGIS has not been certified as compliant by the OGC.

What is PostgreSQL?

PostgreSQL, often simply Postgres, is an object-relational database management system (ORDBMS) with an emphasis on extensibility and standards compliance. As a database server, its primary functions are to store data securely and return that data in response to requests from other software applications. It can handle workloads ranging from small single-machine applications to large Internet-facing applications (or for data warehousing) with many concurrent users; on macOS Server, PostgreSQL is the default database and it is also available for Microsoft Windows and Linux (supplied in most distributions). PostgreSQL is a powerful, open source object-relational database system and It runs on all major operating systems.

It is fully ACID compliant, has full support for foreign keys, joins, views, triggers, and stored procedures (in multiple languages)
PostgreSQL supports compound, unique, partial, and functional indexes which can use any of its B-tree, R-tree, hash, or GiST storage methods. GiST(Generalized Search Tree) serves as a foundation for many public projects that use PostgreSQL such a OpenFTS and PostGIS. And as I described above PostGIS is a project which adds support for geographic objects in PostgreSQL, allowing it to be used as a spatial database for geographic information systems (GIS), much like ESRI’s SDE or Oracle’s Spatial extension.

Install PostGIS and PostgreSQL

Installation of PostGIS and PostgreSQL is much simpler then you think. PostgreSQL is available in all Ubuntu versions by default. However, Ubuntu “snapshots” a specific version of PostgreSQL that is then supported throughout the lifetime of that Ubuntu version. Other versions of PostgreSQL are available through the PostgreSQL apt repository.
The PostgreSQL apt repository supports LTS versions of Ubuntu (14.04 and 16.04) on amd64, i386 and ppc64el architectures as well as select non-LTS versions(17.04). While not fully supported, the packages often work on other non-LTS versions as well, by using the closest LTS version available.
The following describes how to install Postgresql 9.6, PostGIS 2.3, pgRouting 2.3, PGAdmin on Ubuntu version 16.04. It is assumed to also work on Linux Mint, Lubuntu, and Xubuntu.
Run these in terminal:

  • Verifying version of ubuntu
    sudo lsb_release -a
  • Add Repository to sources.list

    For xenial (16.4.2 LTS)

    sudo sh -c 'echo "deb http://apt.postgresql.org/pub/repos/apt xenial-pgdg main" >> /etc/apt/sources.list'
  • Adding keys
    wget --quiet -O - http://apt.postgresql.org/pub/repos/apt/ACCC4CF8.asc | sudo apt-key add - 
    sudo apt-get update
  • Installation

    The following will install postgresql 9.6, PostGIS 2.3, PGAdmin4, pgRouting 2.3 and additional supplied modules including the adminpack extension:

    sudo apt-get install postgresql-9.6
    
    sudo apt-get install postgresql-9.6-postgis-2.3 postgresql-contrib-9.6
    
    postgresql-9.6-postgis-scripts
    
    #to get the commandline tools shp2pgsql, raster2pgsql you need to do this
    sudo apt-get install postgis
  • To get pgRouting
    # Install pgRouting 2.3 package
    sudo apt-get install postgresql-9.6-pgrouting

Now we have successfully installed PostgreSQL and PostGIS into the system and pgAdmin lets you create everything using user interface. You don’t need to remember queries to create tables sequence etc. But I am still showing how to create the database from command line .

You may look over full pgRouting postgresql post in detail.

  • Enable Adminpack

    While in terminal, log in to the psql console as postgres user:

    sudo -u postgres psql
    CREATE EXTENSION adminpack;

    Never install PostGIS in the postgres database, create a user database You can also enable the PostGIS extension here (or with the GUI as described below):

    sudo -u postgres psql
    CREATE DATABASE gisdb;\connect gisdb;
    
    CREATE SCHEMA postgis;
    
    ALTER DATABASE gisdb SET search_path=public, postgis, contrib;
    
    \connect gisdb; 
     -- this is to force new search path to take effect
    
    CREATE EXTENSION postgis SCHEMA postgis;
    
    SELECT postgis_full_version();

    should give you output something like this:

                           postgis_full_version
    -----------------------------------------------------------------------
    POSTGIS="2.4.3 r16312" PGSQL="96" GEOS="3.5.0-CAPI-1.9.0 r4084" PROJ="Rel. 4.9.2, 08 September 2015" GDAL="GDAL 1.11.3, released 2015/09/16" LIBXML="2.9.3" LIBJSON="0.11.99" LIBPROTOBUF="1.2.1" RASTER
    (1 row)
  • Install pgRouting – postgis and postgresql

    CREATE  EXTENSION pgrouting;
    SELECT * FROM pgr_version();

    should give you:

    version |  tag   |   hash    | branch | boost
    --------+--------+-----------+--------+--------
      2.5.2 | v2.5.2 | 60585f1f7 | master | 1.58.0
    (1 row)
  • Exit the psql console:
    \q

    This is how we can make database and create schema in command line .

Now let’s see how we can do it in pgAdmin :

PgAdmin – Install PostGIS and PostgreSQL

PostgreSQL has a number of administrative front-ends. The primary one is psql a command-line tool for entering SQL queries. Another popular PostgreSQL front-end is the free and open source graphical to pgAdmin. All queries done in pgAdmin can also be done on the command line with psql.

  • Find pgAdmin and start it up.

    Install PostGIS and PostgreSQL
    Install PostGIS and PostgreSQL
  • If this is the first time you have run pgAdmin, you should have a server entry for PostGIS (localhost:5432) already configured in pgAdmin. Double click the entry, and enter anything you like at the password prompt to connect to the database.
    The PostGIS database has been installed with unrestricted access for local users (users connecting from the same machine as the database is running). That means that it will accept any word you provide. If you need to connect from a remote computer, the password for the PostgreSQL user has been set to PostgreSQL.

Creating a Database

  •  Open the Databases tree item and have a look at the available databases. The PostgreSQL database is the user database for the default PostgreSQL user and is not too interesting to us.
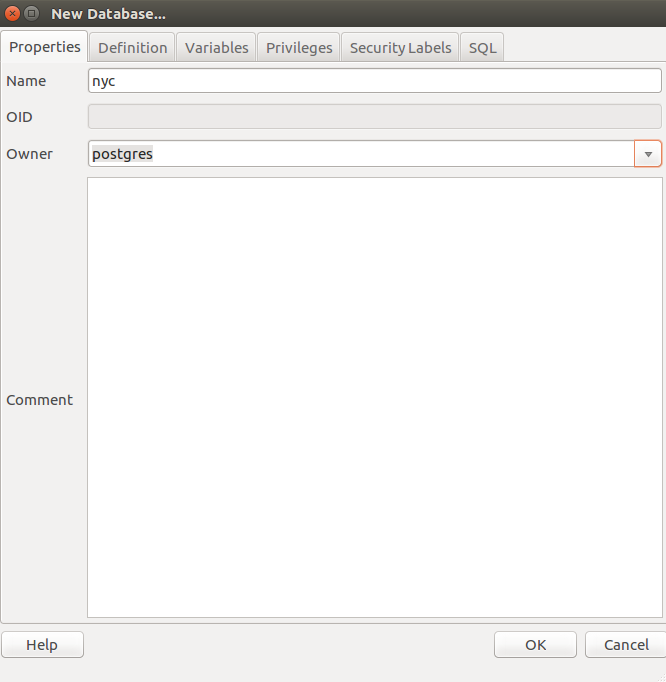
  • Right-click on the Databases item and select New Database.
    Install PostGIS and PostgreSQL
  • Fill in the New Database form as shown below and click OK.
     Name   |  nyc     |
     -------+----------+
     Owner  | postgres |
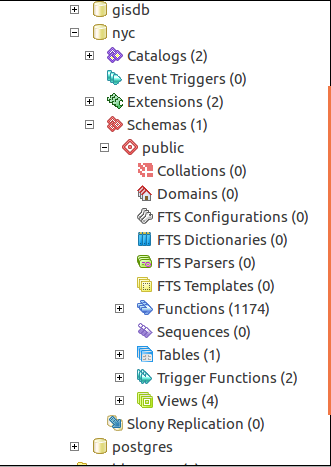
    Install PostGIS and PostgreSQL
    Install PostGIS and PostgreSQL
  • Select the new nyc database and open it up to display the tree of objects. You’ll see the public schema.
    Install PostGIS and PostgreSQL
  • Click on the SQL query button indicated below (or go to Tools > Query Tool).Install PostGIS and PostgreSQL
  • Enter the following query into the query text field to load the PostGIS spatial extension:
    CREATE EXTENSION postgis;
  • Click the Play button in the toolbar (or press F5) to “Execute the query.”
  • Now confirm that PostGIS is installed by running a PostGIS function:
    SELECT postgis_full_version();

You have successfully created a PostgreSQL database with PostGIS!! Let us know by commenting below if you have faced any problem in Install PostGIS and PostgreSQL. Or comment below with the trick you have applied to install postgis.

PGrouting PostGIS Postgresql – No need for Google routing

Do you have all road data with you and want to creating routing from that according to your algorithm? Needs an alternative to Google Map API, when having your own road datasets? PGrouting with PostGresSql can help you out by doing that. Here in this post we will look for PGRouting PostGreSql implementation steps by steps and finding the direction with PGRouting. Connection between PostGres and QGIS and query data and see the result in QGIS Desktop.

Prerequisite for PGrouting PostGIS Postgresql:

  • Installed QGIS and installed PostGreSql
  • Basic Knowledge of PostGreSQL
  • Basic knowledge with QGIS Desktop
  • Road Map Shapefile

Here we will consider Road Map Shapefile, on which we will query and get the routing. In this article we will see how we can query the road network shapefile to find out the shortest path. The results can be seen in QGIS Desktop software. Here postGIS is used to generate road network. In this tutorial we have id of each route, which is used to query the shortest route. You will understand more easily once you read this article throughly. Here PGrouting has used to find out the shortest path.

Install Postgresql PostGIS PGRouting:

Its installation is simple process include few steps (written an article for linux based system). Here are few points for installing postgresql PGRouting:

# Create the file /etc/apt/sources.list.d/pgdg.list, and add a line for the repository

--> sudo sh -c 'echo "deb http://apt.postgresql.org/pub/repos/apt/ CODENAME-pgdg main" > /etc/apt/sources.list.d/pgdg.list'

The codename can find by using given command

 --> lsb_release -cs

Output:

 Codename xanial

Then replace this codename in command.

# Import the repository key, update the package lists

--> sudo apt-get install wget ca-certificates
 --> wget --quiet -O - https://www.postgresql.org/media/keys/ACCC4CF8.asc | sudo apt-key add -
 --> sudo apt-get update

# Install PGrouting based on your postgresql Installation:

--> sudo apt-get install postgresql-9.6-pgrouting

To be up to date with changes and improvements follow the given command

--> sudo apt-get update & sudo apt-get upgrade

PGRouting PostGreSql PostGIS Shortest Path Steps:

In this article we are using postgres 9.6, PostGIS 2.4.2 and Pgrouting 2.5.2. It is better to check versions for all required software as query syntax change with version. Firstly create a database.

1. Create database in PostGreSql for PGRouting:

You can create a database in Ubuntu terminal. For that you need to follow the given command-

 --> sudo -u postgres createdb -O DATABASE_USER DATABASE_NAME

where -U username, Createdb is command which create new postgresql database, -O output file name, last two options are Database user-name and name for database. For more option in psql visit https://www.postgresql.org/docs/9.0/static/app-psql.html link.

2. Add shape file in postgresql pgrouting database:

If you are using pgAdmin3 then you can open the database by providing user name and password.

In Database you can add shapefile by clicking option PostGIS shape file and DBF loader. Here first off define the user-name with proper password and database name. Then add shape file and import it.

You can use this link to import or upload Shapefile in PostGreSql database.

Now refresh the database and expand public-> tables option you see the shape file’s attribute table.

3. Add Source and target column in attribute table:

The given command will add column in attribute table, named as source and target with integer data type. Here roads_table is the attribute table or imported shape file.

--> ALTER TABLE roads_table ADD COLUMN "source" integer;
--> ALTER TABLE roads_table ADD COLUMN "target" integer;

4. Create topology – PGRouting:

Here you must be aware of what is topology when working with spatial system. Topology is a set of rules and behaviours that model how points, lines, and polygons share coincident geometry.

Here creating topology means attaching nodes to every end point of route. This is done using method from pgrouting that is pgr_createTopology().
This takes table name, tolerance, geom field name and id as inputs.

--> SELECT pgr_createTopology('roads_table', 0.001, 'the_geom', 'id')

More detailed explanation is given below:

The topology creation function accepts the following parameters:

-> edge_table:

Text Network table name. (may contain the schema name AS well)

-> tolerance:

Float8 Snapping tolerance of disconnected edges. (in projection unit)

-> the_geom:

Text Geometry column name of the network table. Default value is the_geom.

-> Id:

Text Primary key column name of the network table. Default value is id.

-> Source:

Text Source column name of the network table. Default value is source.

-> Target:

Text Target column name of the network table. Default value is target.

-> rows_where:

Text Condition to SELECT a subset or rows. Default value is true to indicate all rows that where source or target have a null value, otherwise the condition is used.

-> Clean:

Boolean Clean any previous topology. Default value is false.

For more details: http://docs.pgrouting.org/2.2/en/src/topology/doc/pgr_createTopology.html

5. Create network table – PGrouting PostGIS Postgresql:

This table contains all information such as gid, length of routes, name of roads, source and target. Here source and target is taken from node table where as other information from attribute table. For this first we need to create node table.

In node table you have source as a start_id and target as end_id.

CREATE TABLE node AS
 SELECT row_number() OVER (ORDER BY foo.p)::integer AS id,
 foo.p AS the_geom
 FROM (
 SELECT DISTINCT roads_table.source AS p FROM roads_table
 UNION
 SELECT DISTINCT roads_table.target AS p FROM roads_table
 ) foo
 GROUP BY foo.p;

This explains that distinct values of source and target from roads_table table is selected and union operation has performed. Then number of rows are selected from this union table and saved them in node table.

CREATE TABLE network AS
 SELECT a.*, b.id as start_id, c.id as end_id
 FROM roads_table AS a
 JOIN node AS b ON a.source = b.the_geom
 JOIN node AS c ON a.target = c.the_geom;

This query explains that in network table b.id is named as start_id and c.id as end_id.

Now we will use pgr_dijkstra method from PGrouting PostGIS Postgresql

The minimal syntax is given

pgr_dijkstra(TEXT edges_sql, BIGINT start_vid, BIGINT end_vid)
 RETURNS SET OF (seq, path_seq, node, edge, cost, agg_cost) or EMPTY SET

This returns seq, path sequence, node, edge, cost, agg_cost fields.

Select seq, node, edge,cost, geom from pgr_dijkstra(
 'Select gid as id, source, target, st_length(geom) as cost from network', 3566,20051, false) as di
 JOIN network pt
 ON di.edge = pt.gid ;

Here we have joined network table to select geometry field. This all command would be running in SQL window in DB manager option in QGIS.

You can create a shape file as a result for query. For that you need to click on load as new layer option then provide geom as geometry option and edge as column with unique values and click load. The result layer will be added to canvas of QGIS.

PgRouting PostGIS PostGreSql using Latitude Longitude for source and destination:

You just need to change the last command in SQL window of QGIS software.

Select seq, node, edge,cost, geom, agg_cost from pgr_dijkstra(
 'Select gid as id, source, target, st_length(geom::geography)/1000 as cost from network',(SELECT source FROM network
 ORDER BY geom <-> ST_SetSRID(ST_Point
 (74.862413,24.476381),4326) LIMIT 1),
 (SELECT source FROM network
 ORDER BY geom <-> ST_SetSRID(ST_Point
 (75.857734,22.719588),4326) limit 1), false) as di
 JOIN network pt
 ON (di.edge = pt.gid);

This query explains that we are using pgr_dijkstra from pgrouting which takes sql_text,integer start_id, integer end_id and boolean type for directed route. If route is directed, give input as true otherwise false. Here in this article we have undirected route. As now in place of we want to give latitude and longitude so for that given query has executed.

SELECT source FROM network ORDER BY geom <-> ST_SetSRID(ST_Point (75.857734,22.719588),4326) limit 1

This part is little interesting, first of all we need to understand that always we provide latitude longitude of point(place), not of any line (road). So this point can be restaurant, stops, hotels or hospitals etc.

Now the very first task is to find out the nearest path from these points. For that we used <-> from postgis.

<-> — Returns the distance between two points.

Now we may have 2 or more path from selected point. So the shortest one should be selected from these path, For that we used order by command which arranges these path in ascending order and after that limit 1 command selects top most 1 row, which his nothing but the shortest path from source to path. Similar concept is applied on end point also.

Syntax of postgresql:

double precision <->( geometry A , geometry B );

The <-> operator returns the 2D distance between two geometries. Used in the “ORDER BY” clause provides index-assisted nearest-neighbor result sets. For PostgreSQL below 9.5 only gives centroid distance of bounding boxes and for PostgreSQL 9.5+, does true KNN (K nearest neighbor) distance search giving true distance between geometries, and distance sphere for geographies.

Syntax of postgresql:

geometry ST_SetSRID(geometry geom, integer srid); 
geometry ST_Point(float x_lon, float y_lat);

In ST_Point we give source and destination latitude longitude. Using ST_SetSRID Set the SRID on a geometry to a particular integer value. Here EPSG 4326 is used which is WGS84 datum. EPSG stands for European Petroleum Survey Group, They publish a database of coordinate system information. SELECT source FROM network this returns source id. Similarly got source id of end point. Then cost is set as length of route in kilometers. All these provided to pgr_dijsktra method and join network table to take geometry as output to show result in QGIS.

Output of PGrouting PostGIS Postgresql – No need for Google routing

Here is the output of route which is rendered with QGIS Desktop, where green color indicates the road network and red color display the shortest distance we get from A and B.

PGrouting PostGIS Postgresql - No need for Google routing
PGrouting PostGIS Postgresql – No need for Google routing

We got good results as distance from A to B is calculated as 368Km and on Google map it is 361 km. Similarly many points have tested and result vary from 6 to 8Km.

Did you tried PGRouting postgis postgresql? If you are facing any issue, do let us know by commenting below with the solution.