How to Convert SQLITE Data to MIF Format Online (Step-by-Step Guide)

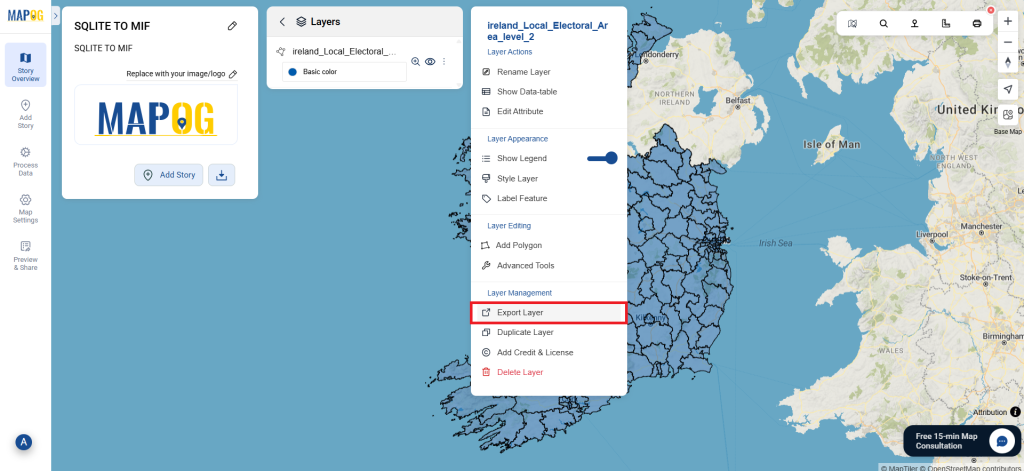
This guide will walk you through the steps to convert SQLITE data into MIF format using the Converter Tool in MAPOG. Whether you’re a first-time user or a seasoned pro, we’ll break down the entire conversion process into straightforward steps.

Overview of the Conversion Process:

The Converter Tool in MAPOG effortlessly converts data between different formats. You upload your data in one format, and the tool transforms it into another format that meets your needs. Additionally, GIS Data can be exported in multiple formats, offering flexibility for various applications.

Online GIS Data Conversion

Step 1: Let’s Upload Your Data:

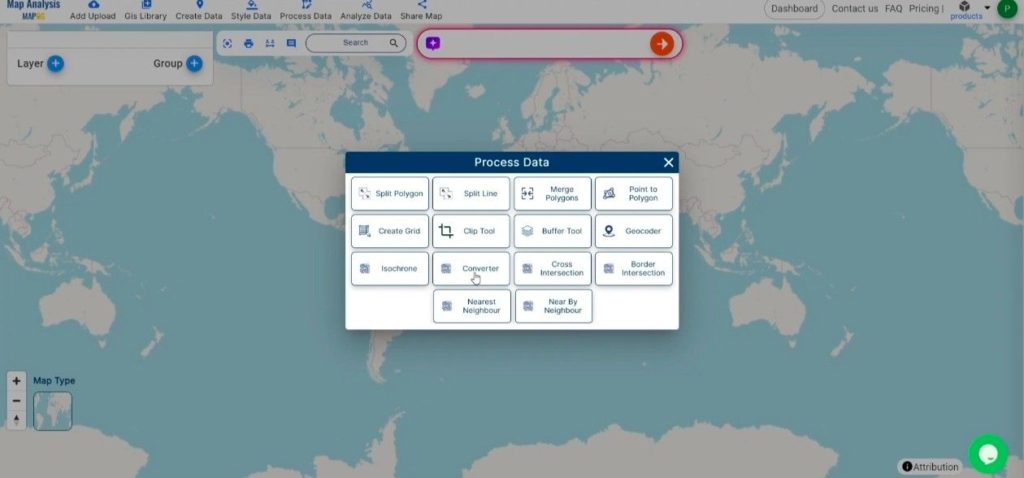
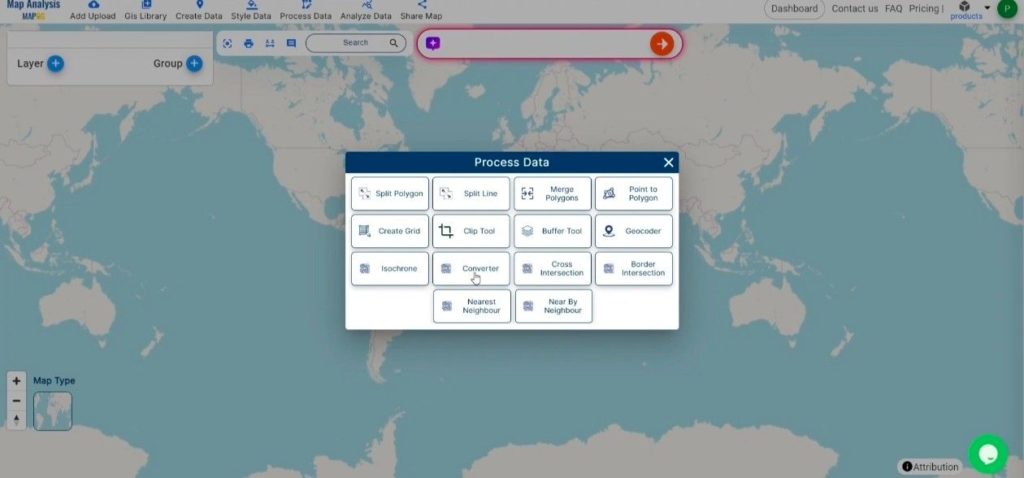
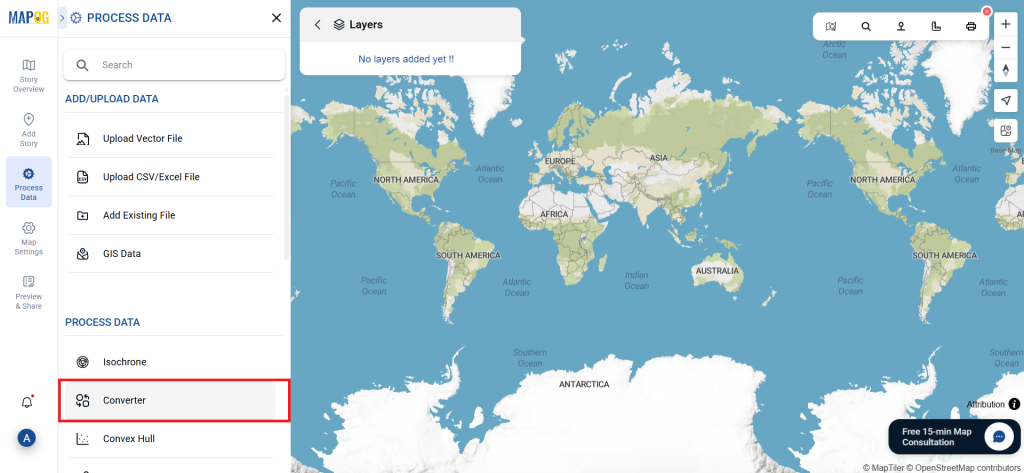
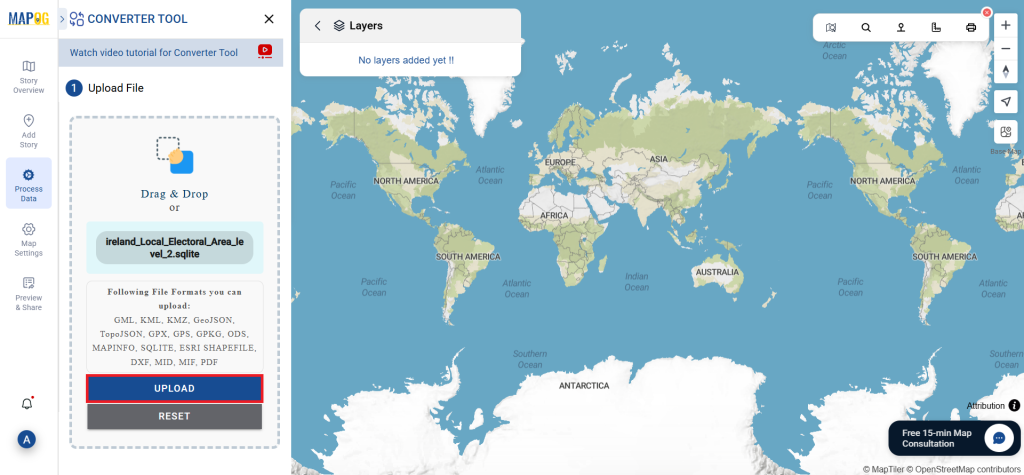
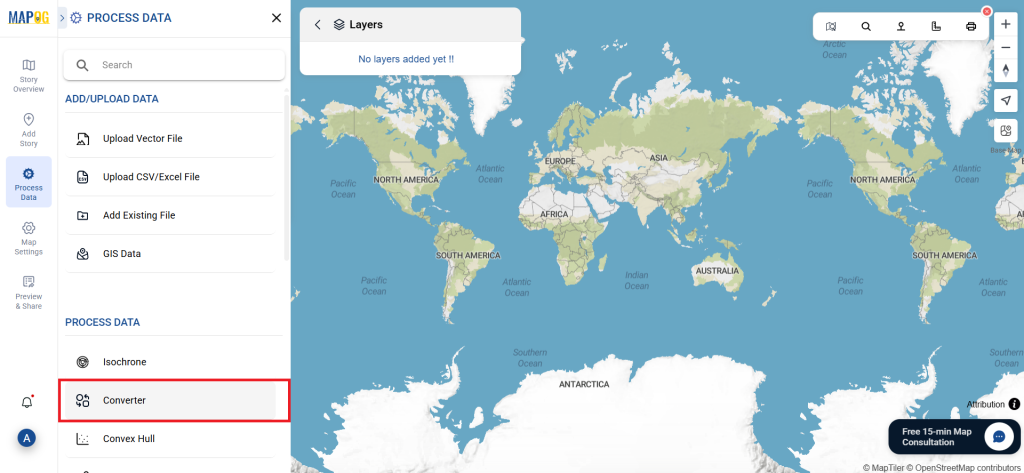
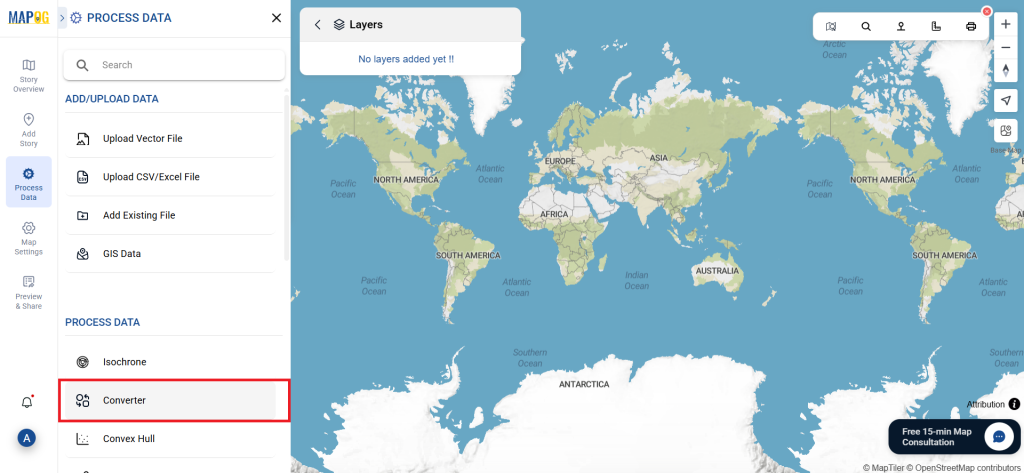
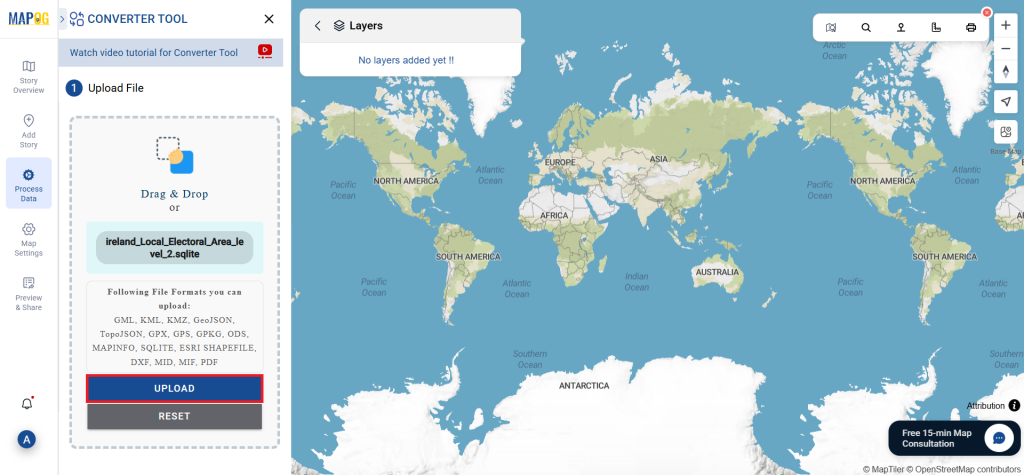
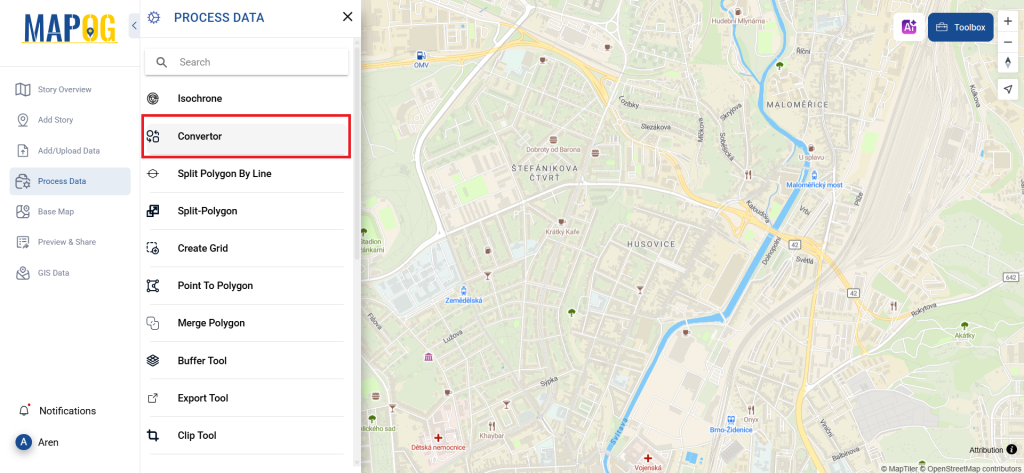
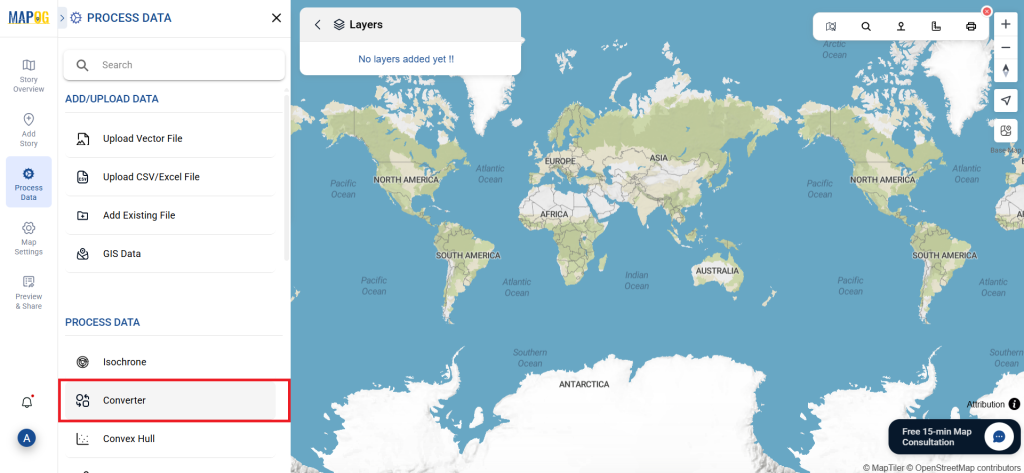
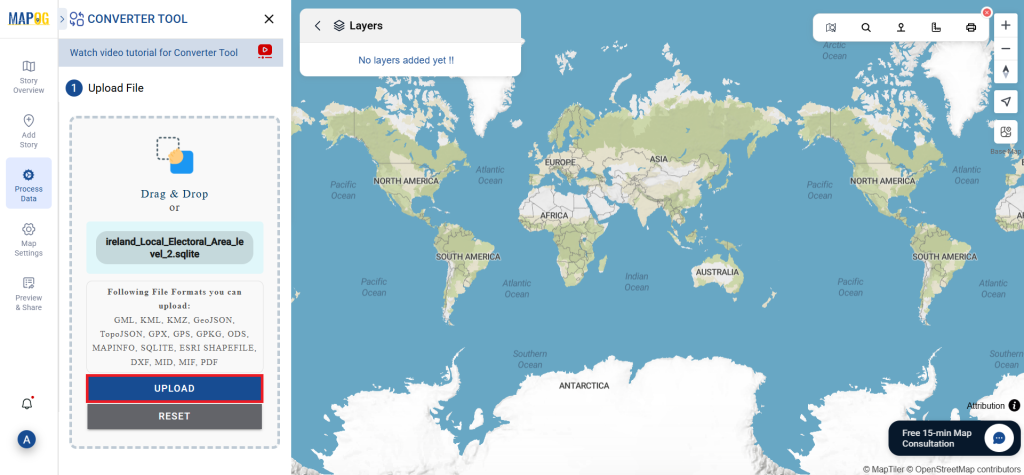
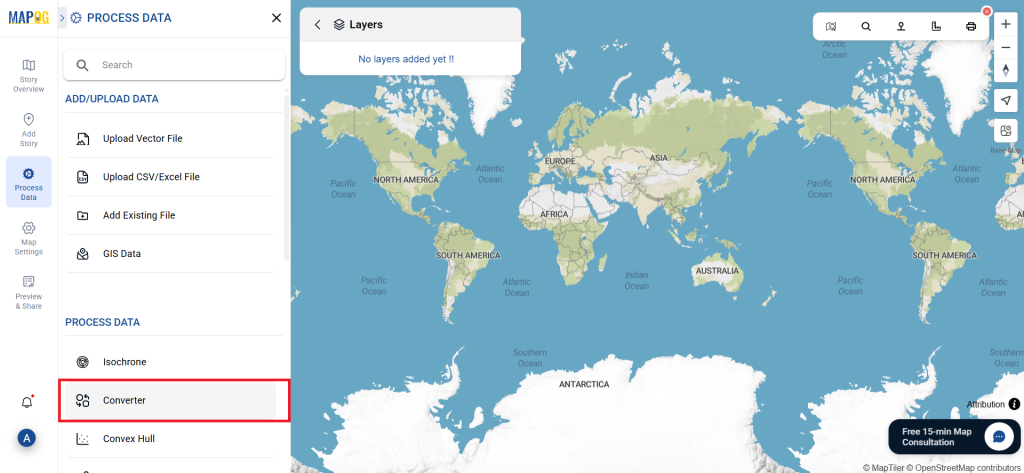
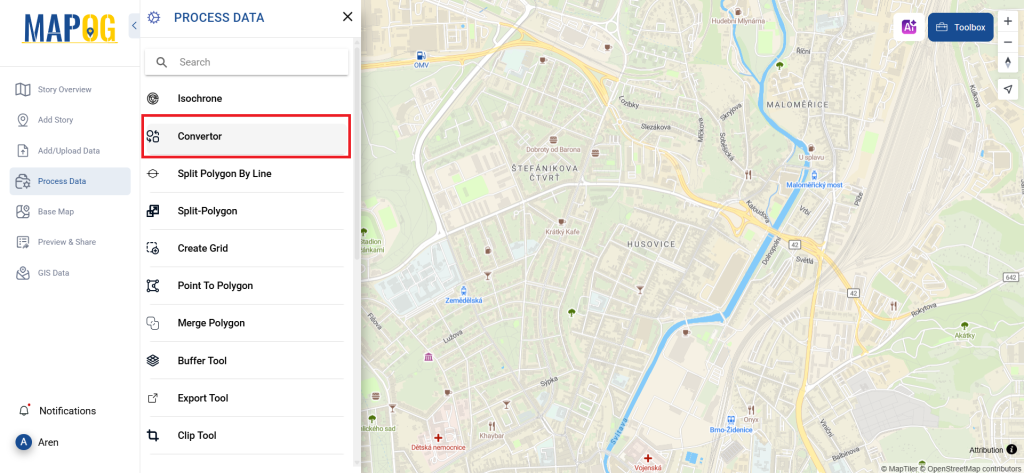
  1. Start by going to the “Process Data” section and choosing the “Converter Tool” option.
SQLITE to MIF

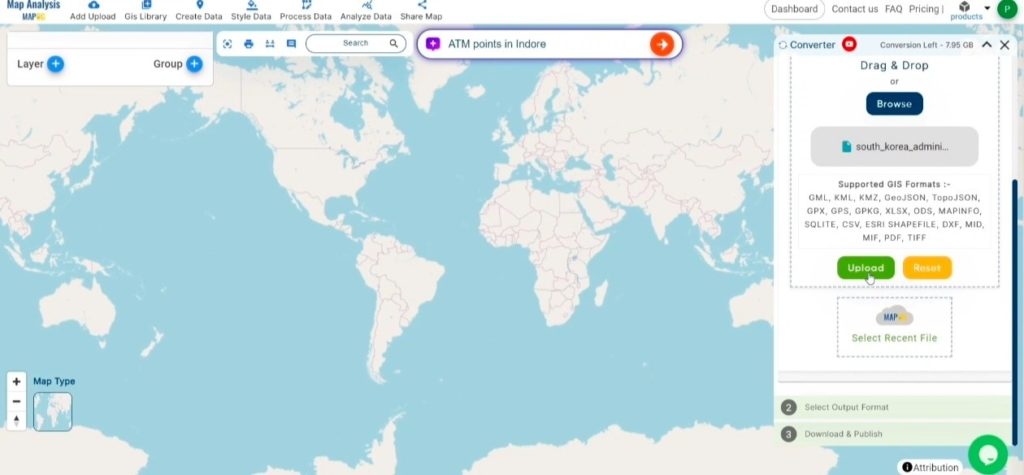
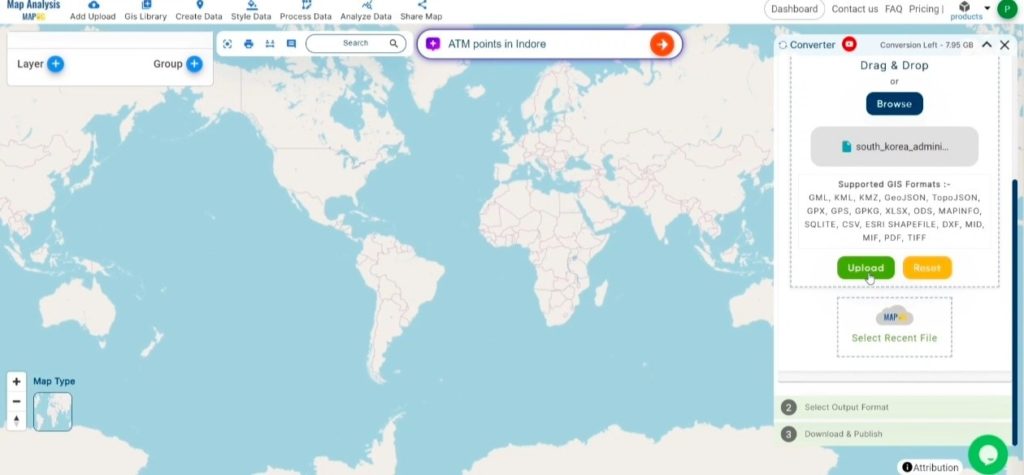
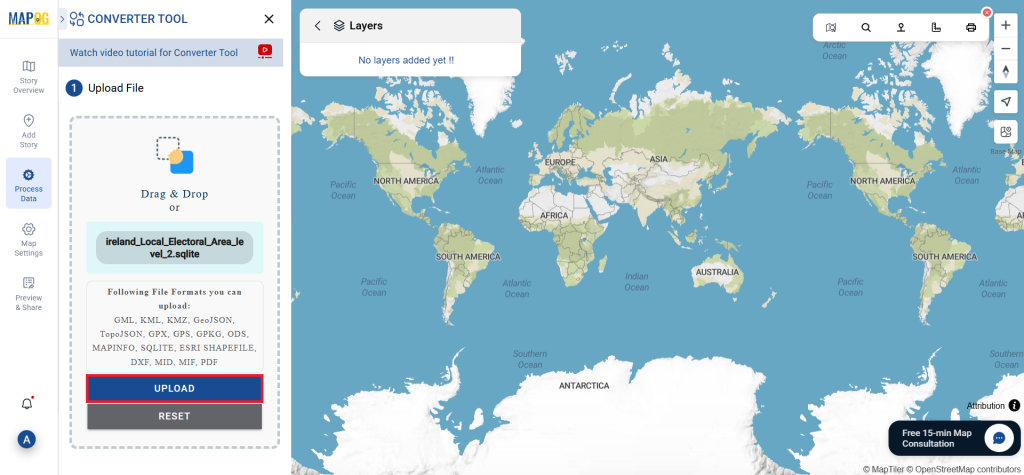
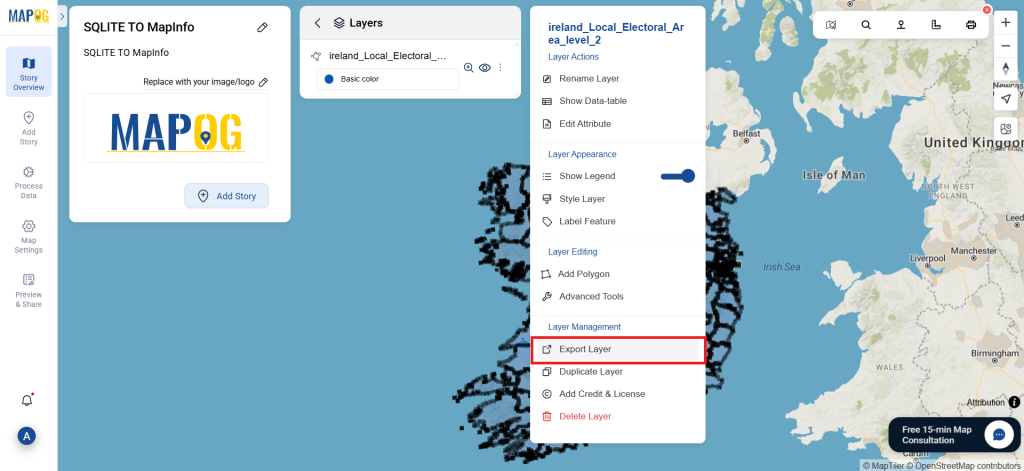
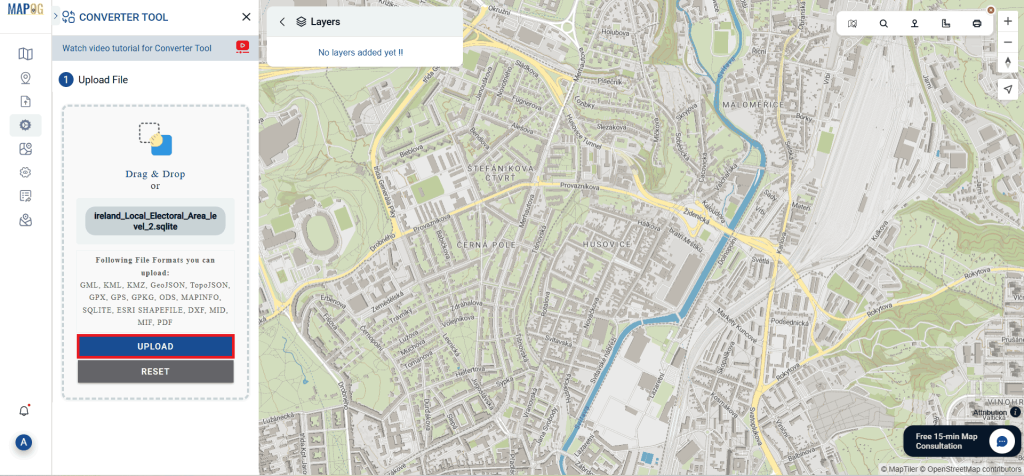
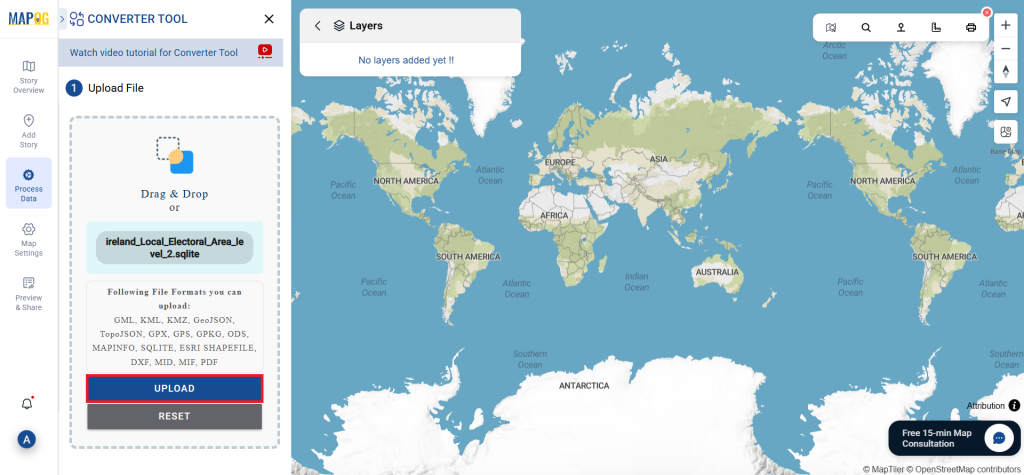
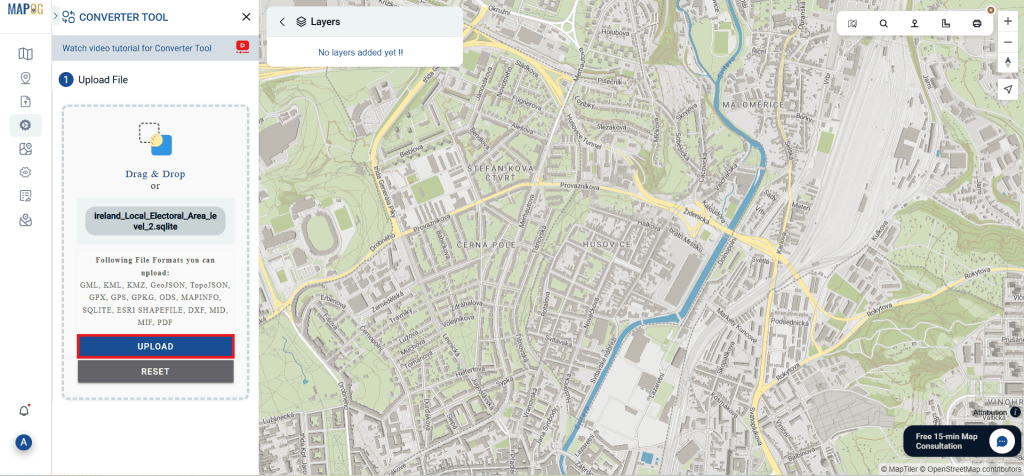
Next, upload your SQLITE file. This is the initial step where you input the data that you want to convert.

SQLITE to MIF

Step 2: Then Choose the Conversion Format:

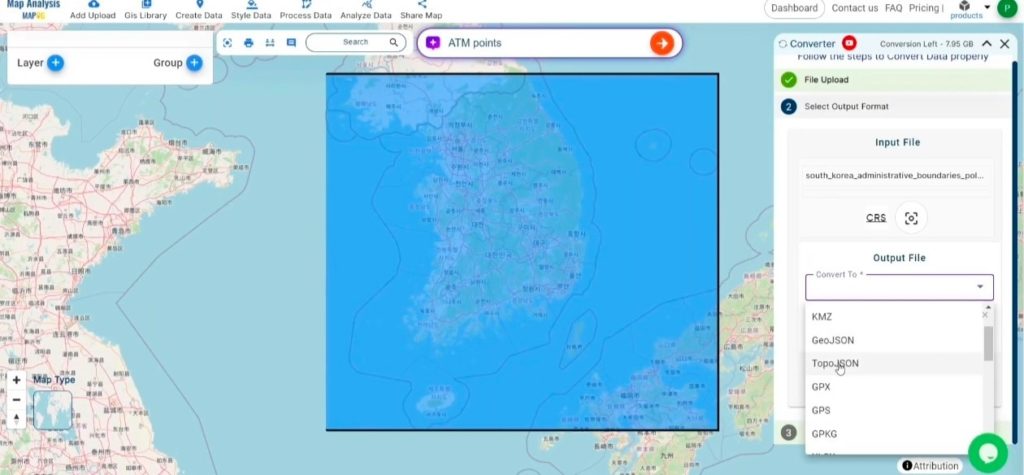
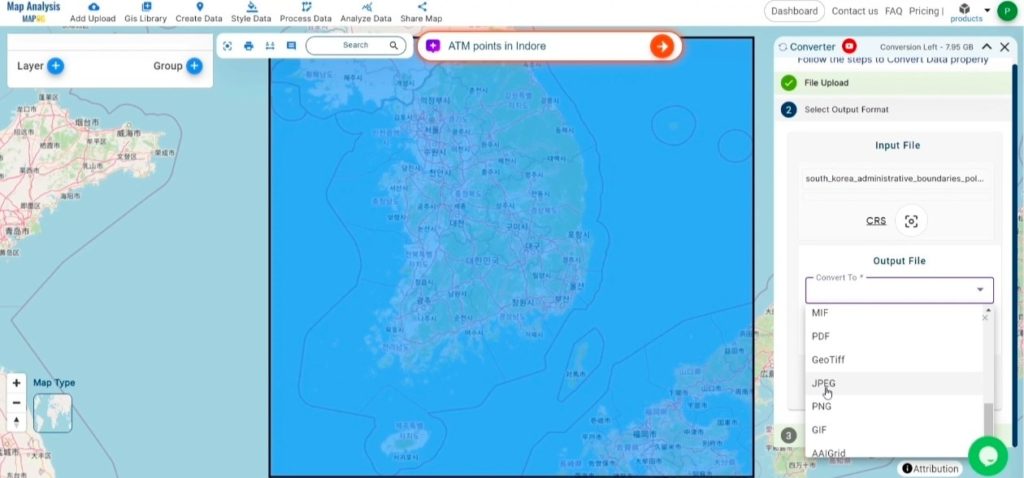
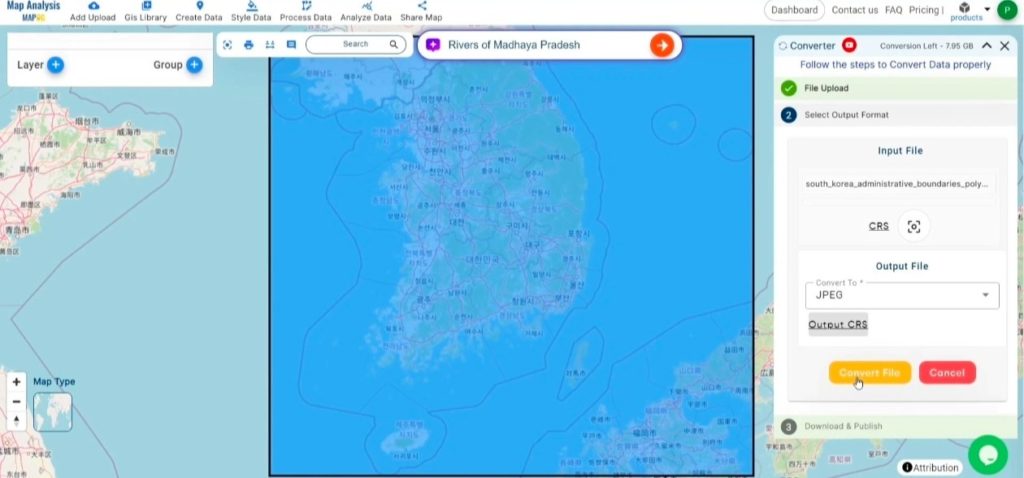
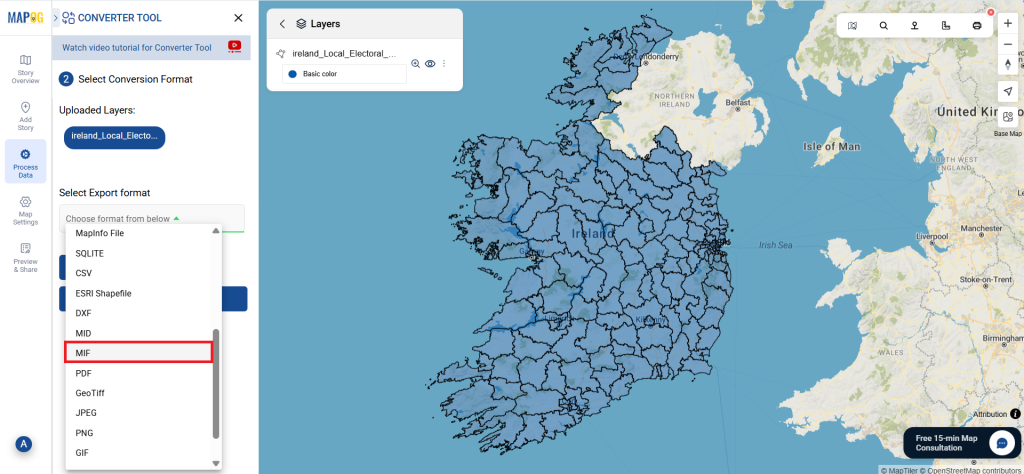
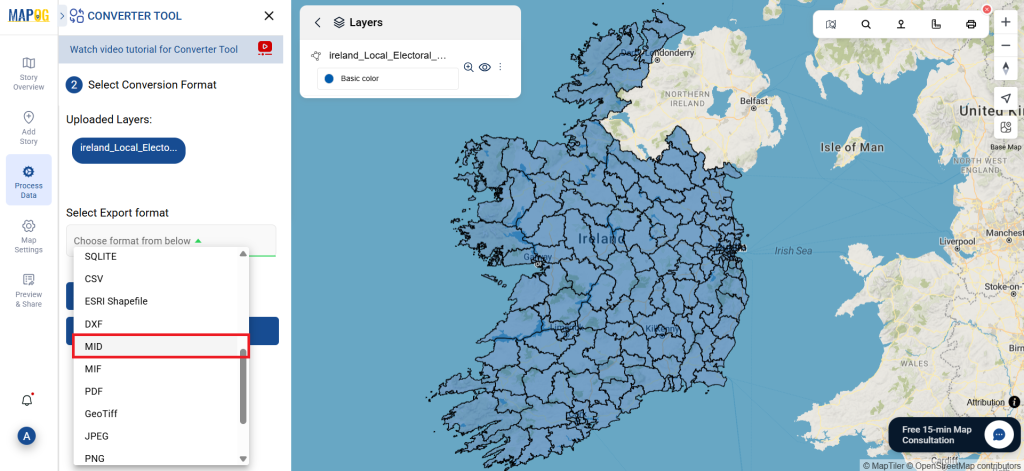
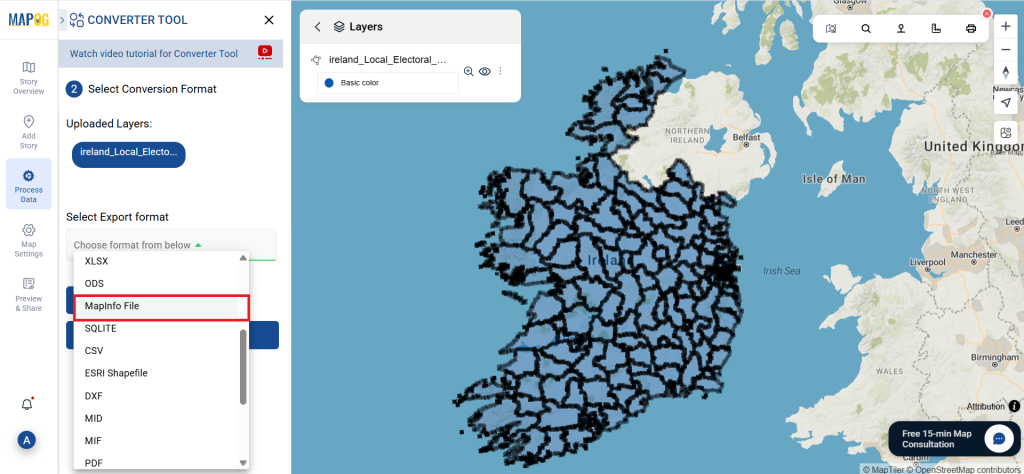
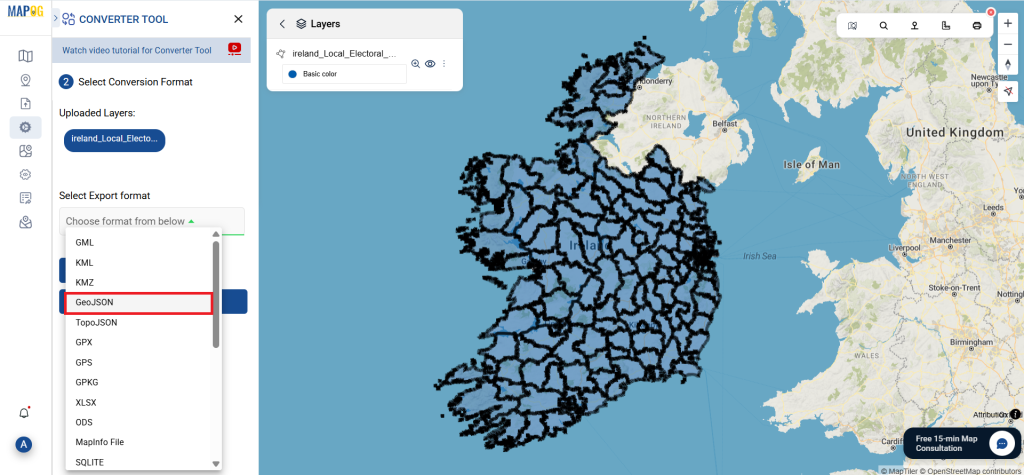
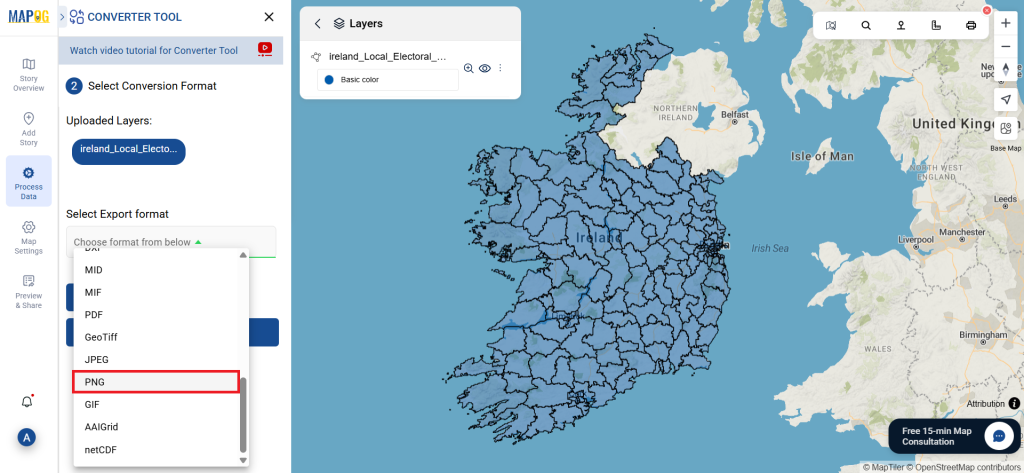
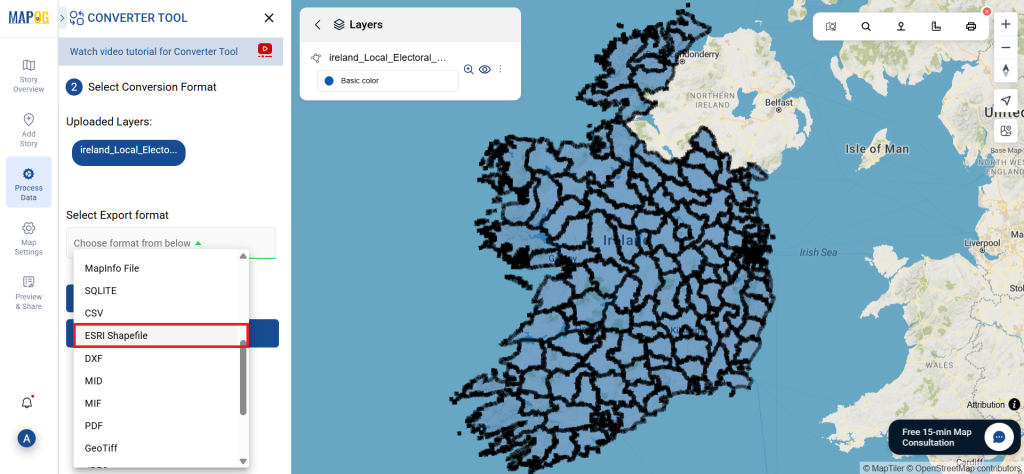
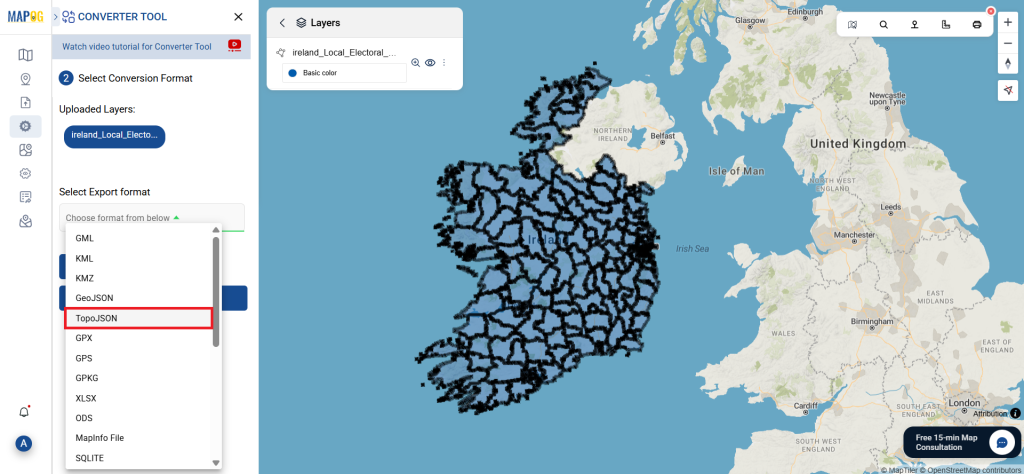
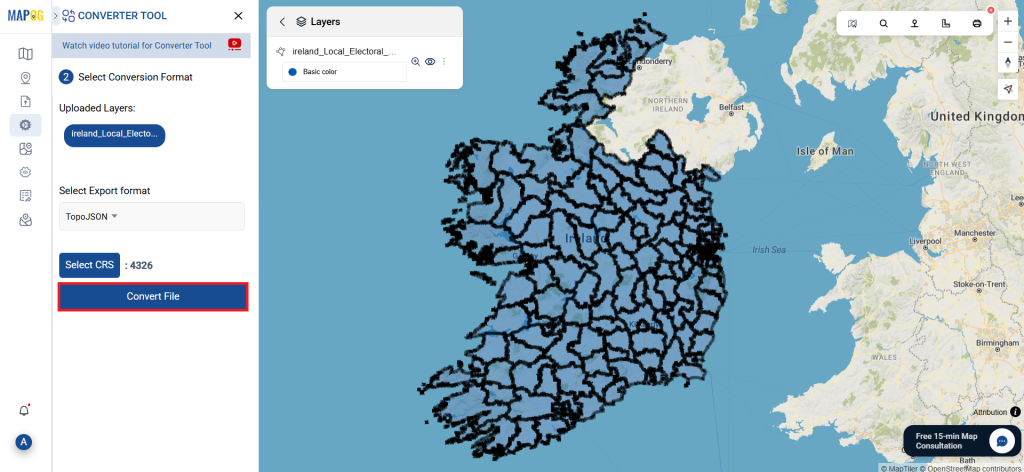
  1. Next, choose MIF as the output format if your aim is to export only the data. While the tool provides multiple conversion options, we will concentrate on converting the file to MIF format for this guide.
SQLITE to MIF

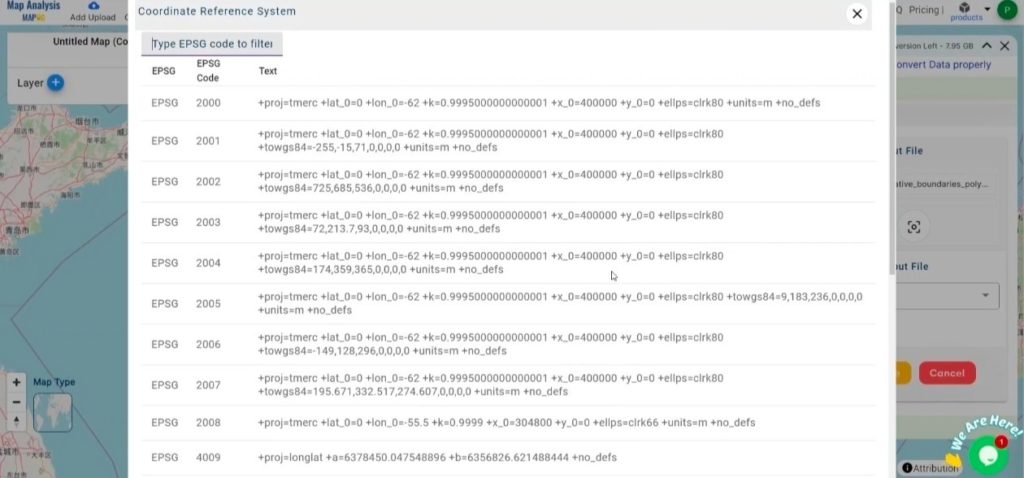
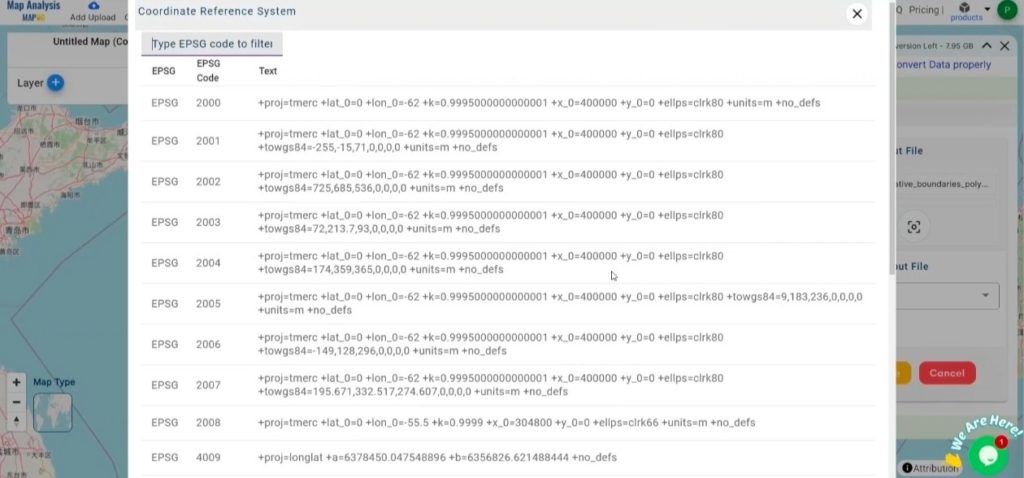
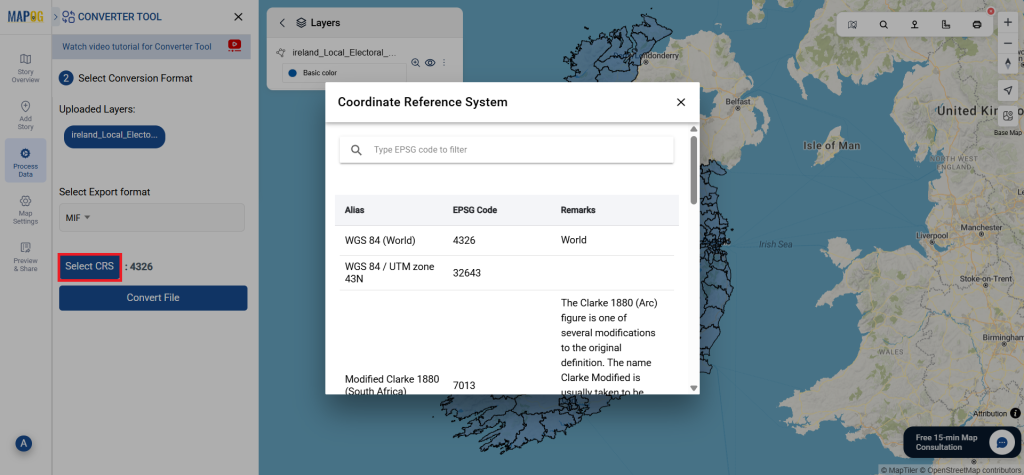
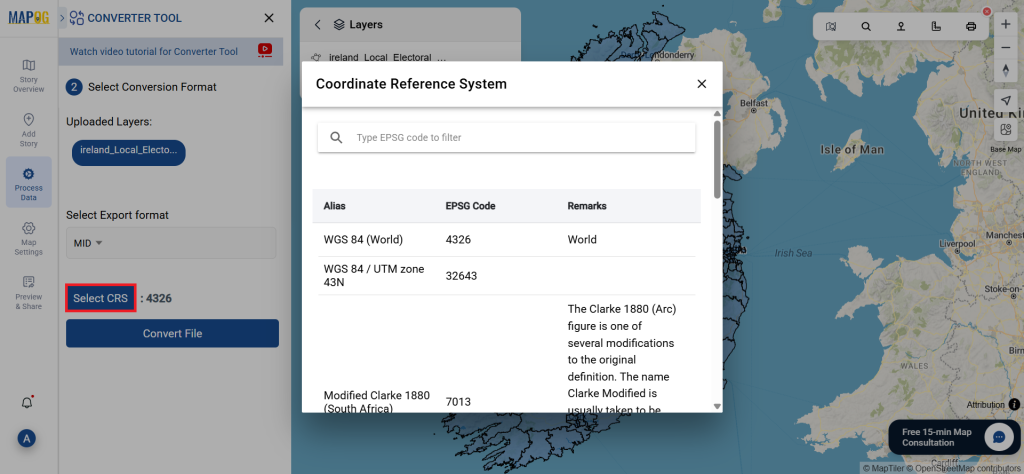
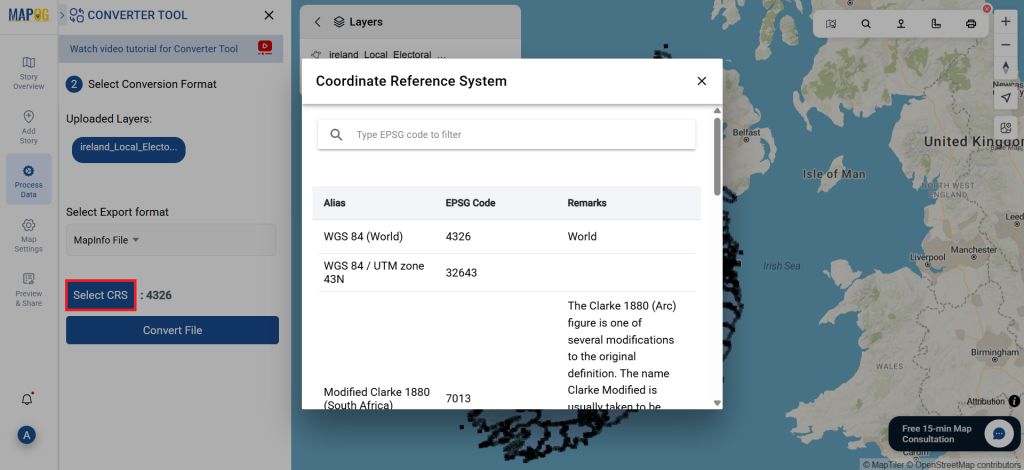
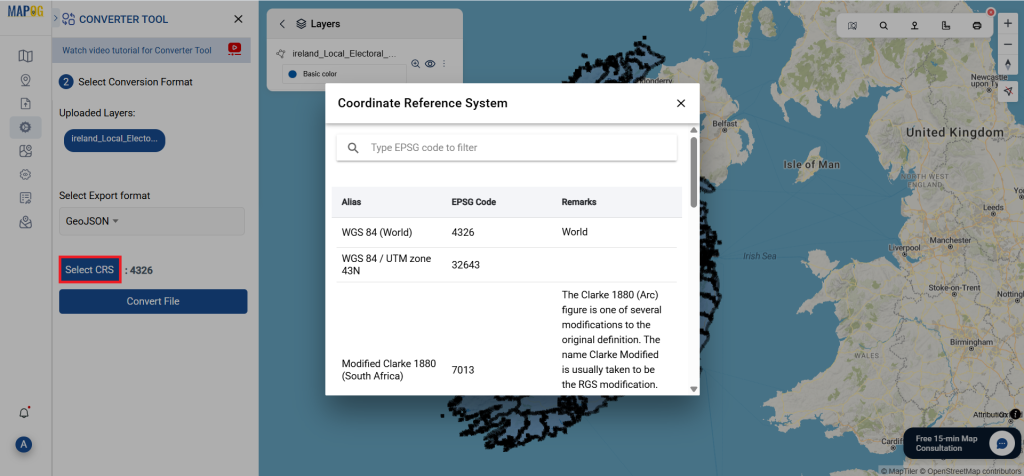
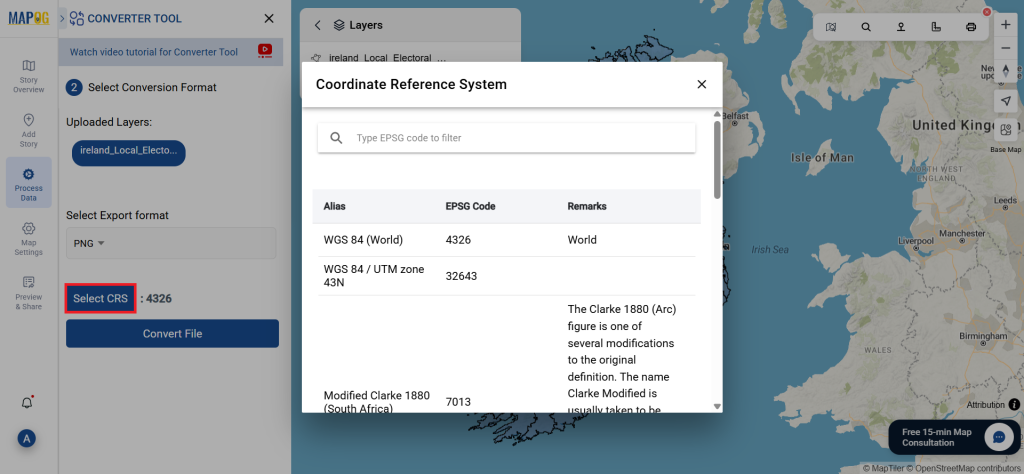
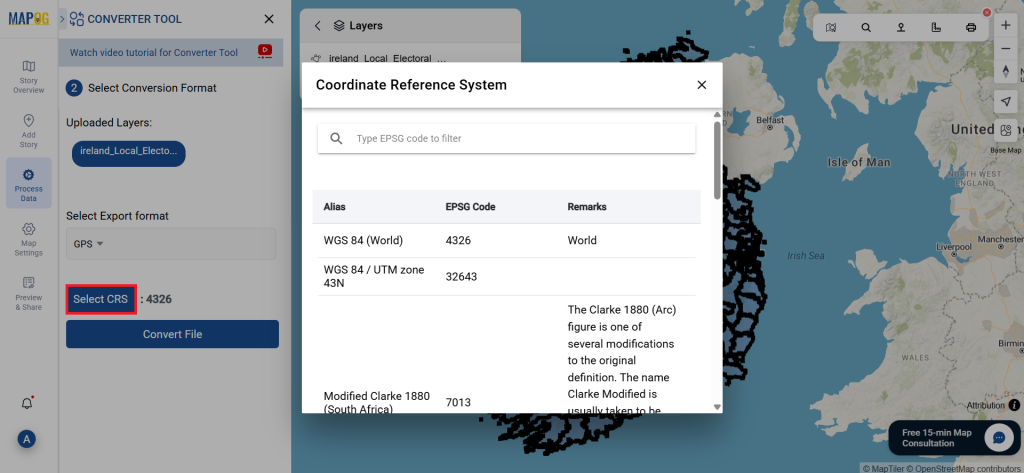
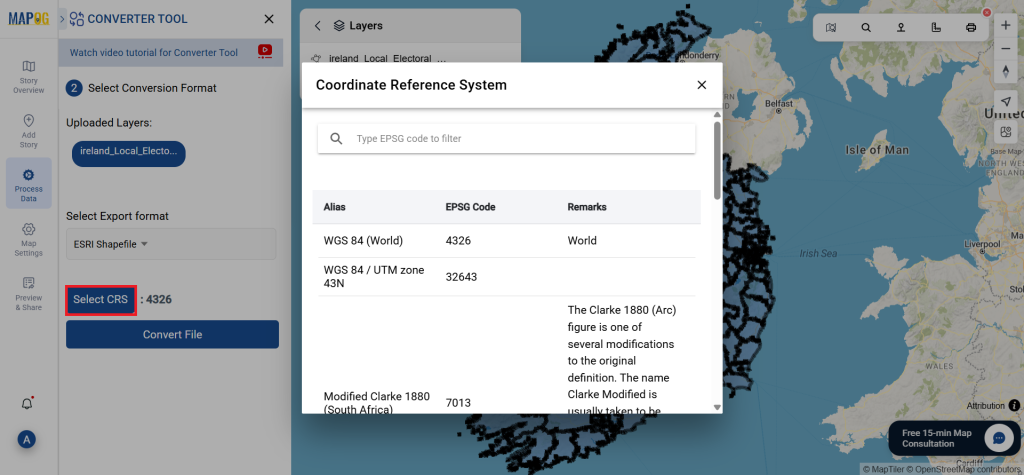
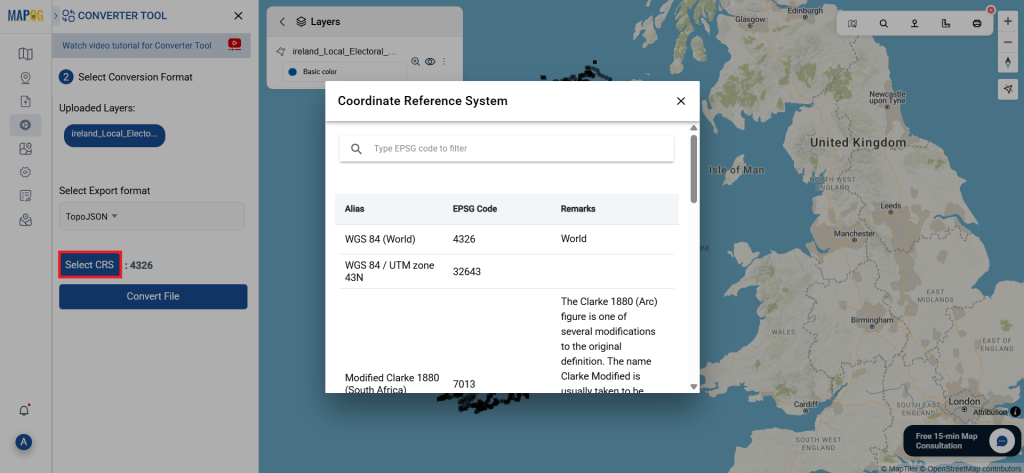
You can also adjust the Output CRS according to your spatial needs.

SQLITE to MIF

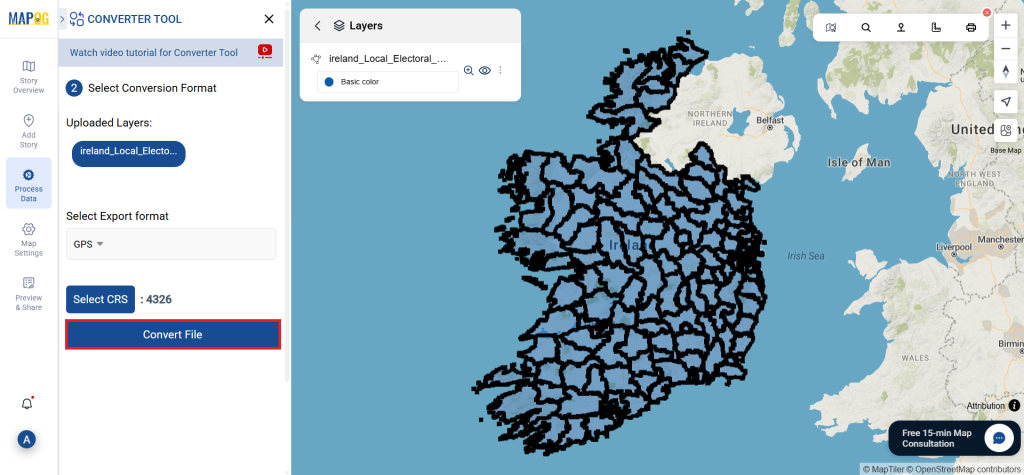
Step 3: Perform the Conversion:

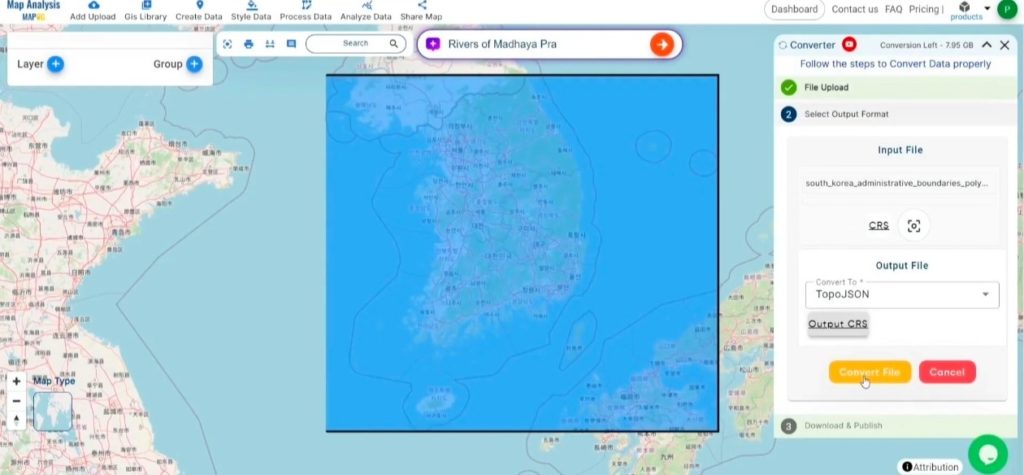
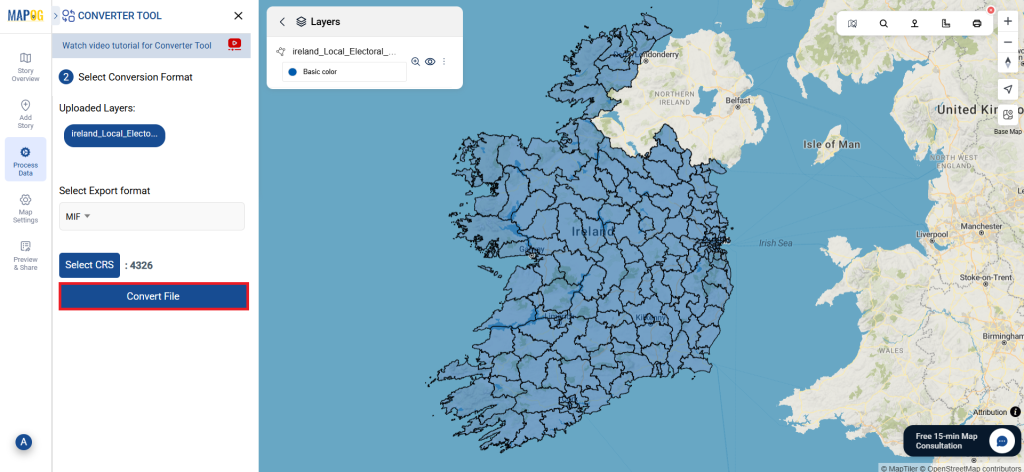
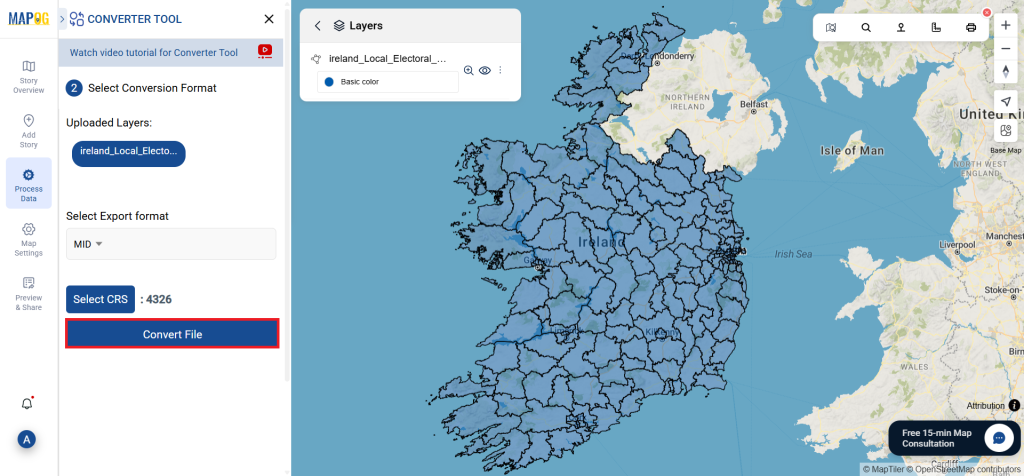
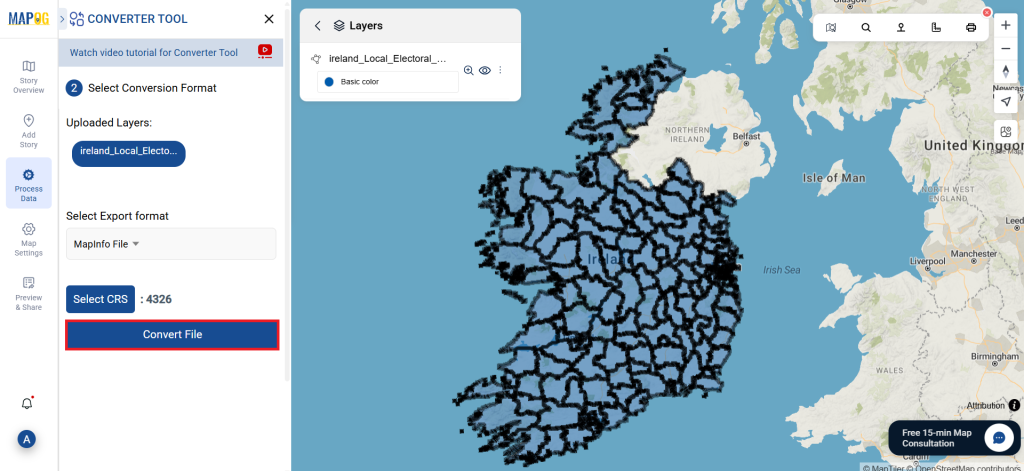
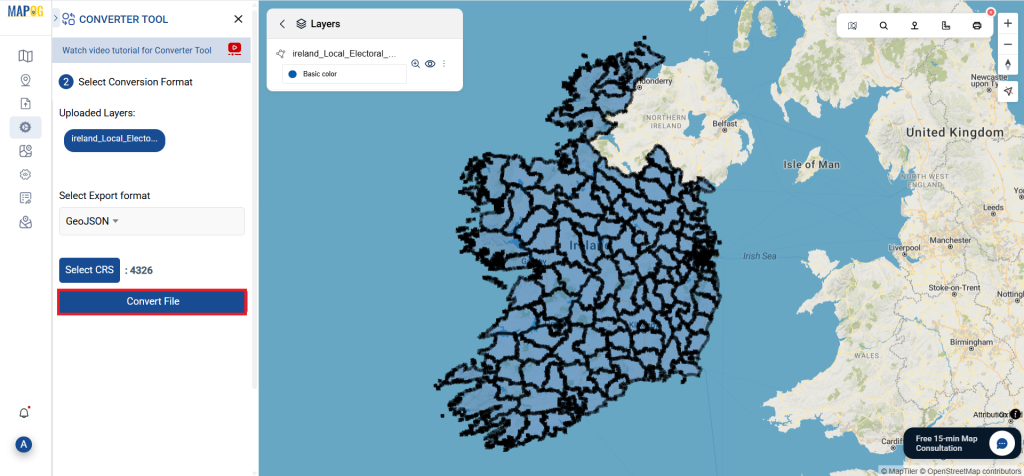
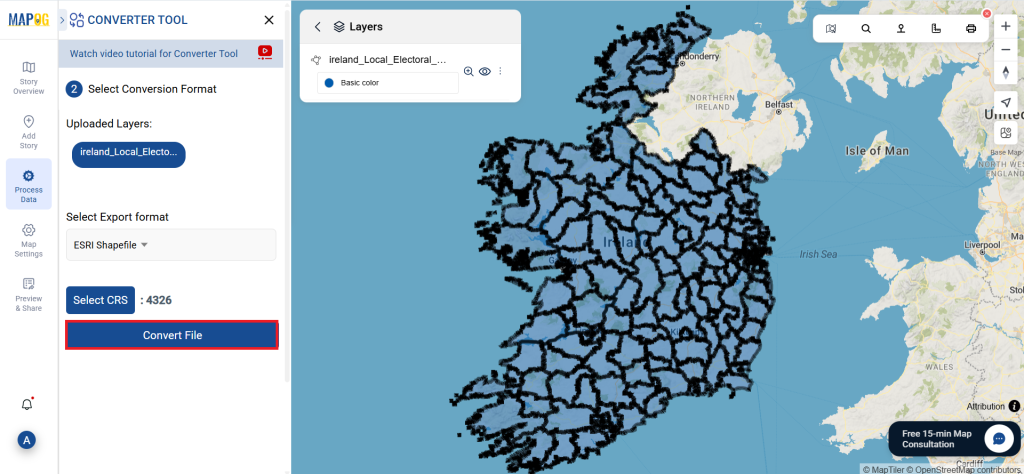
Head over to the ‘Convert Files’ section and watch the tool in action. Simply upload your data using the Converter Tool, and it will seamlessly transform your SQLITE file into MIF format, making the process quick and easy.

SQLITE to MIF

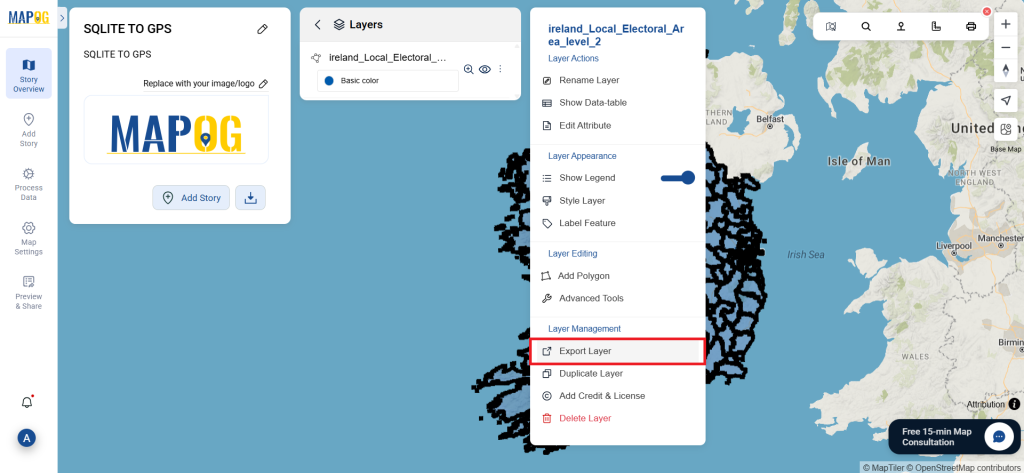
Step 4: Verify and Download:

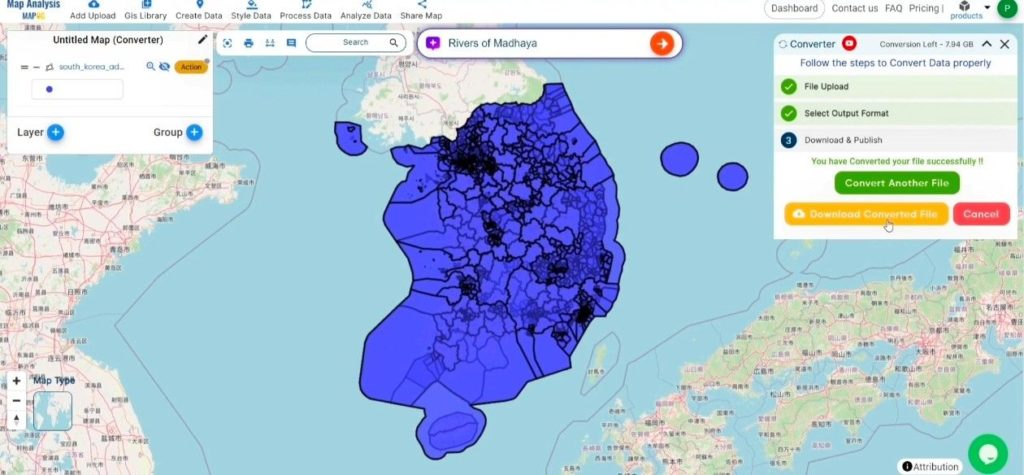
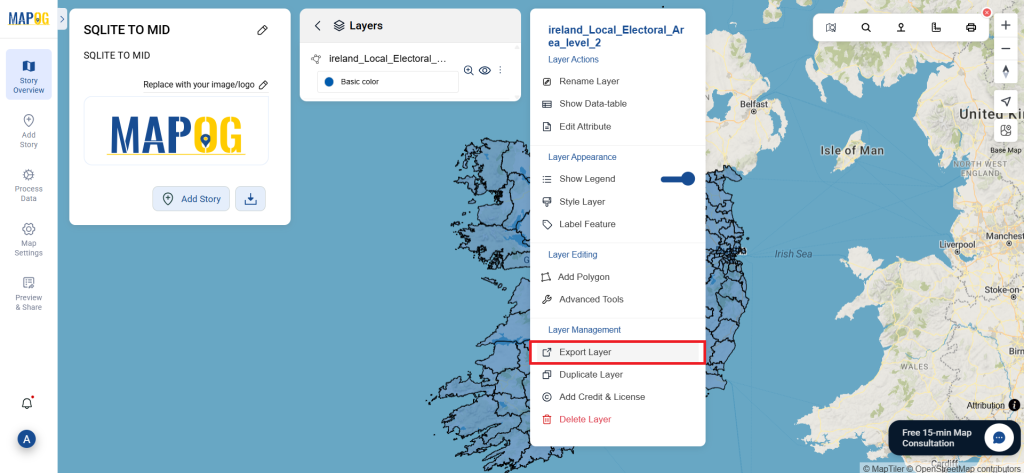
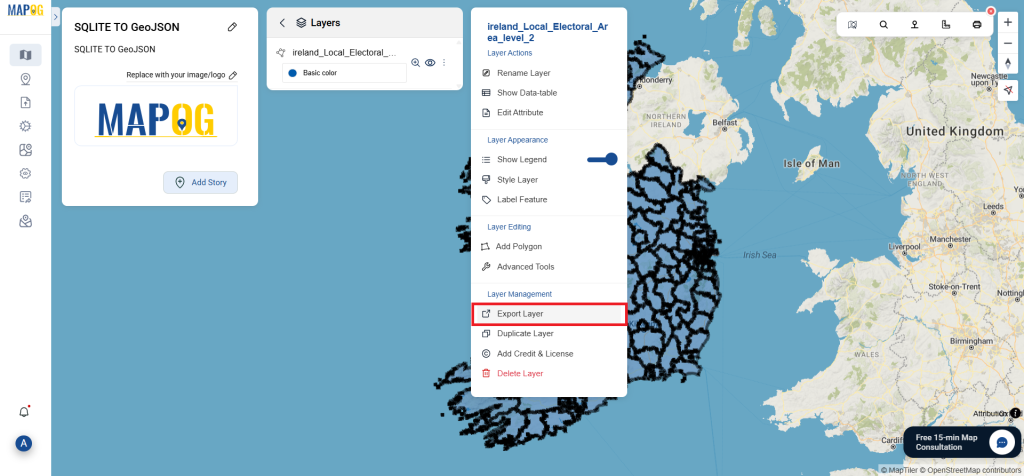
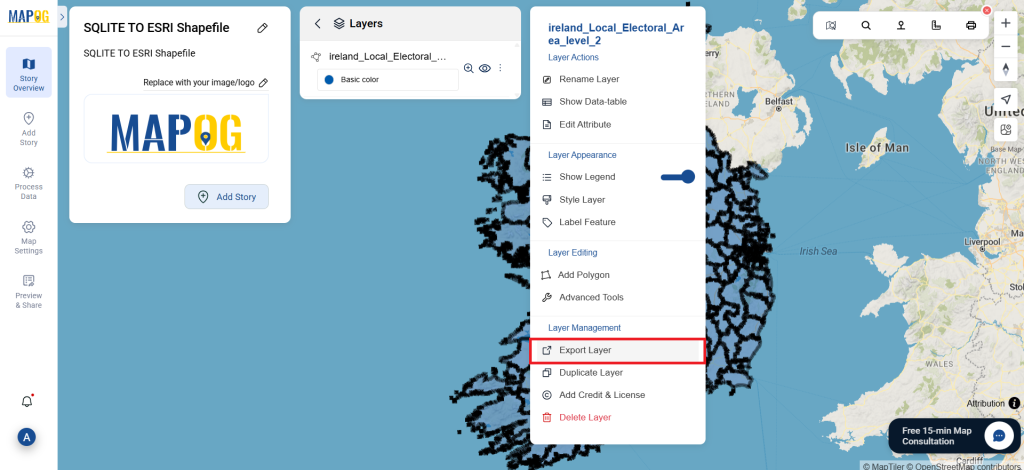
After the conversion is complete, take a moment to check your MIF data to ensure everything is accurate. Once you’re satisfied with the results, download the file. This step is crucial to confirm that the conversion was successful and all your data remains intact.

SQLITE to MIF

Additional Tools for Further Analysis:

With MAPOG’s versatile toolkit, you can effortlessly upload vectors and upload Excel or CSV data, incorporate existing layers, perform polygon splitting, use the converter for various formats, calculate isochrones, and utilize the Export Tool.

 Here are some other blogs you might be interested in:

How to Convert SQLITE to MID Format Online GIS Converter Tool (Step-by-Step Guide)

This guide will walk you through the steps to convert SQLITE data into MID format using the Converter Tool in MAPOG. Whether you’re a first-time user or a seasoned pro, so we’ll break down the entire conversion process into straightforward steps.

👉 Use Converter Tool

Understand and do the Conversion Process:

Firstly, The Converter Tool in MAPOG allows you to seamlessly convert data from one format to another, almost like magic. However, You simply upload your data in one format, and the tool transforms it into another format that best suits your needs. Plus, GIS Data can be downloaded in a variety of formats, making it versatile for a wide range of applications.

Online GIS Data Conversion

Step 1: Upload Your Data:

Navigate the “Process Data” section and select the “Converter Tool” option to get started.

SQLITE to MID

Upload your SQLITE file. This is your entry point where you feed in the information that needs conversion.

SQLITE to MID

Step 2: Choose the Conversion Format:

To proceed, set the output format to MID if your goal is to export just the data. The tool offers various conversion options, but for this guide, we’ll focus on converting the file to MID format.

SQLITE to MID

Additionally, you can configure the Output CRS to match your spatial requirements.

SQLITE to MID

Step 3: Execute the Conversion:

Navigate to the ‘Convert Files’ section and let the tool do its job. By using the Converter Tool, you upload your data, and the tool automatically converts it from SQLITE to MID format, streamlining the entire process.

SQLITE to MID

Step 4: Review and Download:

Take a moment to review your converted MID data to make sure everything looks correct. Once you’re happy with it, go ahead and download the file. This step is really important to ensure that the conversion worked properly and that all your data is intact.

SQLITE to MID

Additional Tools for Further Analysis:

With MAPOG’s versatile toolkit, you can effortlessly upload vectors and upload Excel or CSV data, incorporate existing layers, perform polygon splitting, use the converter for various formats, calculate isochrones, and utilize the Export Tool.

👉 Book a MAPOG Meeting

Here are some other blogs you might be interested in:

Convert SQLITE to ESRI Shapefile : Online GIS Data Converter

This guide will walk you through the straightforward process of convert SQLITE to ESRI Shapefile format using the Converter Tool in MAPOG. Whether you’re a first-time user or someone familiar with the tool, you’ll find that convert SQLITE to ESRI Shapefile with MAPOG is quick and easy. We’ll break down each step to ensure the entire process is clear and simple for you.

Key Concept of File Conversion:

The Converter Tool in MAPOG serves to change data from one format to another, almost like a seamless transformation. You start by inputting data in one format, and the tool delivers it in a different format that suits your analysis needs. Plus, GIS Data can be downloaded in various formats, offering flexibility for a range of applications.

Online GIS Data Conversion

Step 1: Upload the Data:

Navigate to Process Data and select the Converter Tool option.

SQLITE to ESRI Shapefile

Upload your SQLITE file. This is where you input the data that you want to convert.

SQLITE to ESRI Shapefile

Step 2: Choose the Conversion Format:

Select ESRI Shapefile as the output format if you need to export just the data. The tool offers multiple options for conversion, but in this guide, we’ll focus on converting the file to ESRI Shapefile.

SQLITE to ESRI Shapefile

Additionally, you can set the Output CRS according to your requirements.

SQLITE to ESRI Shapefile

Step 3: Execute the Conversion: 

Hit  to Convert Files and let the tool do its job. After you’ve input your data, the Converter Tool will transform it from SQLITE format to ESRI Shapefile format.

SQLITE to ESRI Shapefile

Step 4: Review and Download: 

Take a moment to check your converted ESRI Shapefile data to ensure everything is accurate. Once you’re satisfied, proceed to download the file. This step is crucial to confirm that the conversion was successful and that all your data is intact.

SQLITE to ESRI Shapefile

With MAPOG’s versatile toolkit, you can effortlessly upload vectors and upload Excel or CSV data, incorporate existing layers, perform polygon splitting, use the converter for various formats, calculate isochrones, and utilize the Export Tool.

Here are some other blogs you might be interested in:

Convert SQLITE to TopoJSON : Online GIS Converter

In this guide, it will provide step by step of how to convert SQLITE to TopoJSON format with the help of Converter Tool in MAPOG. So, both if you are a first-time user and a regular one, Convert SQLITE to TopoJSON with MAPOG, the entire process will be explained in simple steps for you.

Key Concept to Converting Files:

The Converter Tool in MAPOG functions to transform data from one format to another, it’s like a magical process. You input the  data in one format, and it will provide the outputs in a different format suitable for your analysis. Additionally, GIS Data can be downloaded in various formats, making it adaptable for multiple uses.

Online GIS Data Conversion

Step 1: Upload the Data:

  1.  Go to “Process Data” and click on “Converter Tool” option.
SQLITE to TopoJSON

2. Upload your SQLITE file. This is your entry point where you feed in the information that needs conversion.

SQLITE to TopoJSON

Step 2: Select the Format for Conversion:

  1. Select the output format as TopoJSON if you want to expatriate only the data. The tool provides several options in arriving at the result but for this guide, we are using the option to convert the file to TopoJSON.
SQLITE to TopoJSON

2. You can also set the Output CRS as per your need.

SQLITE to TopoJSON

Step 3: Run the Conversion:

Go to ‘Convert Files’ and watch the tool at work. Working with the Converter Tool you input your data and then the tool converts it from the SQLITE format to the TopoJSON format.

SQLITE to TopoJSON

Step 4: Review and Download:

Take a moment to review your converted TopoJSON data to make sure everything looks correct. Once you’re happy with it, go ahead and download the file. This step is really important to ensure that the conversion worked properly and that all your data is intact.

SQLITE to TopoJSON

With MAPOG’s versatile toolkit, you can effortlessly upload vectors and upload Excel or CSV data, incorporate existing layers, perform polygon splitting, use the converter for various formats, calculate isochrones, and utilize the Export Tool.

Here are some other blogs you might be interested in:

Convert SQLITE to KMZ : A Complete Guide of Online GIS Data Converter

In this guide, it will provide step by step of how to convert SQLITE to KMZ format with the help of Converter Tool in MAPOG. So, both if you are a first-time user and a regular one, Converting SQLITE to KMZ  with MAPOG, the entire process will be explained in simple steps for you.

Key Concept to Converting Files:

The Converter Tool in MAPOG functions to transform data from one format to another, it’s like a magical process. You input the  data in one format, and it will provide the outputs in a different format suitable for your analysis like for this case convert SQLITE to KMZ as an example. Additionally, GIS Data can be downloaded in various formats, making it adaptable for multiple uses.

Online GIS Data Conversion

Step 1: Upload the Data:

  1.  Go to “Process Data” and click on “Converter Tool” option.
SQLITE to KMZ

2. Upload your SQLITE file. This is your entry point where you feed in the information that needs conversion.

SQLITE to KMZ

Step 2: Select the Format for Conversion:

  1. Select the output format as KMZ if you want to expatriate only the data. The tool provides several options in arriving at the result but for this guide, we are using the option to convert the file to KMZ.
SQLITE to KMZ

2. You can also set the Output CRS as per your need.

SQLITE to KMZ

Step 3: Run the Conversion:

Go to ‘Convert Files’ and watch the tool at work. Working with the Converter Tool you input your data and then the tool converts it from the SQLITE format to the KMZ format.

SQLITE to KMZ

Step 4: Review and Download:

Take a moment to review your converted KMZ data to make sure everything looks correct. Once you’re happy with it, go ahead and download the file. This step is really important to ensure that the conversion worked properly and that all your data is intact.

SQLITE to KMZ

With MAPOG’s versatile toolkit, you can effortlessly upload vectors and upload Excel or CSV data, incorporate existing layers, perform polygon splitting, use the converter for various formats, calculate isochrones, and utilize the Export Tool.

Here are some other blogs you might be interested in:

Converting GPS to GML | Online GIS Data Converter

This tutorial will walk you through the process of using MAPOG‘s Converter Tool to rapidly and simply convert GPS files to GML format. Thus, the entire process of Converting GPS to GML with MAPOG will be broken down into easy steps for you, regardless of whether you are a first-time user or not.

Key Concept to Converting files

One tool in the MAPOG Map Analysis is the Converter Tool, which is used to change the type of information you have. It accepts data supplied in one format and outputs it in another that you can use for analysis. Additionally, GIS data may be downloaded in any format, meaning it can be used for a variety of purposes.

Online Conversion from GPS to GML

Step 1: Upload the Data

1. Choose the data by using the “Process Data” option, then select the “Converter Tool.”

GPS to GML

2. Upload your GPS file. This is the entry point where you enter the data to be converted.

GPS to GML
Step 2: Decide on the Conversion Format

1. If you wish to export just the data, choose GML or Generalized Markup Language as the output format. The application offers other ways to get the desired outcome, but in this tutorial, we’ll be using the option to convert the file to GML.

GPS to GML

2. At this point, you can also adjust the Output CRS.

GPS to GML
Step 3: Execute the Conversion

Navigate to “Convert Files” to observe the tool in action. When you use the Converter Tool, you enter your data and it transforms it from GPS to GML format.

GPS to GML
Step 4: Review and Download

Take a moment to review your converted GML data to make sure everything looks correct. Once you’re happy with it, go ahead and download the file. This step is really important to ensure that the conversion worked properly and that all your data is intact.

GPS to GML
Step 5: Add Basic Style

We can add a basic style to this map, click the action button of the newly converted layer, select the Basic style from the “Style Editor” section, select the file, choose the icon, and save the style.

GPS to GML

And that’s it! You now know how to use MAPOG’s Converter Tool to convert GPS files to GMLs. It’s now simpler than ever to modify your data and get it ready for whatever analysis you require. This useful tool makes handling different data types easier, which improves the efficiency and productivity of your work.

With MAPOG’s versatile toolkit, you can effortlessly upload vector and upload Excel or CSV data, incorporate existing layers, perform polyline splitting, use the converter for various formats, calculate isochrones, and utilize the Export Tool.

Here are some other blogs you might be interested in:

Convert GPS to SQLITE Online

Here’s how you can effortlessly convert GPS files to SQLITE format using the Converter Tool in MAPOG. Whether you’re new to the process or a seasoned user, this guide will walk you through each step clearly and concisely.

Understanding the File Conversion Process

The Converter Tool in MAPOG is designed to transform data from one format to another with ease. Just like a magic trick, you input your GPS data, and it outputs it in the SQLITE format, ready for your analysis. The flexibility of GIS Data allows you to download it in various formats, making it adaptable for different uses.

Step-by-Step Guide to Converting GPS to SQLITE

1.  Uploading Your Data:      

Begin by selecting your data through the “Process Data” option, then navigate to the “Converter Tool.

Convert GPS to SQLITE

Upload your GPS file, which serves as the starting point for the conversion process.

Convert GPS to SQLITE
2.  Choosing the Conversion Format:   

Once your data is uploaded, select SQLITE as the output format. The Converter Tool offers multiple format options, but for this guide, we’ll focus on converting the file to SQLITE.

Convert GPS to SQLITE

You can also set the CRS at this stage.

Convert GPS to SQLITE
3.  Running the Conversion:   

Now, head over to ‘Convert Files’ and initiate the conversion. The tool will automatically process your GPS data and convert it to SQLITE format.

Convert GPS to SQLITE
4.  Reviewing and Downloading:   

After the conversion is complete, take a moment to review your new SQLITE file. Make sure everything is accurate before downloading the final product. This review step is crucial to ensure the integrity of your data.

GPS to SQLITE
Step 5: Share Map

You can even share the map with your friends & colleagues using “Share and Publish” option that provide four methods of sharing like Embedded map, public sharing, assigns & share.

Convert GPS to SQLITE

By following these steps, you’ve successfully used the Converter Tool in MAPOG to convert your GPS files to SQLITE format. This process not only simplifies data transformation but also enhances your productivity by making your data ready for analysis in just a few clicks.

With MAPOG’s versatile toolkit, you can effortlessly upload vector and upload Excel or CSV data, incorporate existing layers, perform polyline splitting, use the converter for various formats, calculate isochrones, and utilize the Export Tool.

Here are some other blogs you might be interested in:

Converting GPS to MID Online

This guide will walk you through converting GPS file into MID format using the Converter Tool in MAPOG. Whether you’re new to this tool or a seasoned user, this guide will simplify the entire process, ensuring that converting GPS to MID becomes second nature.

Key Concepts in File Conversion

The Converter Tool within MAPOG is designed to effortlessly transform your data from one format to another. In fact, it works like a charm, allowing you to seamlessly input data in one form and receive it in another. Furthermore, this tool is suitable for a variety of analyses. Additionally, GIS Data can be downloaded in any format, thereby providing flexibility for various applications.

Step-by-Step GPS to MID Conversion

Step 1: Upload Your Data

Begin by navigating to “Process Data” and selecting the “Converter Tool.”

GPS to MID

Upload your GPS file. This is the first step where you input the data that you wish to convert.

GPS to MID
Step 2: Choose the Conversion Format

Next, select MID as your output format. Although the tool offers several conversion options, this guide focuses on converting files to MID.

GPS to MID

Additionally, you can adjust the CRS (Coordinate Reference System) to ensure that your data is perfectly aligned with your spatial analysis needs.

GPS to MID
Step 3: Execute the Conversion

Proceed to the ‘Convert Files’ section, and let the tool work its magic. The Converter Tool will transform your data from the GPS format to MID.

GPS to MID
Step 4: Review and Download

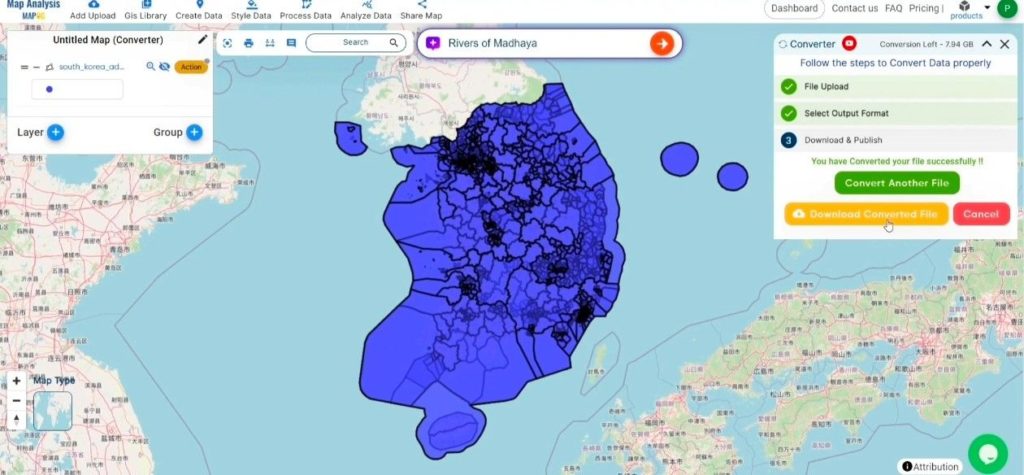
Once the conversion is complete, review your MID data to ensure everything is correct. If you’re satisfied with the results, download the file. This review step is crucial to confirm that the conversion was successful and that your data remains intact.
GPS to MID
Step 4: Measure Distance

You can easily measure the distance between two gas stations by using the measurement tools available. To begin, in the upper right corner, you’ll find the toolbox. It offers two options for measuring distances and areas. Simply select the first option, and then drag a line between the two points you wish to measure. As a result, the distance in kilometers will be displayed in the map interface.

And there you have it! You’ve successfully converted your GPS files into MID format using the MAPOG Converter Tool. This feature simplifies the process of working with different data formats, making your tasks more efficient and your work more productive.

MAPOG has a lot of feature tool. These feature tools allow us to perform a variety of tasks. For example, you can clip or crop your data with the clip tool, style your numeric data with the quantity style tool, create grid on your map with the create grid tool, and more.

Here are some other blogs you might be interested in:

Convert Online GPS to SHP

In this guide, you’ll learn how to easily convert GPS files into SHP format using the Converter Tool within MAPOG feature. Whether you’re new to the tool or a regular user, we’ll walk you through the process step by step, ensuring you understand how to make this conversion seamlessly.

Understanding the Conversion Process

The Converter Tool in MAPOG is designed to help you transform data from one format to another effortlessly. Think of it as a magic wand for your data—you input your GPS information, and out comes a SHP file ready for your analysis. With GIS Data, you can download and shift formats as needed, making it highly adaptable for various uses.

Online GPS to SHP GIS Conversion

Step 1: Upload Your Data
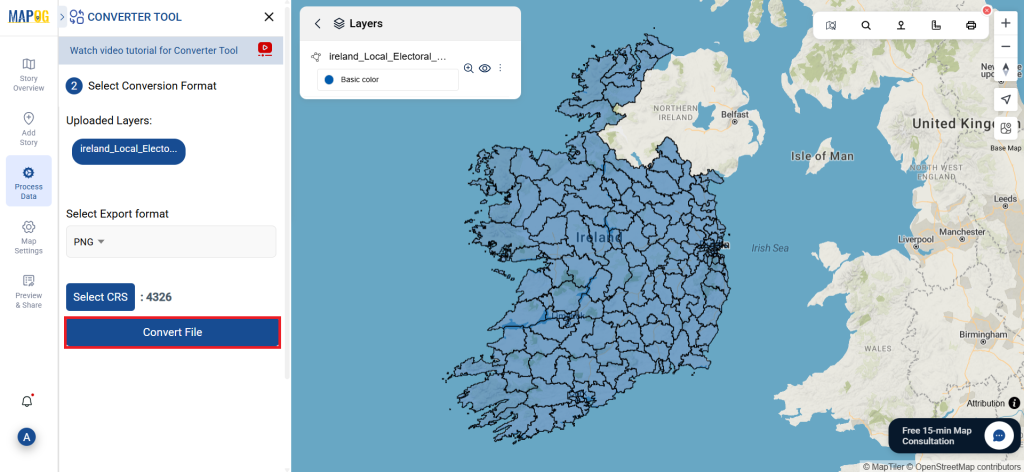
First, you’ll need to upload your GPS file. To begin, select the “Process Data” option from left panel and proceed to the “Converter Tool.”

This is where you will input the GPS file that requires conversion.

Step 2: Choose the Output Format

Next, you’ll select SHP as your desired output format. While the tool offers multiple output options, we’ll focus on converting the file to SHP for this guide.

At this stage, you can also adjust the CRS to ensure your data aligns perfectly with your spatial analysis needs.

Step 3: Execute the Conversion

Once you’ve selected your format, click on “Convert Files” to initiate the process. The Converter Tool will then work to transform your GPS data into SHP format.

Step 4: Review and Download

After the conversion is complete, take a moment to review the SHP data. It’s crucial to ensure that the conversion was successful and that all your data is accurate. Once you’re satisfied, you can download the file.

GPS to SHP
Step 5: Clip Layer

You can even clip out some of the gas stations using the clip tool option. To clip some gas stations go to the process data from left panel and click on “Clip Layer” option. There provide the layer, draw shape, clip the area you want and click submit.

And that’s all there is to it! You’ve successfully used MAPOG’s Converter Tool to convert your GPS files into SHP format. This streamlined process simplifies handling various data formats, making your analysis more efficient and productive.

With MAPOG’s versatile toolkit, you can effortlessly upload vector and upload Excel or CSV data, incorporate existing layers, perform polyline splitting, use the converter for various formats, calculate isochrones, and utilize the Export Tool.

Here are some other blogs you might be interested in:

Convert Online GPS to PDF : Step by Step Guide

In this guide, you’ll learn how to effortlessly convert GPS files into PDF format using the Converter Tool in MAPOG. Whether you’re new to the process or an experienced user, this step-by-step guide will walk you through the entire conversion process in a straightforward manner.

Understanding the Conversion Process

The Converter Tool in MAPOG Map Analysis is designed to transform your data from one format to another with ease. It’s like having a digital wizard at your fingertips! You simply input your data, and the tool outputs it in a format that best suits your analytical needs. Additionally, GIS Data is versatile and can be downloaded in various formats, making it adaptable for multiple uses.
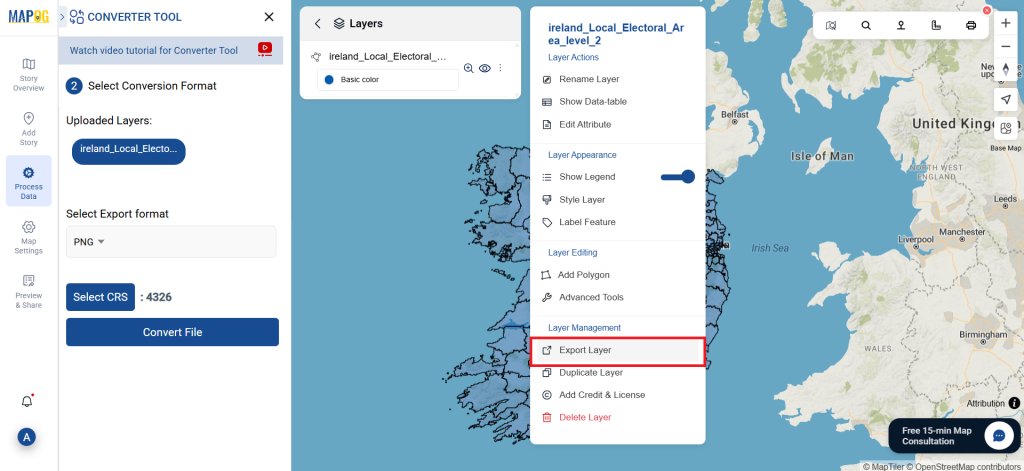
Online GPS to PDF GIS Converter

Step 1: Upload Your Data
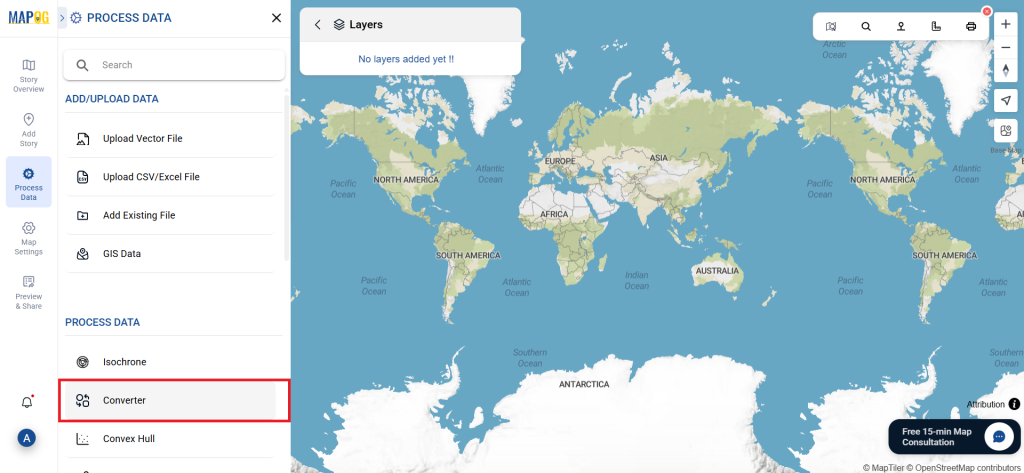
First, you’ll need to navigate to the “Converter Tool” via “Process Data.”

GPS to PDF

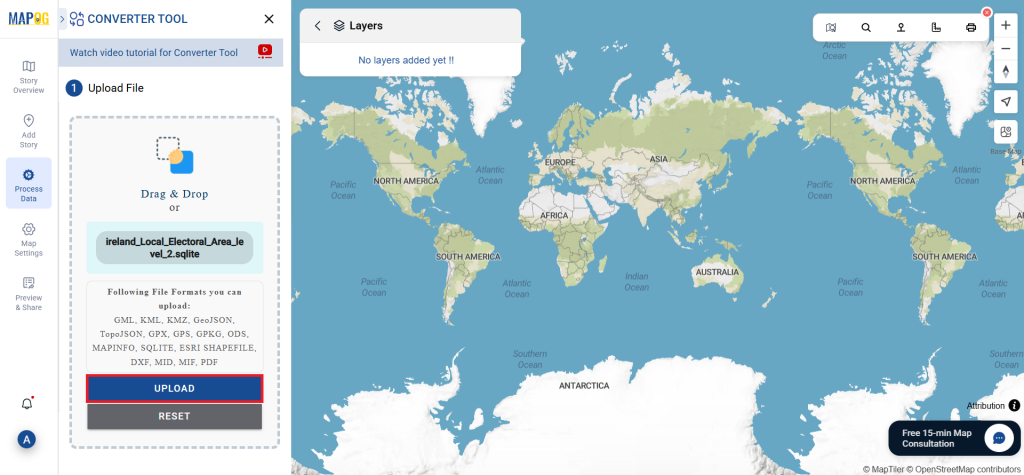
Upload your GPS file, which serves as the starting point for your conversion process.

GPS to PDF
Step 2: Choose the Conversion Format

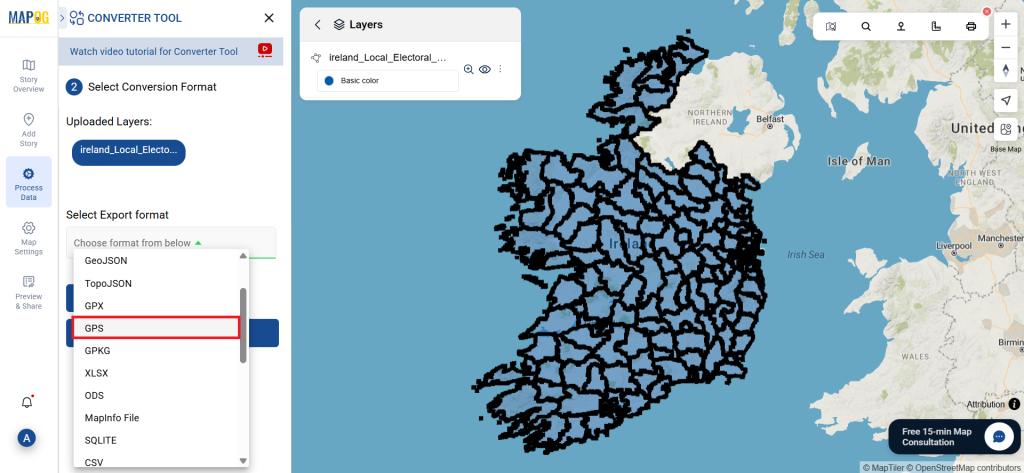
Next, select PDF as your desired output format. The tool offers various output options, but for this guide, we’ll focus on converting your file to PDF.

GPS to PDF

Additionally, this is a good time to set the CRS (Coordinate Reference System) to ensure your data aligns correctly with your spatial analysis requirements.
GPS to PDF
Step 3: Execute the Conversion

After setting up your data and selecting the appropriate format, click on ‘Convert Files’ to begin the conversion. The Converter Tool will seamlessly transform your GPS data into a PDF file.
GPS to PDF
Step 4: Review and Download Your PDF

Finally, take a moment to review your converted PDF file to ensure all data has been accurately transferred. Once satisfied, you can even download the file. This final review step is crucial to confirm that the conversion was successful and that your data remains intact.

GPS to PDF
Step 5: Create Grid

You can create Grid around the stations. Just click on the action button of new converted file, and select advanced tools, there you’ll find create grid tool. Then select your layer, provide range and submit!

GPS to PDF

And there you have it! You’ve successfully used the MAPOG Converter Tool to convert your GPS files into PDFs. This feature simplifies the process of handling various data formats, making your workflow smoother and more efficient, ready for any analysis you might need.

MAPOG has a lot of feature tool. These feature tools allow us to perform a variety of tasks. For example, you can create buffer zones using Buffer Tool, style your numeric data with the quantity style tool, create isochrones on your map using Isochrone tool, and more.

Here are some other blogs you might be interested in:

💬 Book a Meeting