Convert DXF to KMZ : A Complete Guide

This tutorial will guide you through convert DXF file to KMZ format using the Converter Tool in MAPOG. Whether you’re a MAPOG novice or an experienced user, this step-by-step guide will make the conversion process straightforward, helping you confidently transform your DXF file into KMZ format.

Key Concept to Converting Files:

The Converter Tool in MAPOG serves as a key mechanism for converting data between two different formats. Imagine it as a smooth transition where you provide data in one format, and it efficiently transforms it into another format tailored to your analytical requirements. Additionally, GIS data can be exported in multiple formats, enhancing its versatility and applicability across different uses.

Step 1: Upload Your Data:

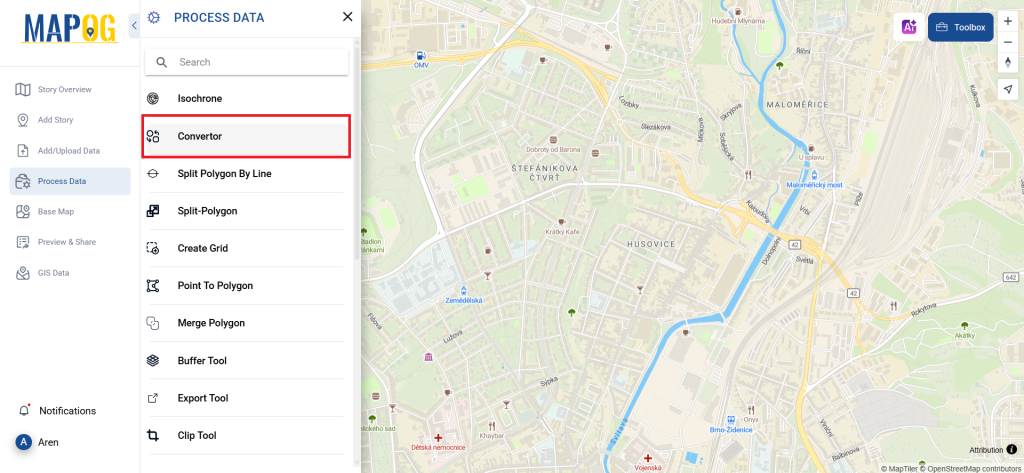
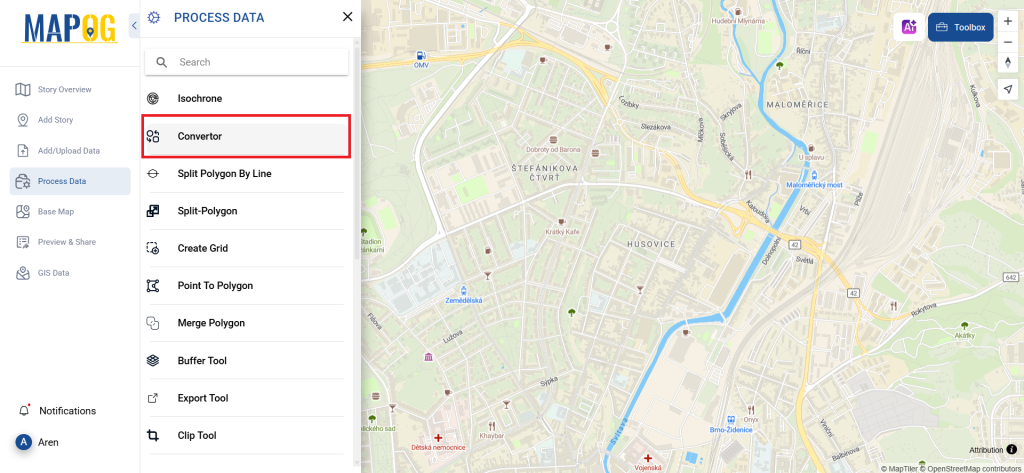
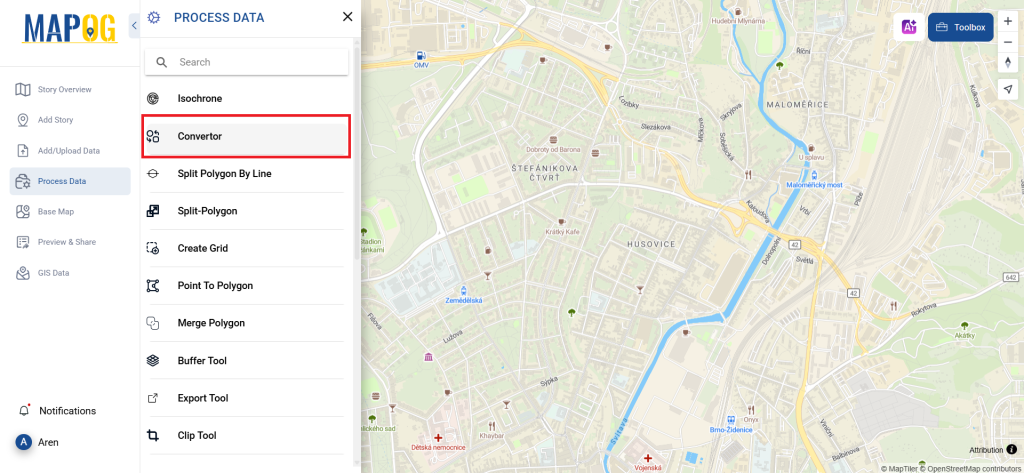
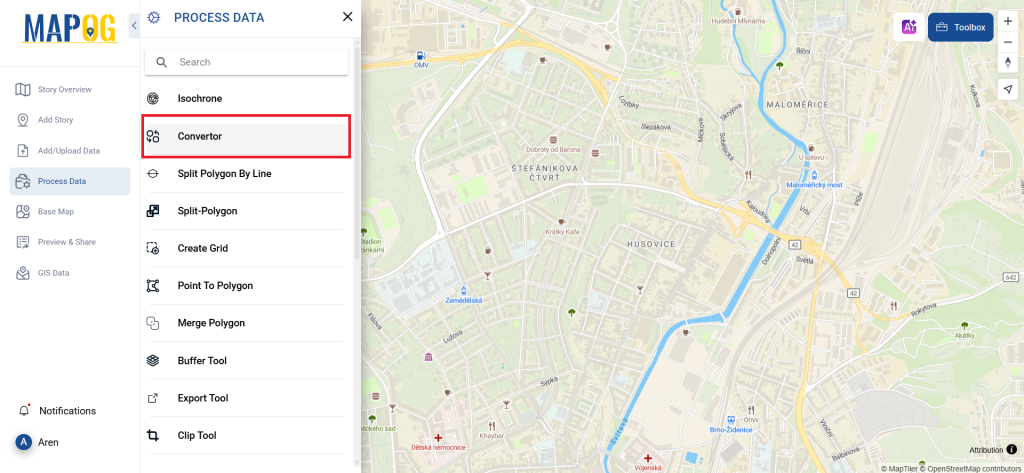
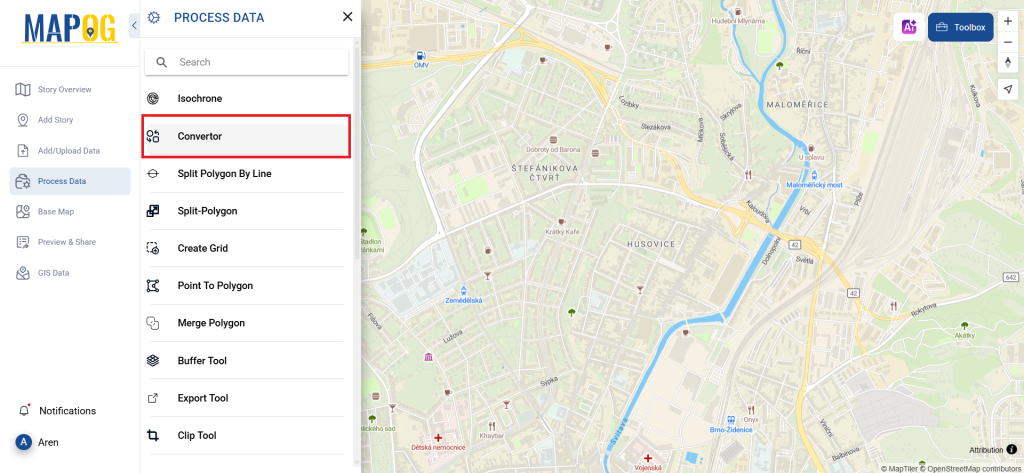
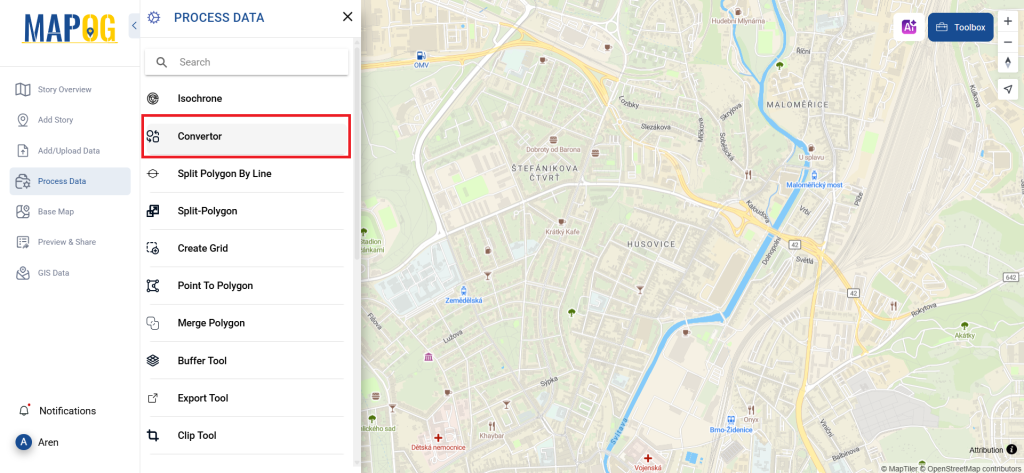
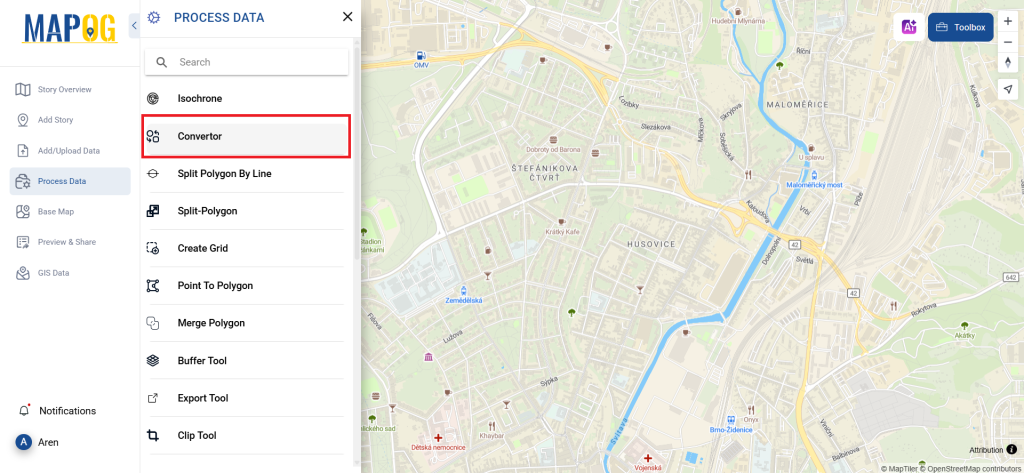
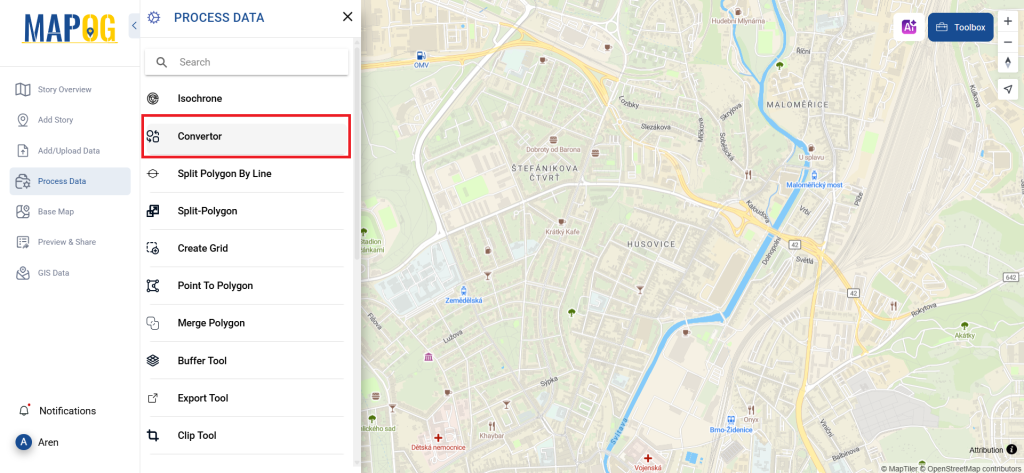
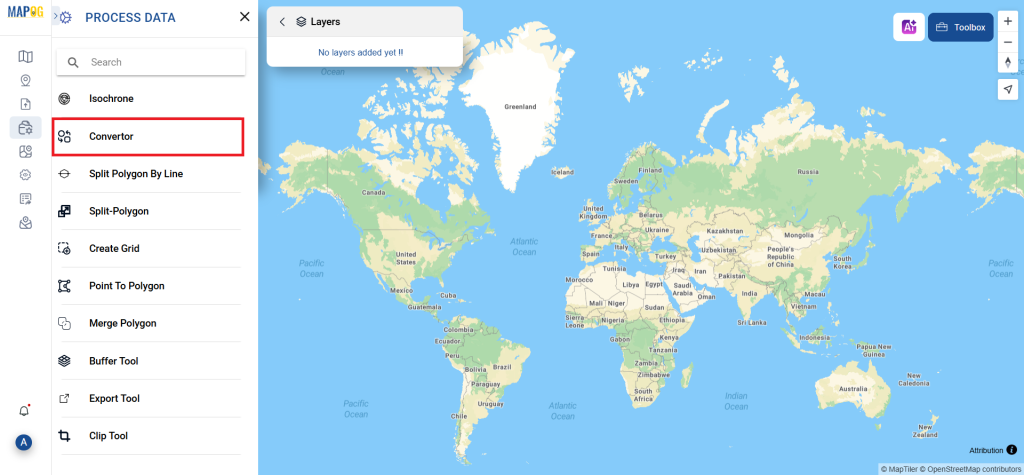
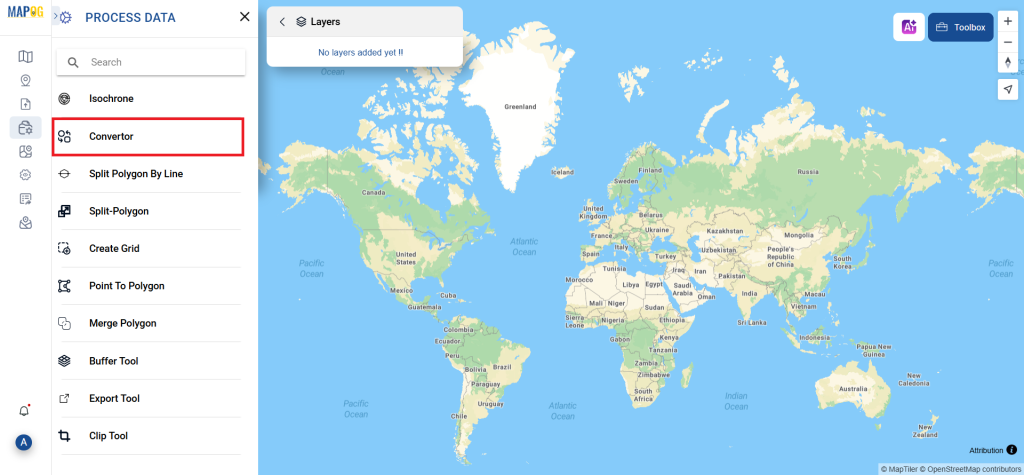
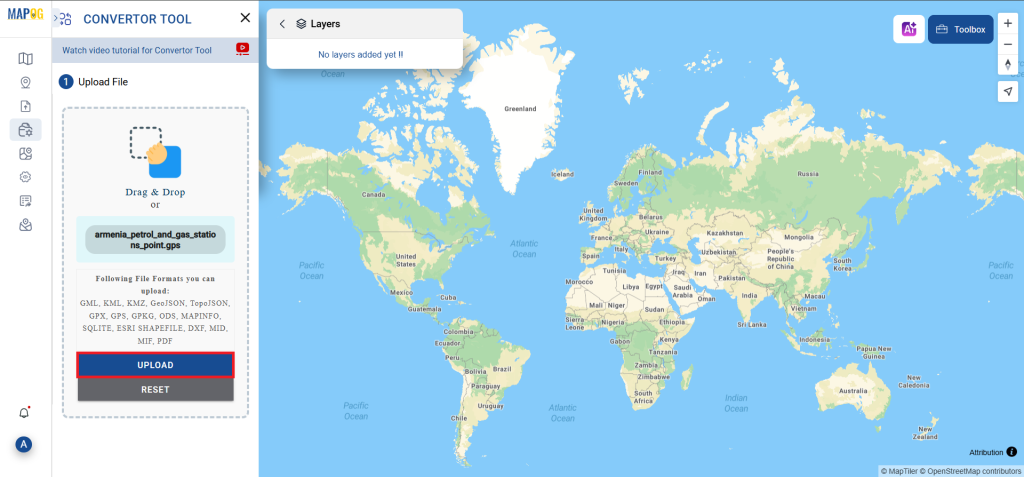
1. Navigate to “Process Reference Layers” and select the “Converter Tool” option.

DXF to KMZ

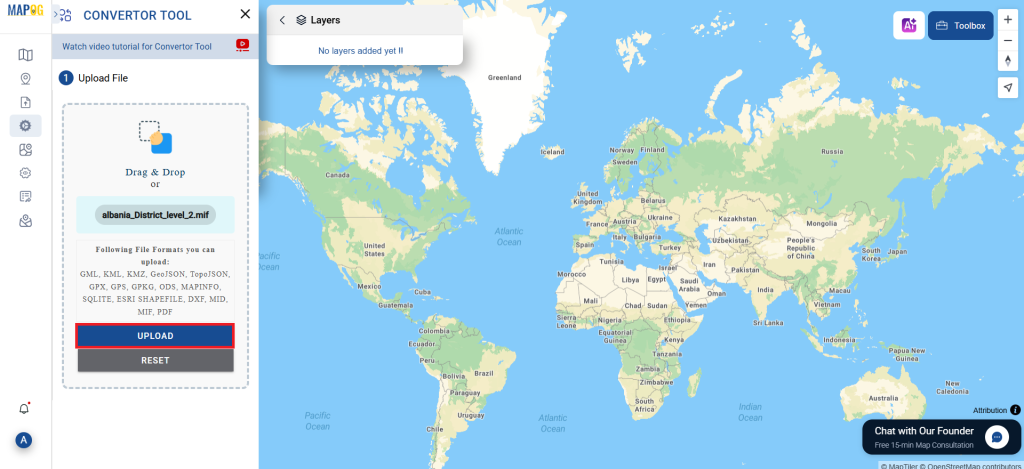
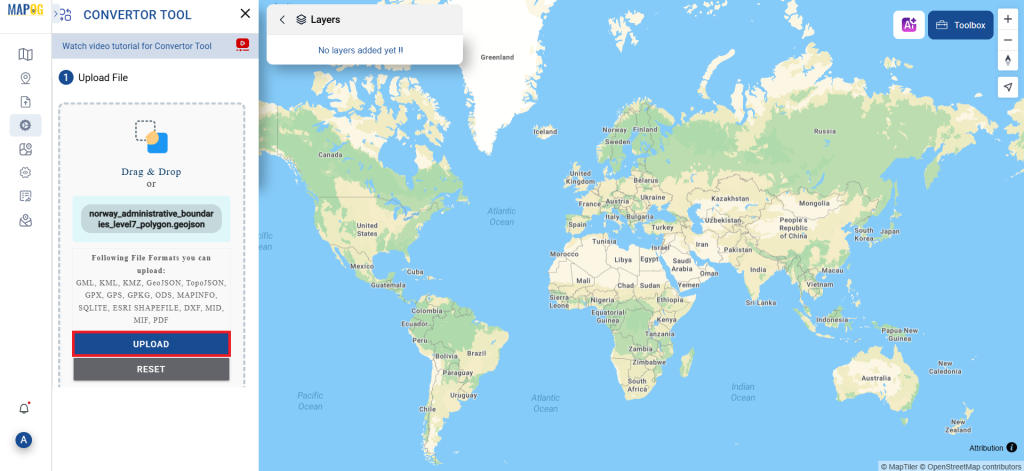
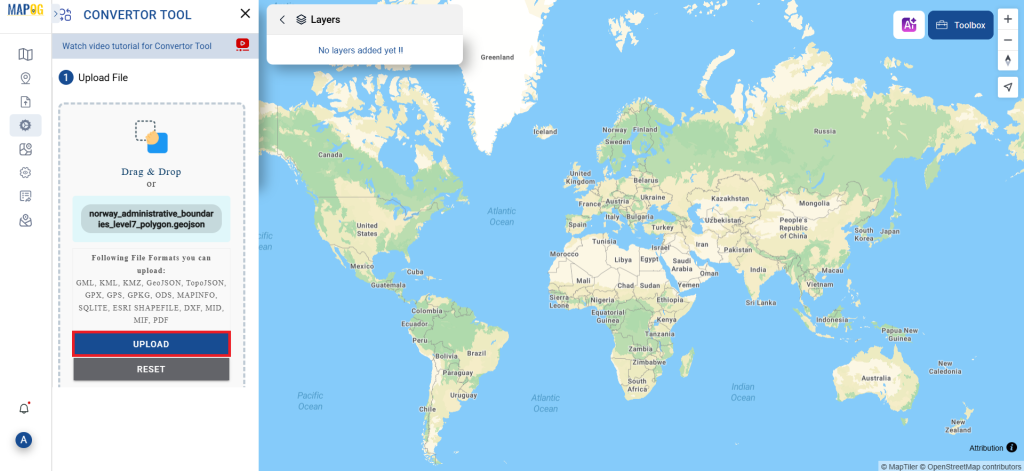
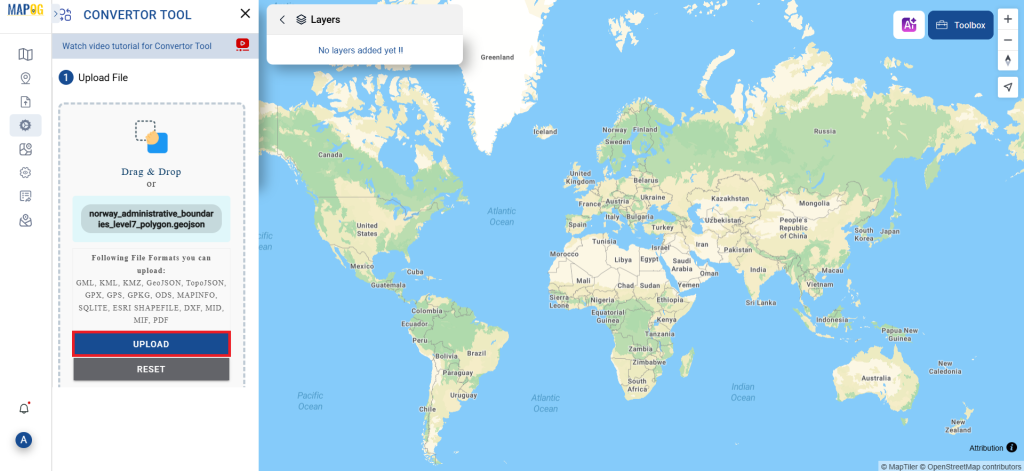
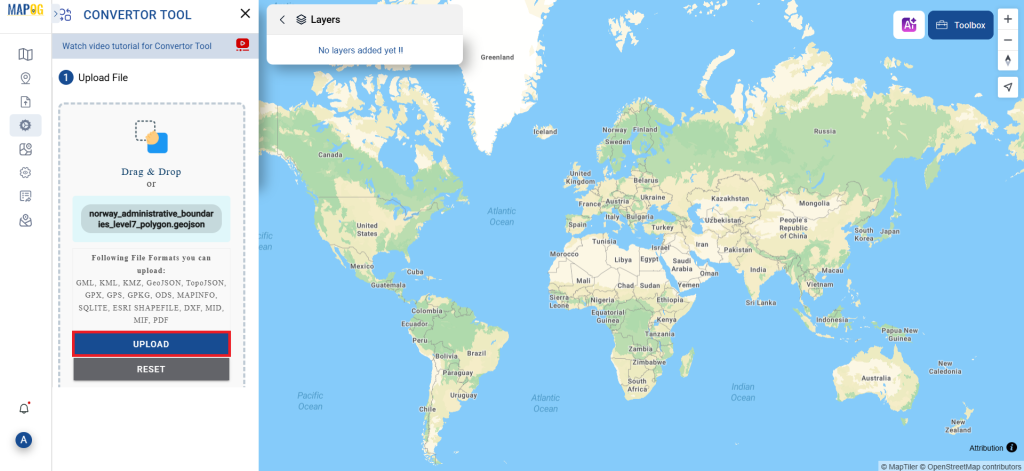
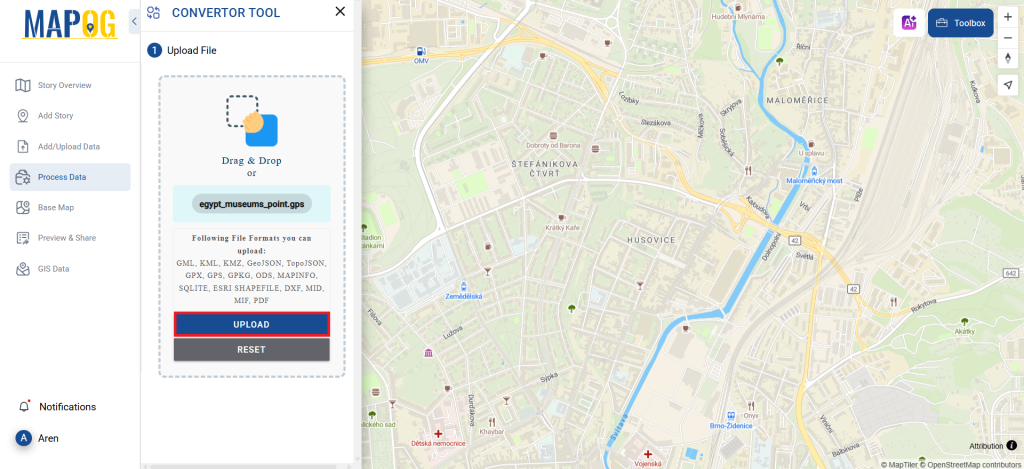
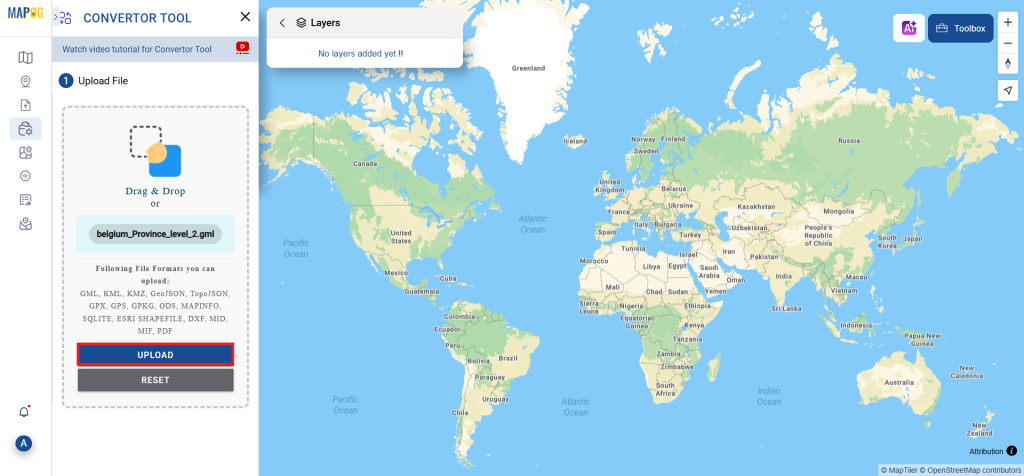
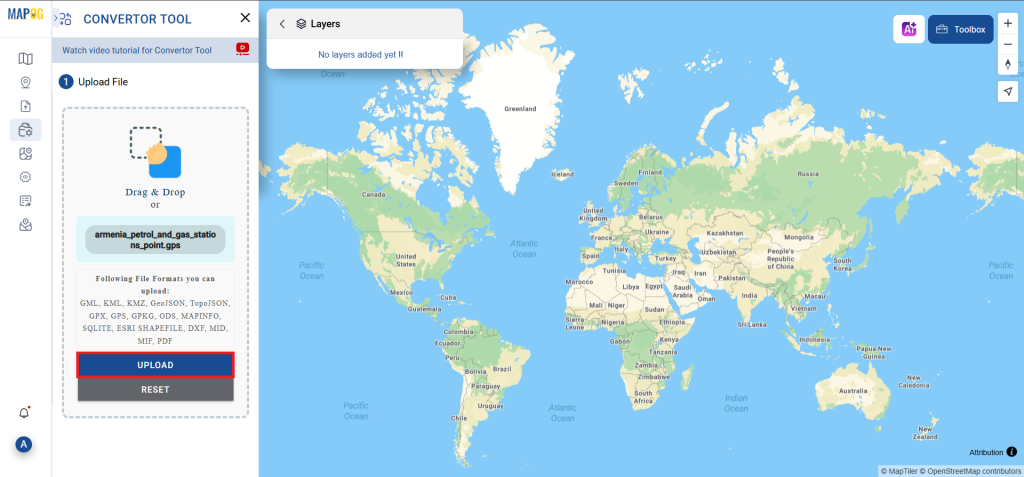
2. Upload your DXF file. This is where you begin by supplying the data that you want to convert.

Step 2: Choose the Conversion Format: 
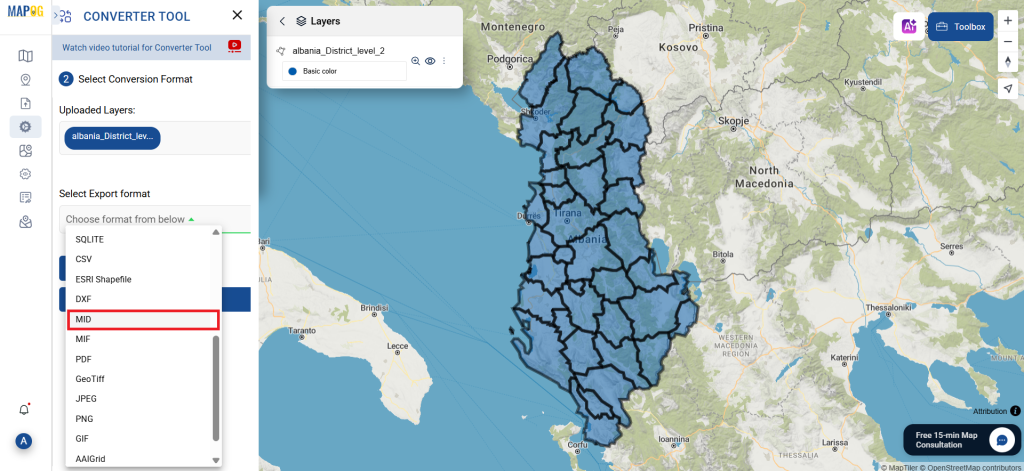
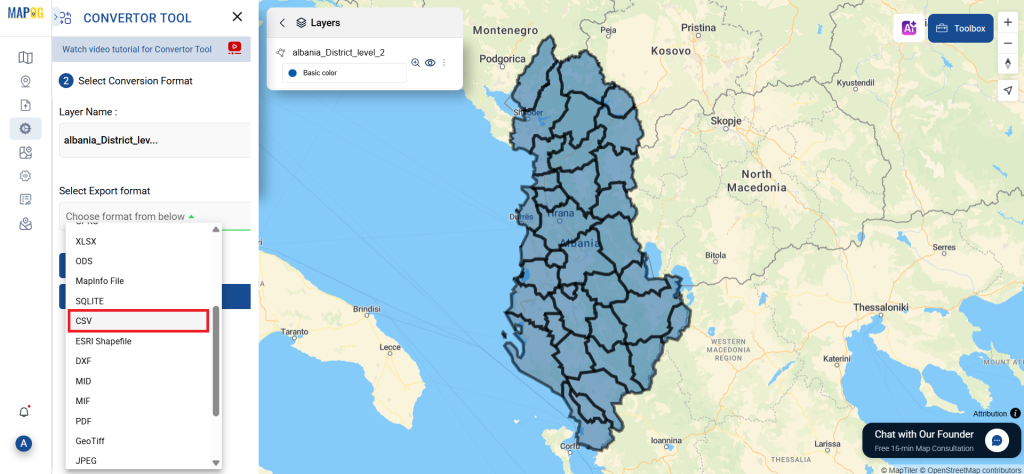
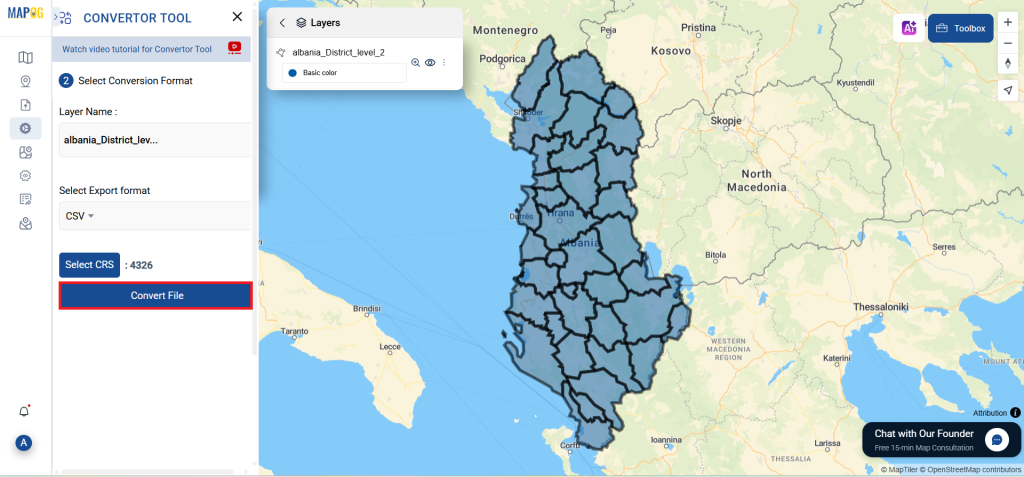
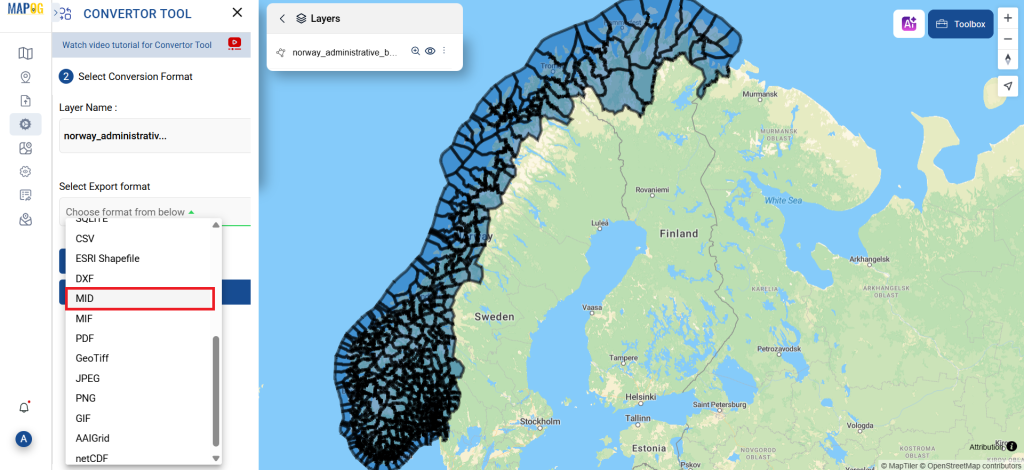
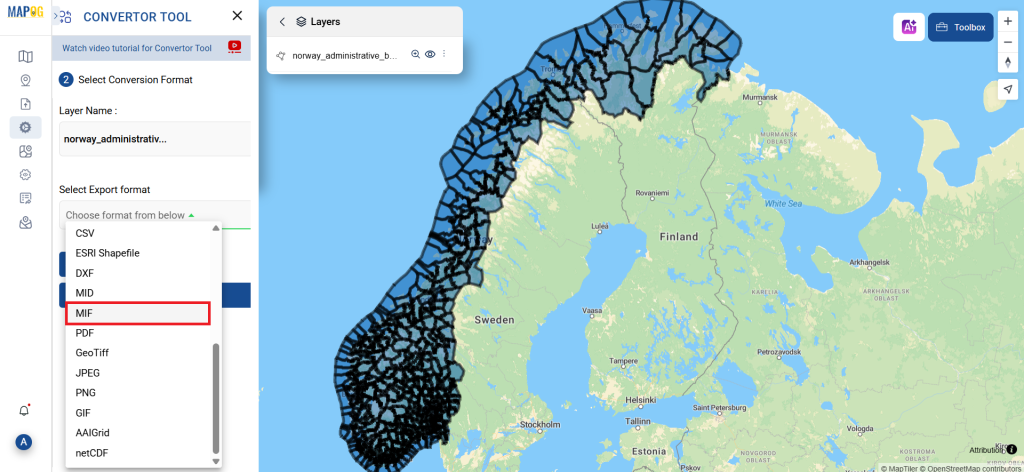
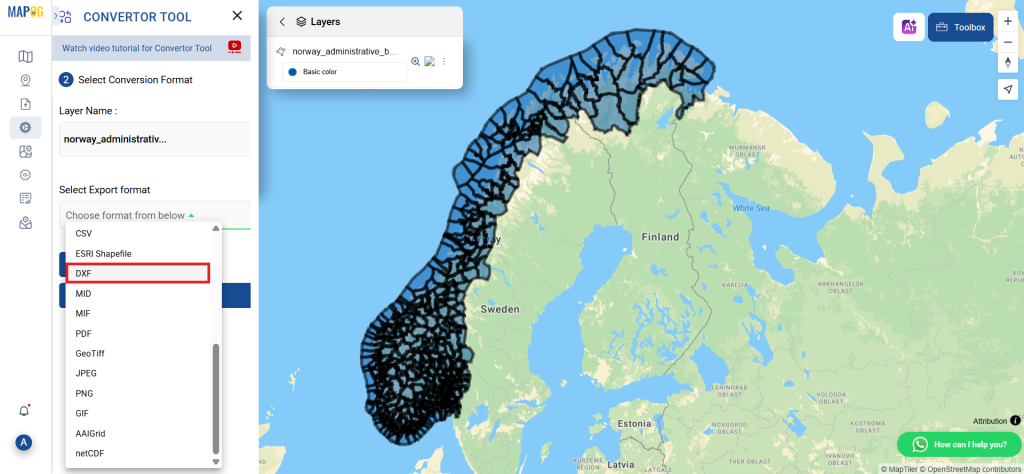
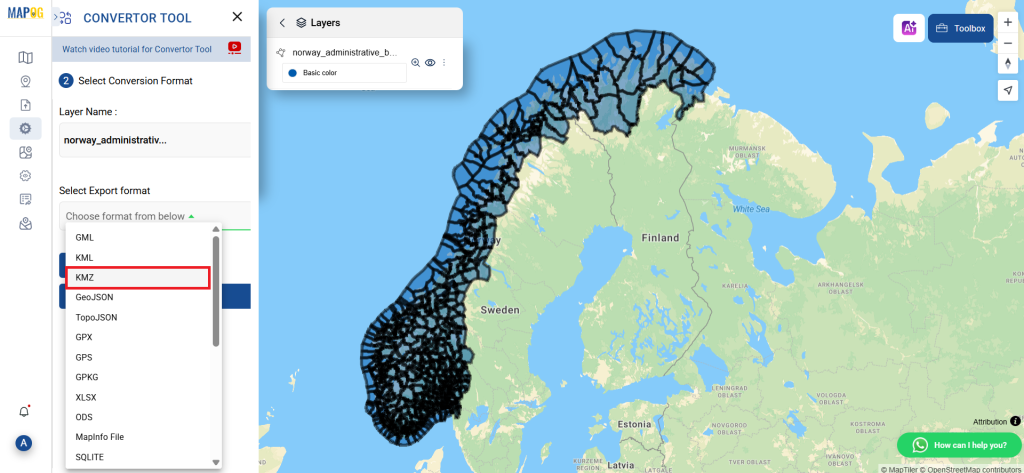
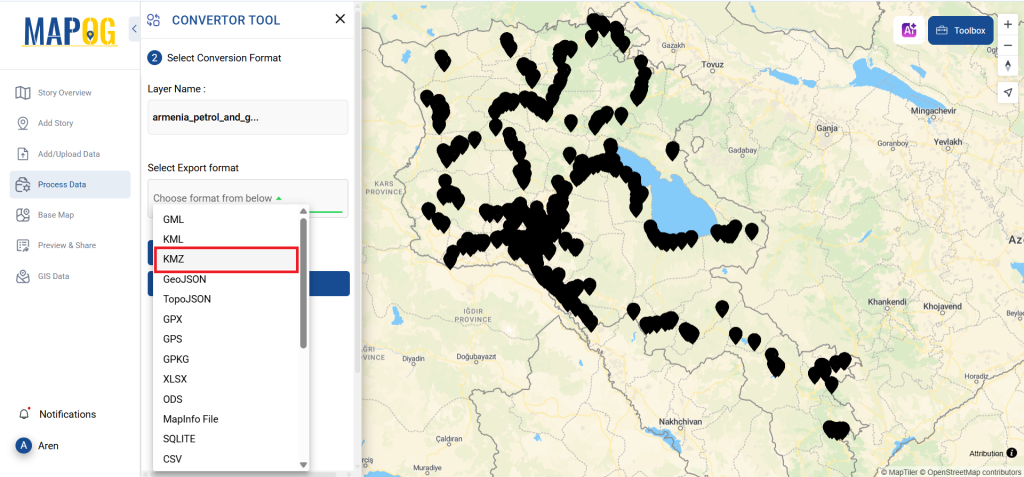
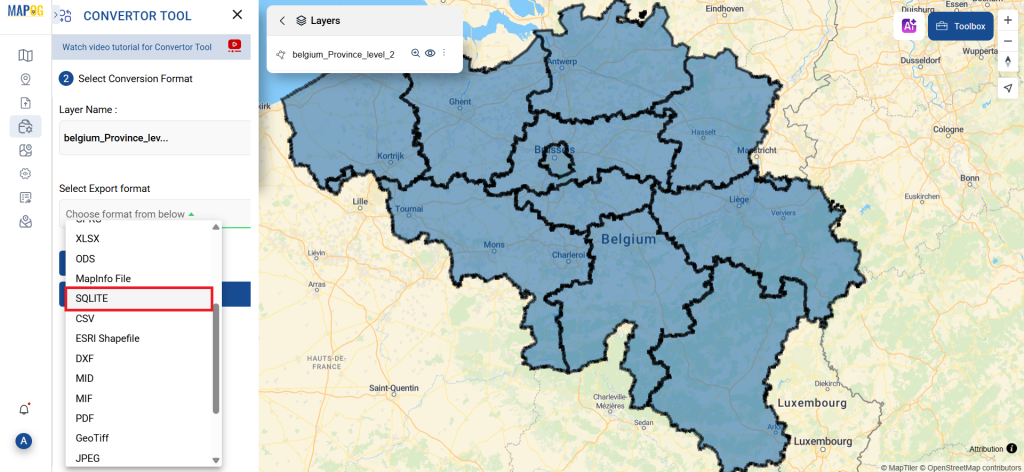
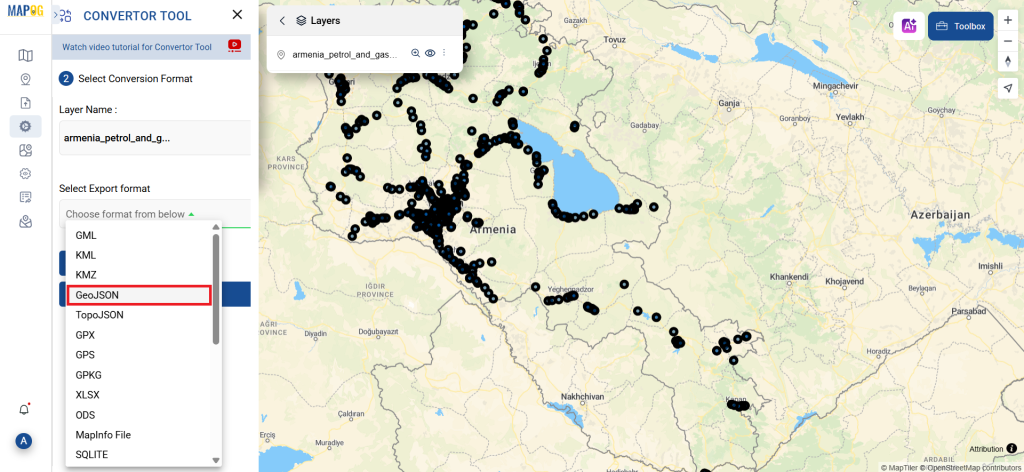
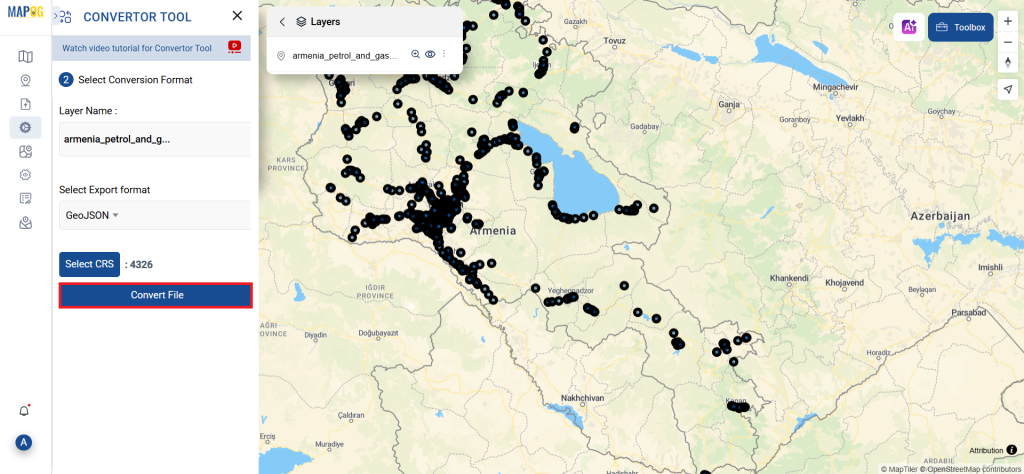
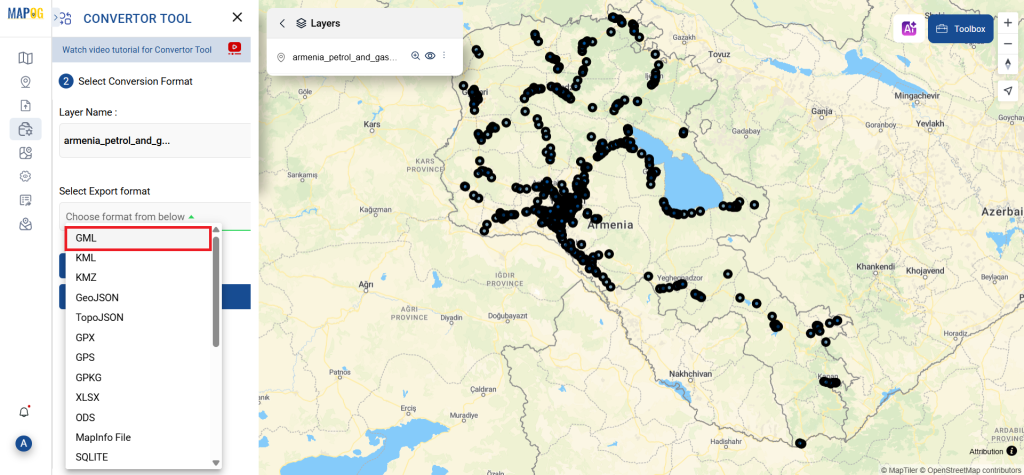
  1. Select KMZ as the output format if you intend to export just the data. Although the tool provides several options to achieve this, this guide specifically focuses on converting the file to KMZ.
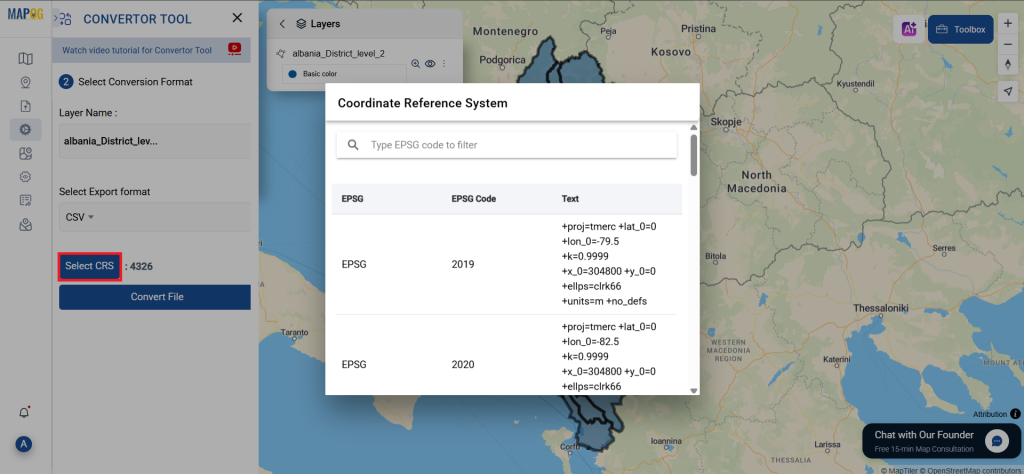
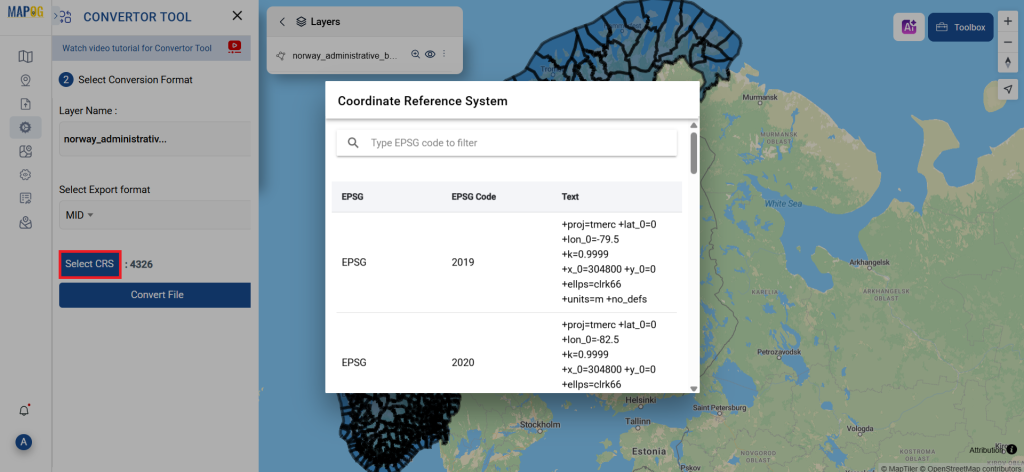
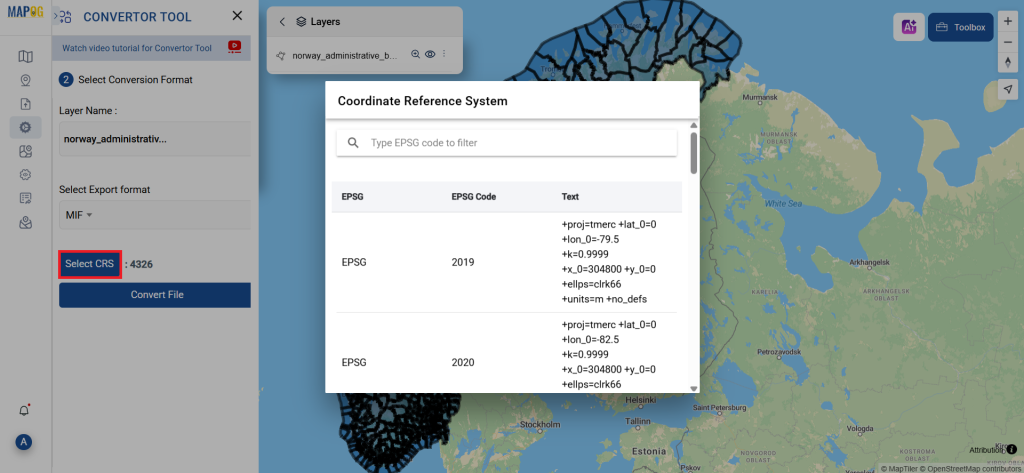
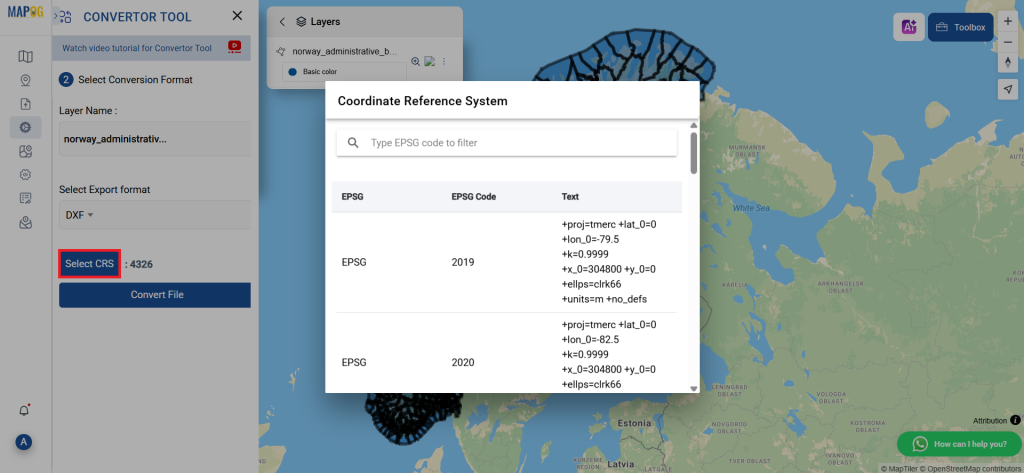
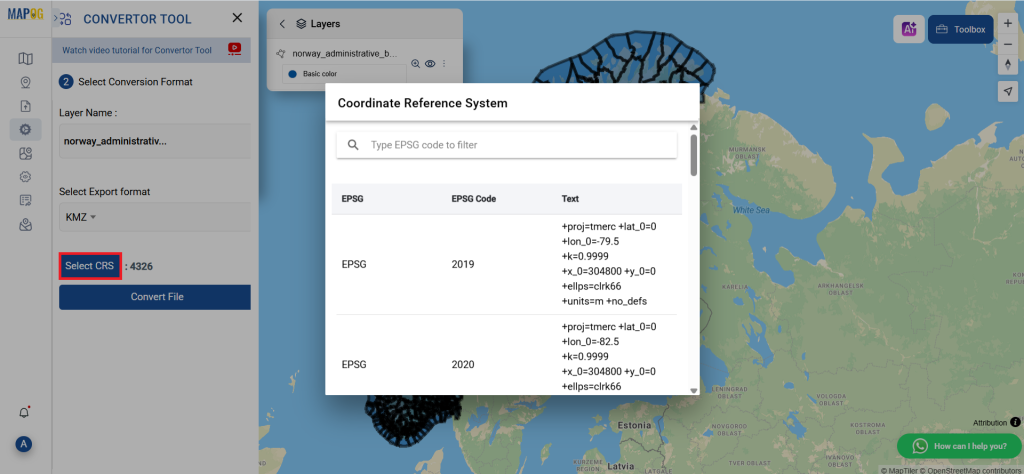
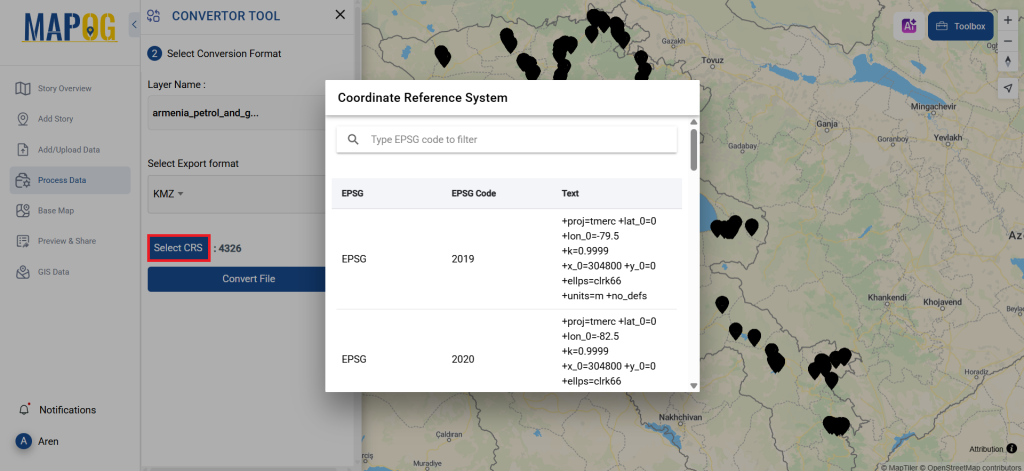
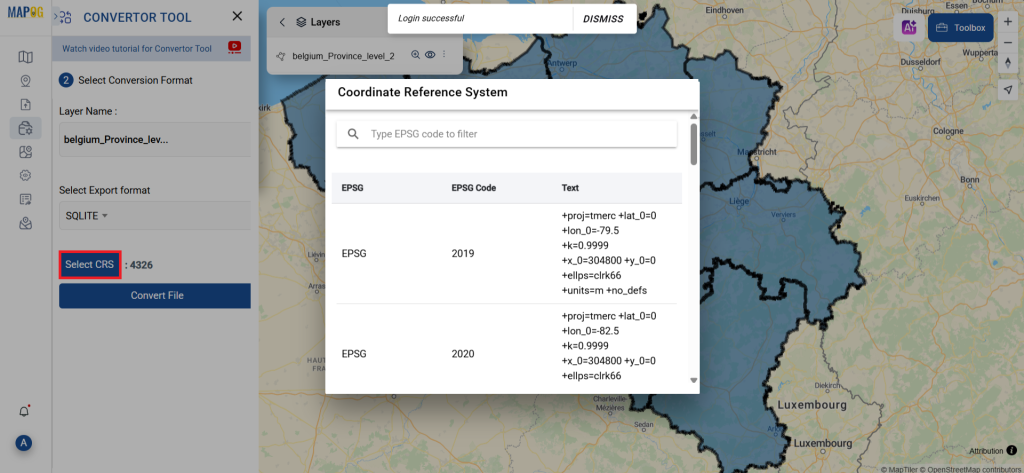
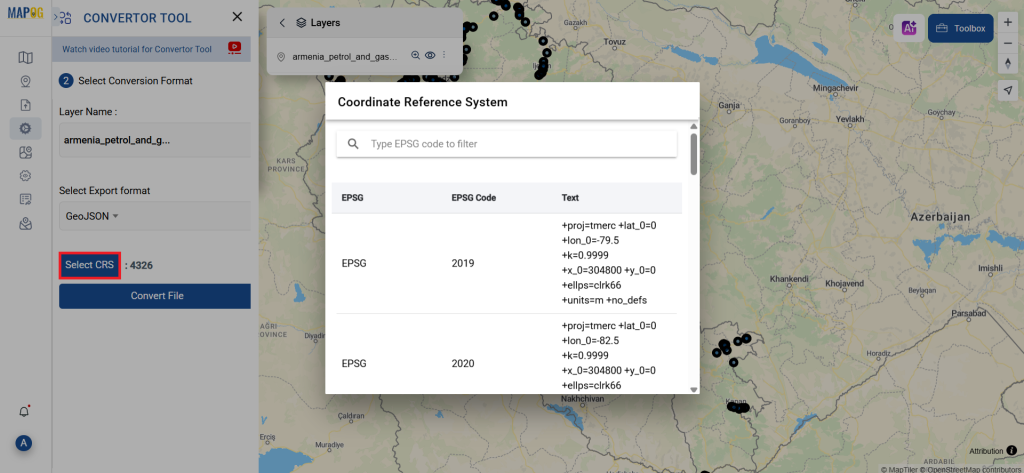
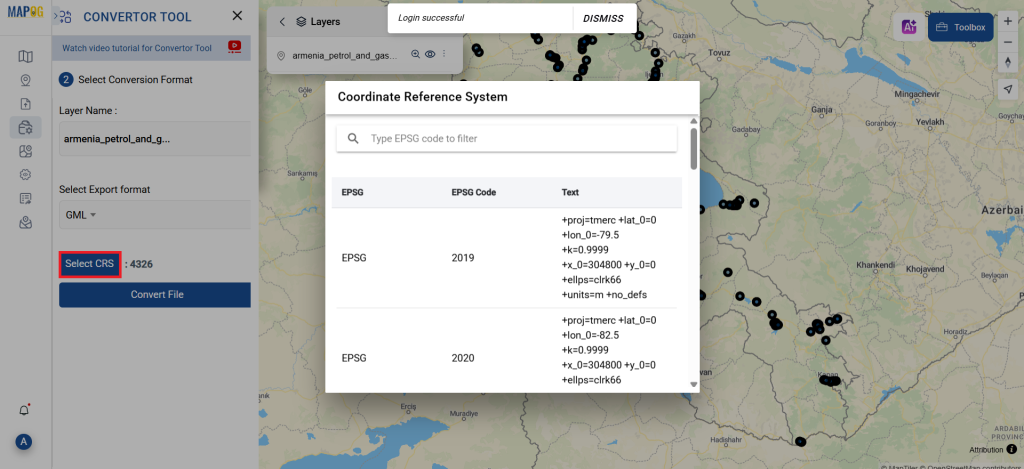
  1. You can also set the Output CRS as per your need.
Step 3 :  Execute the Conversion:

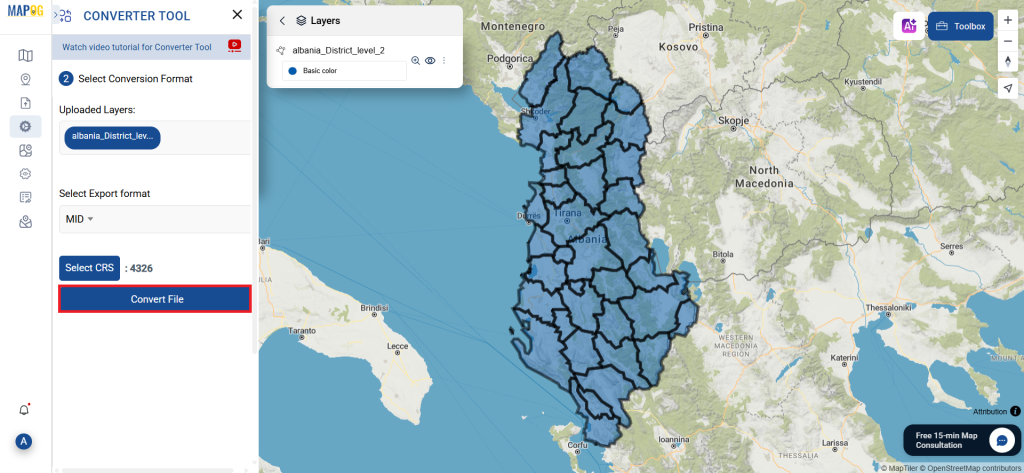
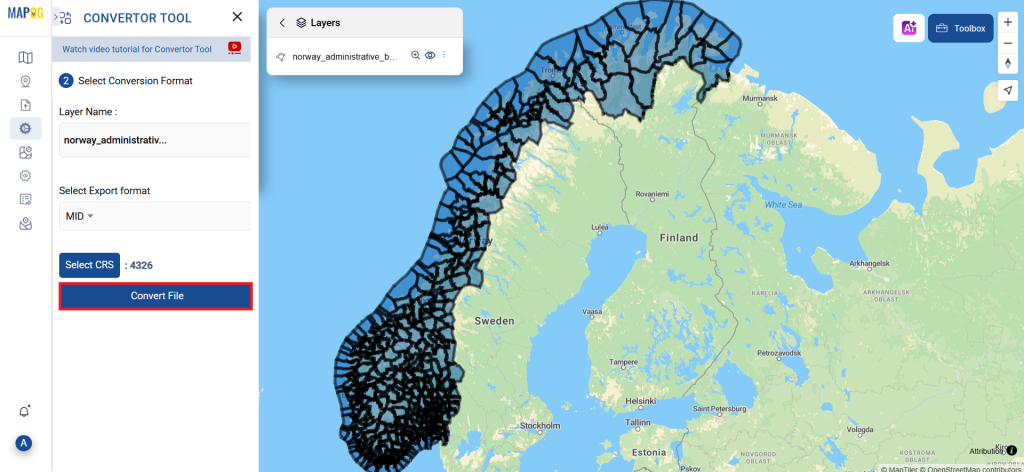
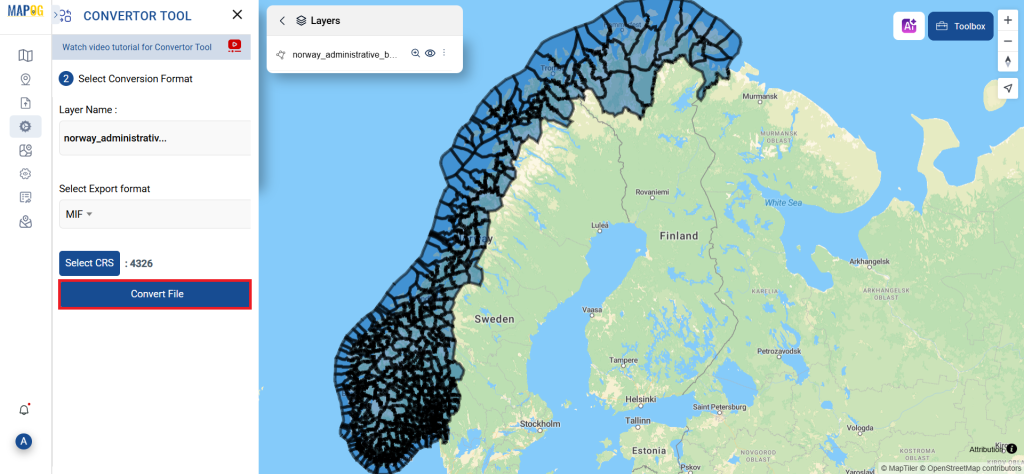
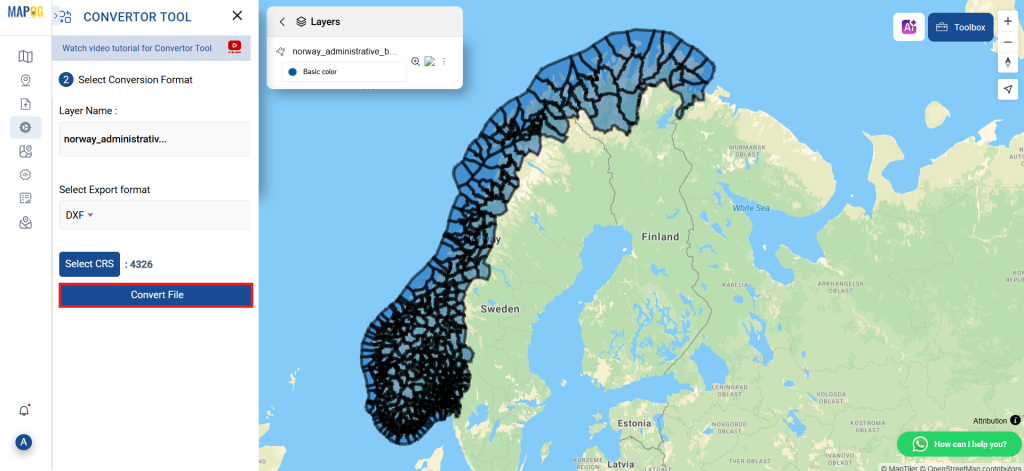
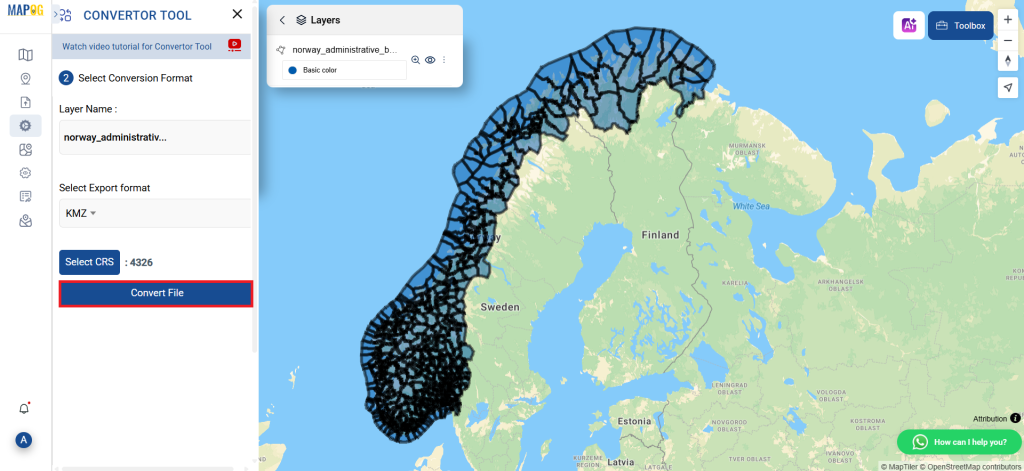
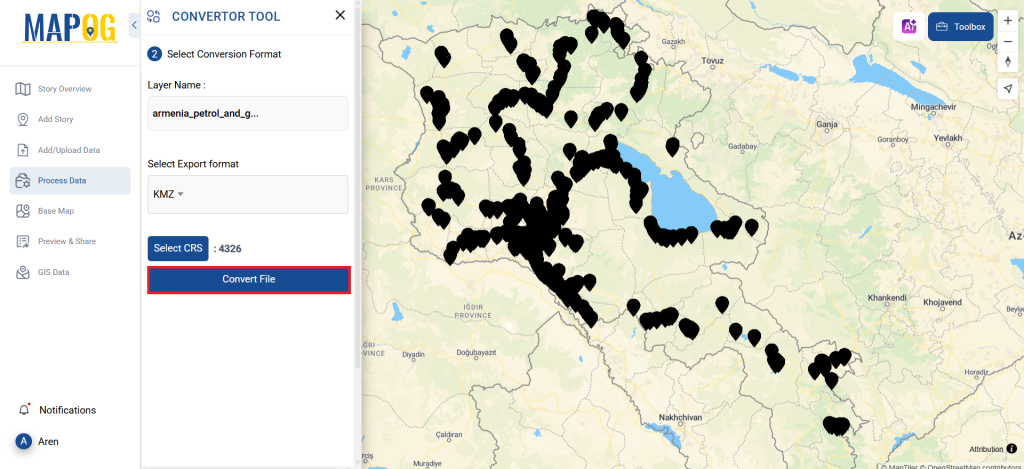
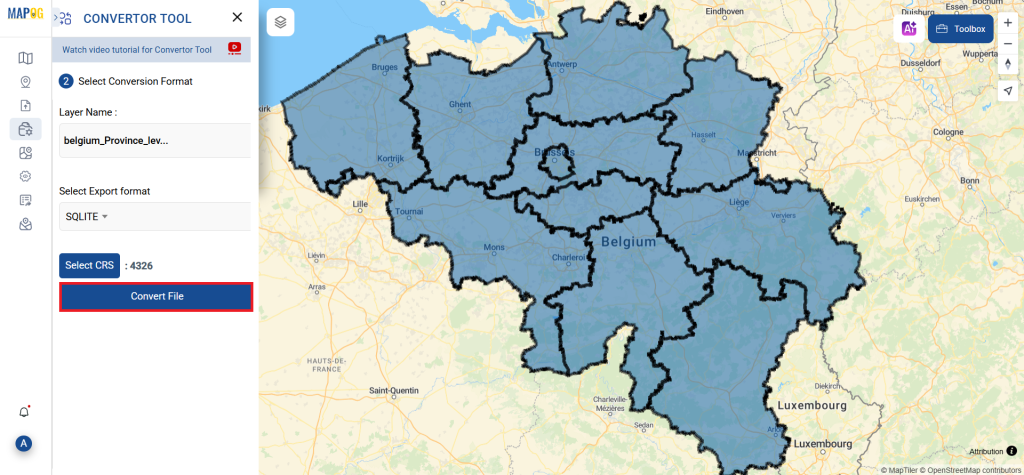
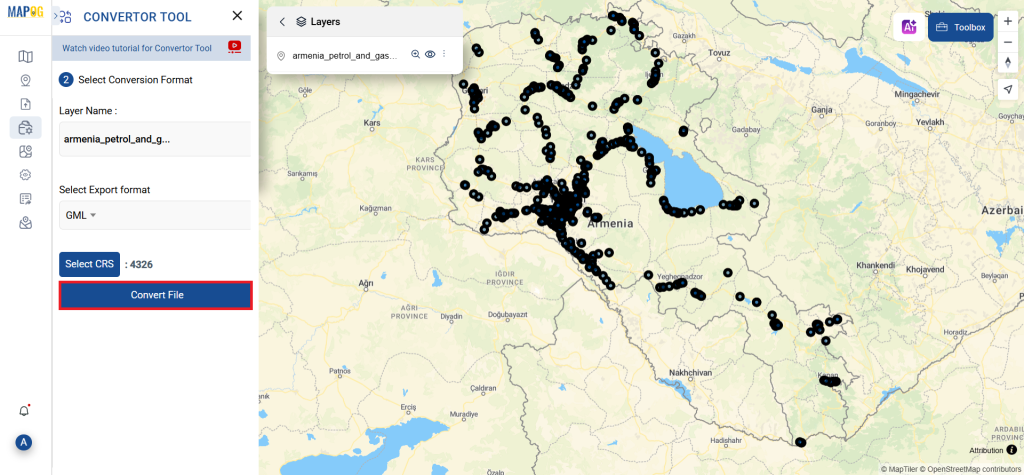
Go to ‘Convert Files’ and allow the tool to work. With the Converter Tool, you just supply your data, and it takes care of converting from DXF to KMZ format.

Step 4: Review and Download:

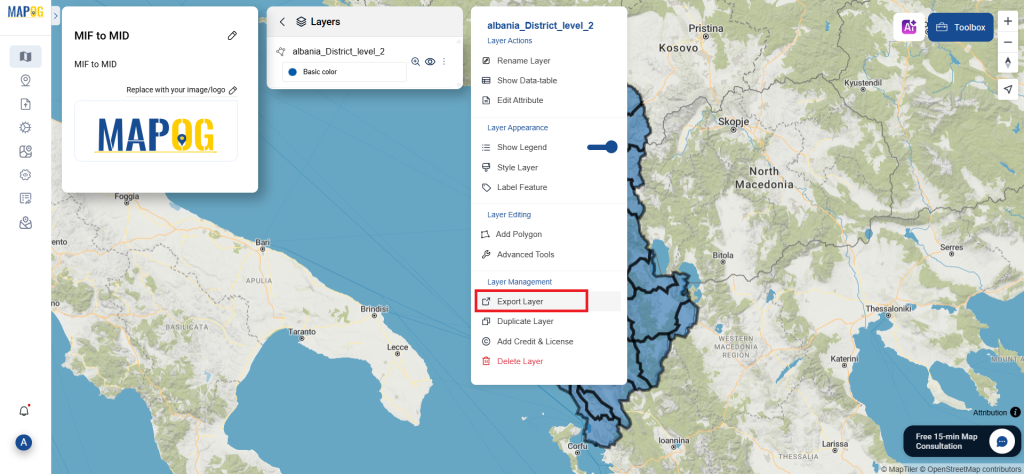
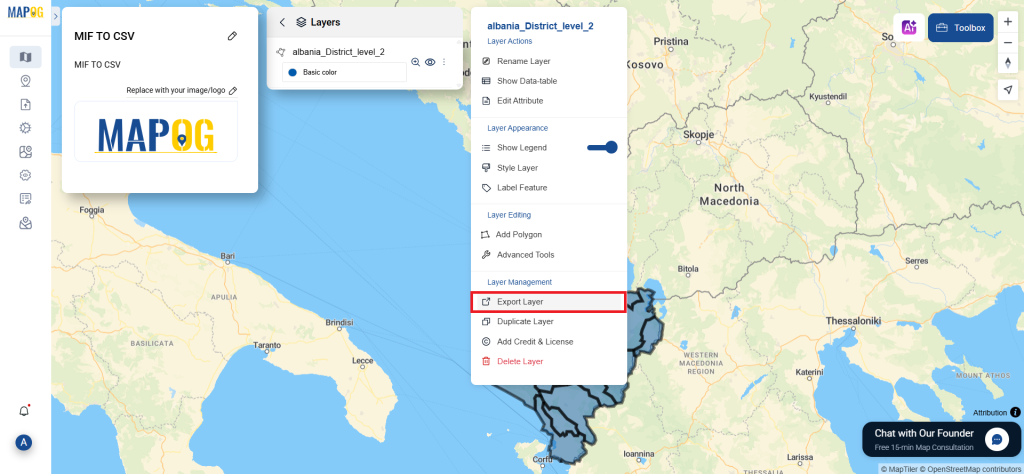
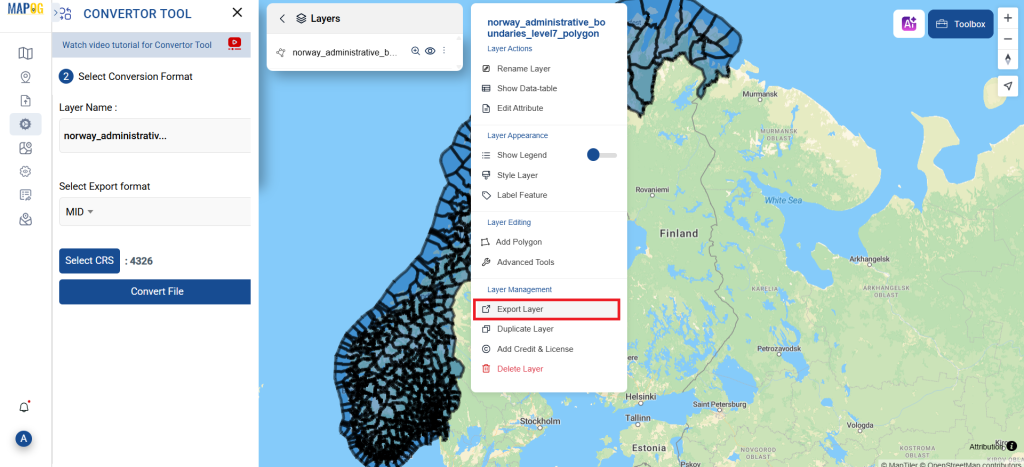
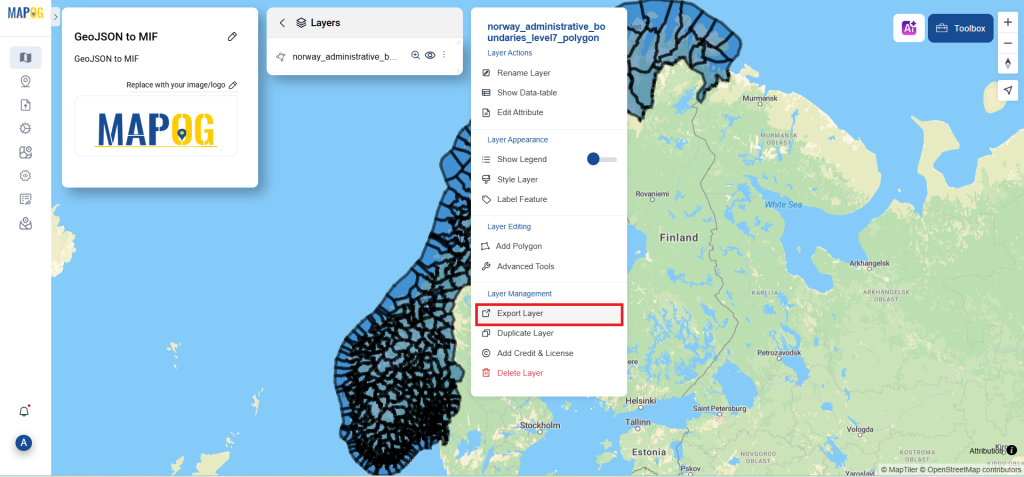
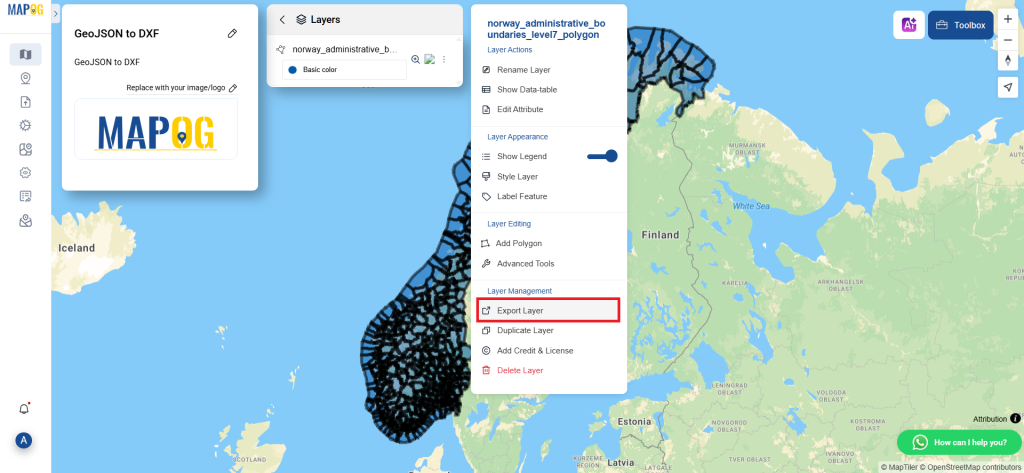
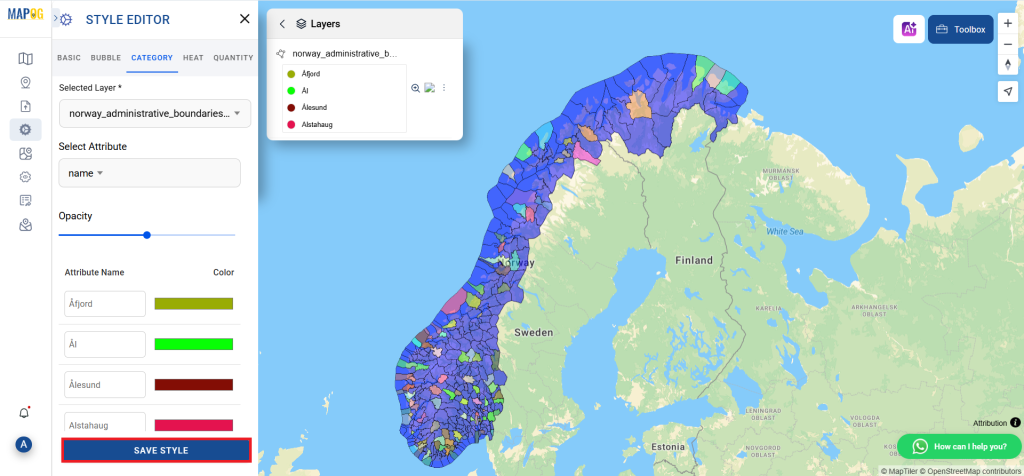
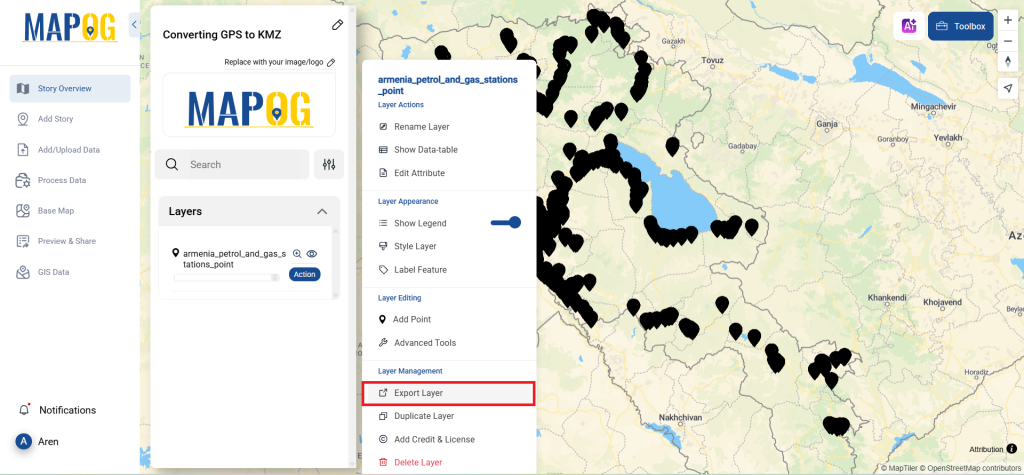
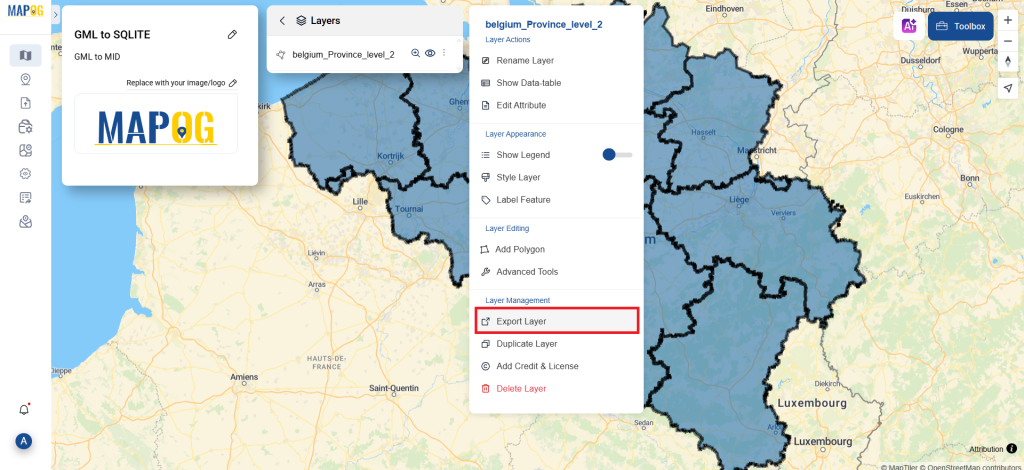
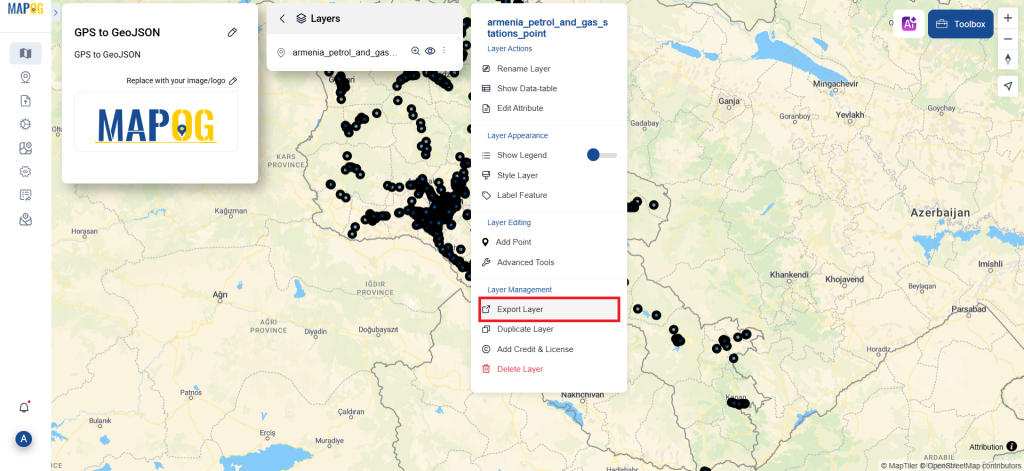
 Take a moment to examine your converted KMZ data to confirm its accuracy. Once you’re confident with the outcome, go ahead and download the file. This step is essential to ensure that the conversion was successful and that all your data is correctly maintained.

Result:

You’ve successfully converted DXF to KMZ using MAPOG’s straightforward tools. This process not only simplifies your data management but also enhances the versatility of your data across different GIS platforms. For assistance or inquiries, contact us at support@mapog.com. Happy mapping!

With MAPOG’s versatile toolkit, you can effortlessly upload vectors and upload Excel or CSV data, incorporate existing layers, perform polygon splitting, use the converter for various formats, calculate isochrones, and utilize the Export Tool.

Use MAPOG for mapping and visualizing data across all domains. Its tools make analysis easy and accurate. Convert files to get data in the format you need.

Here are some other blogs you might be interested in:

Online Convert DXF to GPKG: A Complete Guide

This tutorial will guide you through the process of Convert DXF to GPKG format using the Converter Tool in MAPOG. Whether you are new to MAPOG or have prior experience, this step-by-step guide simplifies the conversion, allowing you to easily transform your DXF file into GPKG format with confidence.

What is DXF Data Format:

DXF is short for Drawing Exchange Format or Drawing Interchange Format and is a type of vector file. Engineers, designers and architects often use the DXF format for 2D and 3D drawings during product design. This data format can be used in case of analyzing the maps. It can be of many types like point, line and polygon or any boundaries.

 Online GIS Data Conversion

Converting DXF Data into GPKG Format:

MAPOG features a Converter Tool that enables users to effortlessly change data from one format to another according to their specific requirements. This tool simplifies the data transformation process for a variety of GIS applications, providing both flexibility and efficiency when dealing with multiple formats. For example, using MAPOG’s Converter Tool, DXF data can be transformed into GPKG format. This conversion not only reduces the file size but also retains crucial geographic information, making the data more appropriate for web-based mapping and interactive applications. As a result, workflows are enhanced, and the usability of GIS data is significantly improved.

Steps For Converting DXF to GPKG

First, Step 1: Upload Your Data:
  1. Go to “Process Reference Layers” and choose the “Converter Tool” option.

2.Upload your DXF file to start the conversion process by providing the data you wish to transform.

Step 2: Choose the Output Format:
  1. Select GPKG as the output format to export your data. Although the tool offers several format options, this guide focuses specifically on converting your file to GPKG.

2. You can also set the Output CRS according to your spatial analysis requirements.

Step 3: Execute the Conversion:

Proceed to ‘Convert Files’ and allow the tool to take care of the conversion. By simply uploading your data, the Converter Tool manages the entire process of converting your DXF file into GPKG format.

Step 4: Review and Download:

Review your converted GPKG data to verify its accuracy. Once you are satisfied with the results, download the file. This step ensures that the conversion was successful and that your data is correctly preserved.

Result:

You’ve successfully converted DXF to GPKG using MAPOG’s straightforward tools. This process not only simplifies your data management but also enhances the versatility of your data across different GIS platforms. For assistance or inquiries, contact us at support@mapog.com. Happy mapping!

With MAPOG’s versatile toolkit, you can effortlessly upload vectors and upload Excel or CSV data, incorporate existing layers, perform polygon splitting, use the converter for various formats, calculate isochrones, and utilize the Export Tool.

Use MAPOG for mapping and visualizing data across all domains. Its tools make analysis easy and accurate. Convert files to get data in the format you need.

Here are some other blogs you might be interested in:

Convert DXF to MapInfo File Online

In this tutorial, we’ll walk you through the process of converting a DXF file to MapInfo File format using the Converter Tool in MAPOG. Whether you’re new to MAPOG or have some experience, this easy-to-follow guide will help you confidently convert your DXF files to JPEG.

What is DXF Data Format:

DXF is short for Drawing Exchange Format or Drawing Interchange Format and is a type of vector file. Engineers, designers and architects often use the DXF format for 2D and 3D drawings during product design. This data format can be used in case of analyzing the maps. It can be of many types like point, line and polygon or any boundaries.

Online GIS Data Conversion 

Converting DXF Data into MapInfo File Format:

MAPOG features a robust Converter Tool that allows users to effortlessly convert data between various formats to suit their needs. This tool streamlines the process of transforming data for different GIS applications, ensuring both flexibility and efficiency when working with multiple formats. For instance, MAPOG’s Converter Tool can convert DXF data into MapInfo File format, reducing file size while preserving important geographic details. This makes the data more compatible with web-based mapping and interactive platforms, ultimately enhancing workflows and significantly improving the usability of GIS data.

Steps For Converting DXF to MapInfo File

Step 1: Upload the Data :
  1. Go to “Process Reference Layers” and choose the “Converter Tool” option.

2.Upload your DXF file to start the conversion process by providing the data you wish to transform.

Step 2: Choose the Output Format:
  1. Select MapInfo File as the output format to export your data. Although the tool offers several format options, this guide focuses specifically on converting your file to MapInfo File.
  1.  You can also set the Output Coordinate Reference System (CRS) according to your spatial analysis requirements.
Step 3: Run the Conversion:

Head over to ‘Convert Files’ and let the tool handle the conversion for you. Just upload your data, and the Converter Tool will automatically take care of converting your DXF file into MapInfo File format, making the process seamless and efficient.

Step 4: Review and Download:

Review your converted MapInfo File  data to verify its accuracy. Once you are satisfied with the results, download the file. This step ensures that the conversion was successful and that your data is correctly preserved.

Result:

You’ve successfully converted DXF to MapInfo File using MAPOG’s straightforward tools. This process not only simplifies your data management but also enhances the versatility of your data across different GIS platforms. For assistance or inquiries, contact us at support@mapog.com. Happy mapping!

With MAPOG’s versatile toolkit, you can effortlessly upload vectors and upload Excel or CSV data, incorporate existing layers, perform polygon splitting, use the converter for various formats, calculate isochrones, and utilize the Export Tool.

Use MAPOG for mapping and visualizing data across all domains. Its tools make analysis easy and accurate. Convert files to get data in the format you need.

Here are some other blogs you might be interested in:

Convert DXF to CSV: A Step-by-Step Guide

This tutorial offers a straightforward walkthrough for converting a DXF file into CSV format using the Converter Tool in MAPOG. Whether you’re new to MAPOG or have some experience, this guide will assist you in seamlessly converting your DXF files to CSV.

What is DXF Data Format:

DXF is short for Drawing Exchange Format or Drawing Interchange Format and is a type of vector file. Engineers, designers and architects often use the DXF format for 2D and 3D drawings during product design. This data format can be used in case of analyzing the maps. It can be of many types like point, line and polygon or any boundaries.

Online GIS Data Conversion

Converting DXF Data into CSV Format:

MAPOG includes an advanced Converter Tool that enables users to easily switch between various data formats to meet their specific needs. This tool simplifies the process of converting data for multiple GIS applications, offering both flexibility and efficiency in handling different formats. For instance, MAPOG’s Converter Tool can convert DXF data into the CSV format, reducing file size while preserving essential geographic details. This makes the data more suitable for web-based mapping and interactive platforms, ultimately enhancing workflows and significantly improving GIS data usability.

Steps to Convert DXF to CSV:

Upload the Data:
  • Navigate to the header menu, click on “Process Reference layers,” and select the “Converter Tool” option to get started.
  • To start the conversion, upload your DXF file by selecting the data you want to convert.
Select the Output Format:
  • Choose CSV as the preferred output format for exporting your data. While the Converter Tool offers multiple format options, this guide focuses specifically on converting your file to CSV format.
  • You can also Choose the Output Coordinate Reference System (CRS) according to your spatial analysis requirement.
Run the Conversion:

Go to the ‘Convert Files’ section and let the tool handle the conversion. Simply upload your DXF file, and the Converter Tool will efficiently convert it to CSV format, ensuring a smooth and fast process.

Review and Download:

Review your converted CSV file to confirm its accuracy. After ensuring that the conversion is correct and meets your requirements, proceed to download the file. This step is crucial to validate that the conversion was successful and that your data has been accurately preserved.

Result:

You’ve successfully converted DXF to CSV using MAPOG’s straightforward tools. This process not only simplifies your data management but also enhances the versatility of your data across different GIS platforms. For assistance or inquiries, contact us at support@mapog.com. Happy mapping!

With MAPOG’s versatile toolkit, you can effortlessly upload vectors and upload Excel or CSV data, incorporate existing layers, perform polygon splitting, use the converter for various formats, calculate isochrones, and utilize the Export Tool.

Use MAPOG for mapping and visualizing data across all domains. Its tools make analysis easy and accurate. Convert files to get data in the format you need.

Here are some other blogs you might be interested in:

Converting DXF to MIF : A Complete Guide

In this tutorial, we’ll guide you through converting a DXF file into MIF format using the Converter Tool in MAPOG. Whether you’re a beginner or have some familiarity with MAPOG, this straightforward guide will assist you in seamlessly transforming your DXF files into  MIF.

What is DXF Data Format:

DXF is short for Drawing Exchange Format or Drawing Interchange Format and is a type of vector file. Engineers, designers and architects often use the DXF format for 2D and 3D drawings during product design. This data format can be used in case of analyzing the maps. It can be of many types like point, line and polygon or any boundaries.

Online GIS Data Conversion

Converting DXF Data into MIF Format:

MAPOG includes an advanced Converter Tool that enables users to easily switch between various data formats to meet their specific needs. This tool simplifies the process of converting data for multiple GIS applications, offering both flexibility and efficiency in handling different formats. For instance, MAPOG’s Converter Tool can convert DXF data into the MIF format, reducing file size while preserving essential geographic details. This makes the data more suitable for web-based mapping and interactive platforms, ultimately enhancing workflows and significantly improving GIS data usability.

Steps to Convert DXF to MIF:

Step 1: Upload the Data :
  1. Go to “Process Reference Layers”  from the header and choose the “Converter Tool” option.

2.Upload your DXF file to start the conversion process by providing the data you wish to transform.

Step 2: Select the Output Format:

1.Choose MIF as your desired output format for exporting the data. While the tool provides multiple format options, this tutorial is specifically centered on converting your file into the MIF format.

2. You can also set the Output Coordinate Reference System (CRS) according to your spatial analysis requirements.

Step 3: Execute the Conversion:

Head over to ‘Convert Files’ and let the tool handle the conversion for you. Just upload your data, and the Converter Tool will automatically take care of converting your DXF file into MIF  format, making the process seamless and efficient.

Step 4: Verify and Download:

Inspect your converted MIF  data to confirm its correctness. After ensuring the results meet your expectations, proceed to download the file. This step is crucial to validate that the conversion was completed successfully and that your data integrity is maintained.

Result:

You’ve successfully converted DXF to MIF using MAPOG’s straightforward tools. This process not only simplifies your data management but also enhances the versatility of your data across different GIS platforms. For assistance or inquiries, contact us at support@mapog.com. Happy mapping!

With MAPOG’s versatile toolkit, you can effortlessly upload vectors and upload Excel or CSV data, incorporate existing layers, perform polygon splitting, use the converter for various formats, calculate isochrones, and utilize the Export Tool.

Use MAPOG for mapping and visualizing data across all domains. Its tools make analysis easy and accurate. Convert files to get data in the format you need.

Here are some other blogs you might be interested in:

Convert DXF to SQLITE: A Complete Guide

In this tutorial, we’ll guide you through Convert DXF to SQLITE using the Converter Tool in MAPOG. Whether you’re a beginner or have some familiarity with MAPOG, this straightforward guide will assist you in seamlessly transforming your DXF files into SQLITE.

What is DXF Data Format:

DXF is short for Drawing Exchange Format or Drawing Interchange Format and is a type of vector file. Engineers, designers and architects often use the DXF format for 2D and 3D drawings during product design. This data format can be used in case of analyzing the maps. It can be of many types like point, line and polygon or any boundaries.

 Online GIS Data Conversion

Converting DXF Data into SQLITE Format:

MAPOG offers a powerful Converter Tool designed to help users easily convert data between different formats based on their requirements. This tool simplifies data transformation for various GIS applications, providing both flexibility and efficiency in handling diverse formats. For example, MAPOG’s Converter Tool can transform DXF data into SQLITE format, optimizing file size while retaining critical geographic details. This conversion makes the data more suitable for online mapping and interactive platforms, improving workflows and greatly enhancing the overall usability of GIS data.

Steps to Convert DXF to SQLITE:

Step 1: Upload the Data :
  1. Go to “Process Reference layers”  from the header and choose the “Converter Tool” option.

2. Upload your DXF file to start the conversion process by providing the data you wish to transform.

Step 2: Select the Output Format:

Choose SQLITE as your desired output format for exporting the data. While the tool provides multiple format options, this tutorial is specifically centered on converting your file into the SQLITE format.

2. You can also set the Output Coordinate Reference System (CRS) according to your spatial analysis requirements.

Step 3: Execute the conversion:

Head over to ‘Convert Files’ and let the tool handle the conversion for you. Just upload your data, and the Converter Tool will automatically take care of converting your DXF file into SQLITE format, making the process seamless and efficient.

Step 4: Verify and Download:

Inspect your converted SQLITE data to confirm its correctness. After ensuring the results meet your expectations, proceed to download the file. This step is crucial to validate that the conversion was completed successfully and that your data integrity is maintained.

Result:

You’ve successfully converted DXF to SQLITE using MAPOG’s straightforward tools. This process not only simplifies your data management but also enhances the versatility of your data across different GIS platforms. For assistance or inquiries, contact us at support@mapog.com. Happy mapping!

With MAPOG’s versatile toolkit, you can effortlessly upload vectors and upload Excel or CSV data, incorporate existing layers, perform polygon splitting, use the converter for various formats, calculate isochrones, and utilize the Export Tool.

Use MAPOG for mapping and visualizing data across all domains. Its tools make analysis easy and accurate. Convert files to get data in the format you need.

Here are some other blogs you might be interested in:

How to Convert SHP to KMZ Easily: Complete Step-by-Step Guide for GIS Users

A crucial part of the GIS process involves file conversion, which ensures that information flows smoothly across different platforms. To make this process effortless, the MAPOG Converter Tool comes into play—it allows users to quickly and efficiently convert data between multiple formats.

What is SHP File?

In GIS, one of the most commonly used geographic vector data formats is the SHP file (Shapefile). It stores both the attribute data, which describes the features, and the geometry, which includes points, lines, and polygons. Additionally, SHP files work seamlessly with applications like ArcGIS and QGIS, making them ideal for mapping locations, boundaries, and other spatial data. Moreover, these files often come with additional supporting files that store related information.

Online GIS Data Conversion

Key Concept for Conversion SHP to KMZ:

To make the conversion process even smoother, MAPOG’s Converter Tool provides a simple and intuitive platform. With its user-friendly interface, users can move through each step without any hassle. Whether you want to convert SHP to KMZ or any other format, MAPOG ensures that the process is both fast and accurate.

Step-by-Step Guide to Converting SHP to KMZ

Step 1: Upload the Data

Start by selecting the “Process Data” section in MAPOG Map Analysis. From there, choose the “Converter Tool” option.

Before uploading your SHP file, make sure it is ready for conversion.

Step 2: Select the Format for Conversion

Next, select KMZ as the output format. KMZ is widely used for displaying geographic data in Google Earth and other web-based mapping platforms, making it a versatile format for visualization and sharing.

Step 3: Execute the Conversion

Once you’ve chosen the KMZ format and set the CRS, proceed with the conversion process.

The MAPOG tool will efficiently convert your SHP file into KMZ format, allowing for easy integration into Google Earth and similar tools.

Step 4: Review and Download

After the conversion is complete, review the output to ensure the data was accurately converted. Finally, download the KMZ file.

Conclusion:

The MAPOG Converter Tool simplifies the process of converting data between different formats, making it an essential resource for GIS professionals. By following these simple steps, you can easily convert SHP files to KMZ format, ensuring your data is ready for use in web mapping applications and interactive visualizations.

Additional Tools for Further Analysis:

With MAPOG’s versatile toolkit, you can effortlessly upload vectors and upload Excel or CSV data, incorporate existing layers, perform polygon splitting, use the converter for various formats, calculate isochrones, and utilize the Export Tool.

Learn About MAPOG:

MAPOG is perfect for people who want to use visually striking and interactive maps to make their data come to life. It lets you build engaging narratives by connecting maps with visuals like text and images. Producing shareable content is made easy with MAPOG, whether you’re marketing a project, giving a tour or presenting research.

Here are some other blogs you might be interested in:

Convert SQLITE to DXF: A Step-by-Step Guide

This tutorial provides a clear and detailed walkthrough for converting a SQLITE file into DXF format using the Converter Tool in MAPOG. Whether you’re a beginner or have some experience with MAPOG, this guide will help you smoothly convert your SQLITE files to DXF.

What is SQLITE Data Format:

A file with .sqlite extension is a lightweight SQL database file created with the SQLITE software. It is a database in a file itself and implements a self-contained, full-featured, highly-reliable SQL database engine. SQLITE database files can be used to share rich contents between systems by simple exchanging these files over the network. Almost all mobiles and computers use SQLITE for storing and sharing of data, and is the choice of file format for cross-platform applications. Due to its compact use and easy usability, it comes bundled inside other applications. SQLITE bindings exist for programming languages such as C, C#, C++, Java, PHP, and many others.

Online GIS Data Conversion

Converting SQLITE Data into DXF Format:

Converter Tool in MAPOG enables users to seamlessly convert data between different formats based on their specific needs. This tool simplifies the data transformation process for a variety of GIS applications, ensuring both flexibility and efficiency when working with multiple file types. For instance, MAPOG’s Converter Tool can convert SQLITE data into DXF format, reducing file size while preserving essential geographic information. This conversion improves the data’s compatibility with online mapping and interactive platforms, ultimately enhancing workflows and significantly increasing GIS data usability.

                      Steps to Convert SQLITE to DXF:

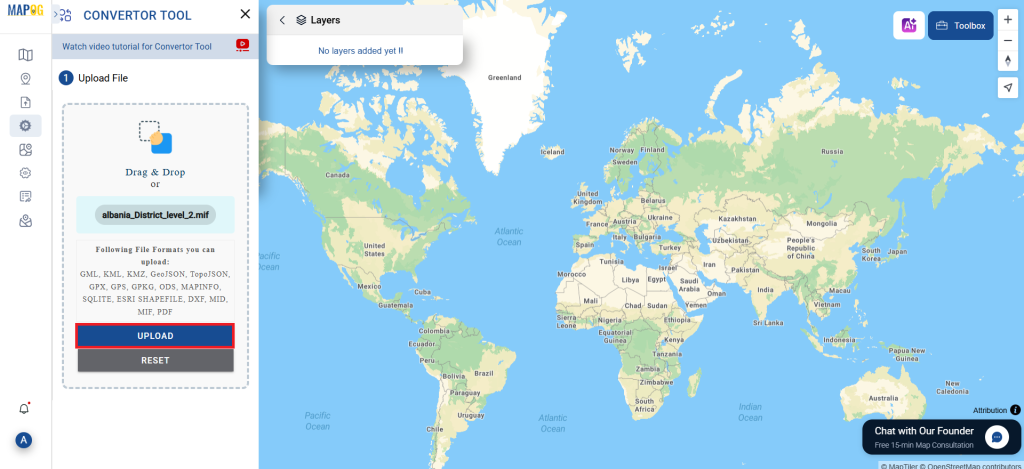
Step 1: Upload the Data:

Navigate to the header menu, click on “Process Data,” and then choose the “Converter Tool” option to begin.

2.To start the conversion, upload your SQLITE file by selecting the data you want to convert.
Step 2: Choose the Output Format

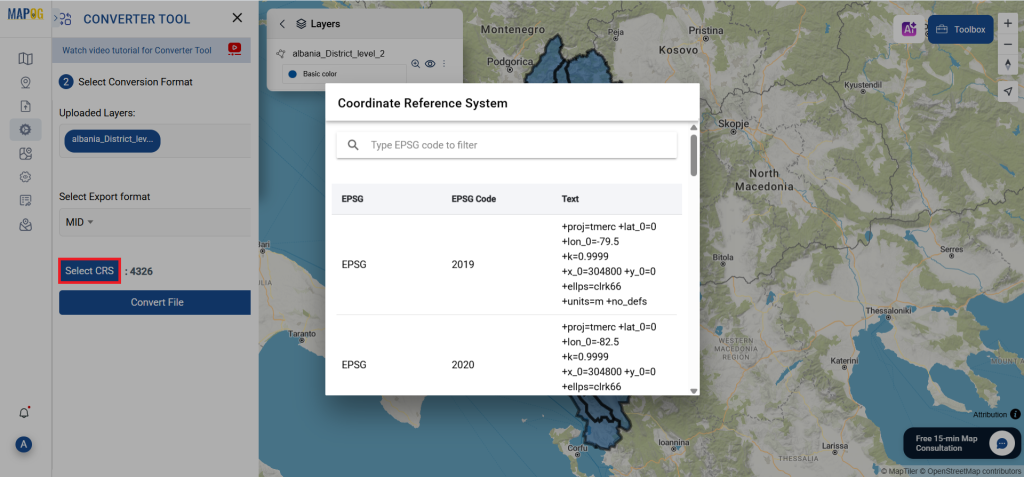
1.Set DXF as the desired output format for your data export. While the Converter Tool provides various format options, this guide is specifically dedicated to converting your file into the DXF format.

2. You can also Choose the Output Coordinate Reference System (CRS) according to your spatial analysis requirement.

Step 3: Execute the Conversion:

Head over to the ‘Convert Files’ section, and allow the tool to handle the conversion process for you. Just upload your SQLITE file, and the Converter Tool will seamlessly transform it into DXF format, making the conversion quick and easy.
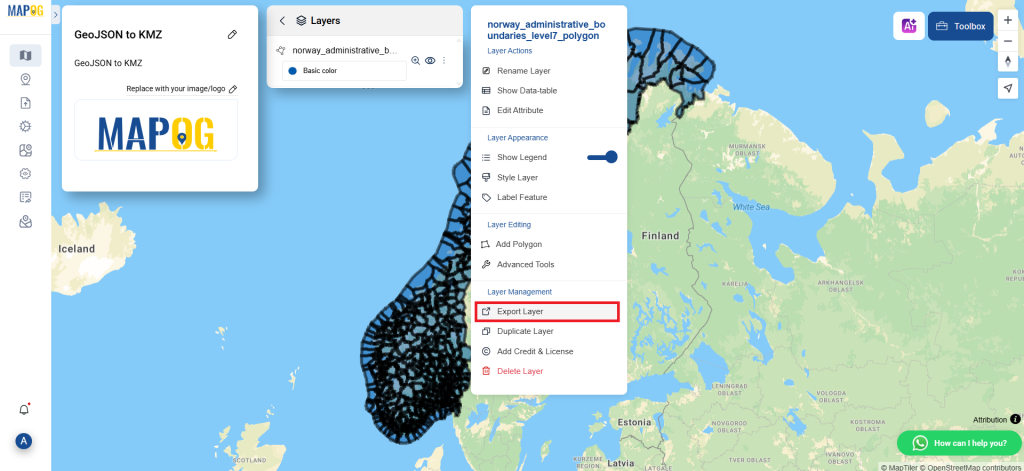
Step 4: Review and Download:

Review your converted DXF file to confirm its accuracy. After ensuring that the conversion is correct and meets your requirements, proceed to download the file. This step is crucial to validate that the conversion was successful and that your data has been accurately preserved.

Additional Tools for Further Analysis:

With MAPOG’s versatile toolkit, you can effortlessly upload vectors and upload Excel or CSV data, incorporate existing layers, perform polygon splitting, use the converter for various formats, calculate isochrones, and utilize the Export Tool.

These blogs may also be useful for you:

Convert DXF to JPEG Online – Easy Step-by-Step Guide

In this tutorial, we’ll walk you through the process of convert DXF to JPEG format using the Converter Tool in MAPOG. Whether you’re new to MAPOG or have some experience, this easy-to-follow guide will help you confidently convert your DXF files to JPEG.

What is DXF Data Format:

DXF is short for Drawing Exchange Format or Drawing Interchange Format and is a type of vector file. Engineers, designers and architects often use the DXF format for 2D and 3D drawings during product design. This data format can be used in case of analyzing the maps. It can be of many types like point, line and polygon or any boundaries.

 Online GIS Data Conversion

Converting DXF Data into JPEG Format:

MAPOG offers a versatile Converter Tool, allowing users to easily convert data between formats to meet their specific needs. This tool streamlines the process of adapting data for a wide range of GIS applications, ensuring both flexibility and efficiency when managing different file types. For instance, MAPOG’s Converter Tool can convert DXF data into JPEG format, effectively reducing file size while preserving essential geographic details. This makes the data better suited for online mapping and interactive platforms. Ultimately, this enhances workflows and greatly improves the overall usability of GIS data.

Steps for Converting DXF to JPEG

Step 1: Upload Your Data:
  1. Go to “Process Reference layers” and choose the “Converter Tool” option.

2.Upload your DXF file to start the conversion process by providing the data you wish to transform.

Step 2: Choose the Output Format:
  1. Select JPEG as the output format to export your data. Although the tool offers several format options, this guide focuses specifically on converting your file to JPEG.

2. You can also set the Output CRS according to your spatial analysis requirements.

Step 3: Run the Conversion:

Head over to ‘Convert Files’ and let the tool handle the conversion for you. Just upload your data, and the Converter Tool will automatically take care of converting your DXF file into JPEG format, making the process seamless and efficient.

Step 4: Review and Download:

Review your converted JPEG data to verify its accuracy. Once you are satisfied with the results, download the file. This step ensures that the conversion was successful and that your data is correctly preserved.

Result:

You’ve successfully converted DXF to JPEG using MAPOG’s straightforward tools. This process not only simplifies your data management but also enhances the versatility of your data across different GIS platforms. For assistance or inquiries, contact us at support@mapog.com. Happy mapping!

With MAPOG’s versatile toolkit, you can effortlessly upload vectors and upload Excel or CSV data, incorporate existing layers, perform polygon splitting, use the converter for various formats, calculate isochrones, and utilize the Export Tool.

Use MAPOG for mapping and visualizing data across all domains. Its tools make analysis easy and accurate. Convert files to get data in the format you need.

Here are some other blogs you might be interested in:

How to Convert MapInfo Files to GPKG (GeoPackage) Format: Step-by-Step Guide

File conversion plays a vital role in the GIS workflow, as it allows data to be used effectively across different platforms and applications. In this context, the Converter Tool in MAPOG simplifies the entire process, making data conversion quick and efficient between various formats.

What is MapInfo File?

MapInfo Professional, a widely used geographic information system software, works with a file format known as a MapInfo file. This format stores geographic data such as boundaries, points of interest, and maps. Moreover, it supports building and analyzing maps, which proves highly useful in fields like environmental studies, urban planning, and many other applications involving spatial data.

Online GIS Data Conversion

Key Concept for Conversion MapInfo to GPKG:

To bridge the gap between formats, the Converter Tool in MAPOG offers a user-friendly platform. In addition, its intuitive design ensures that users can carry out conversions without unnecessary complexity. Consequently, even tasks that might seem challenging become easier to complete. Furthermore, this accessibility empowers a wider range of users, from beginners to professionals, to manage their data effectively.

Step-by-Step Guide to Converting MapInfo to GPKG

Step 1: Upload the Data

Open MAPOG and navigate to the Process Data option. From that option, select the Converter Tool option. Ensure that your MapInfo file is ready for conversion before uploading it.

To begin the conversion, upload your MapInfo file by selecting the data you want to convert.

Step 2: Select the Format for Conversion

Next, choose GPKG as your output format. This step allows you to identify the target format for your data, ensuring that it is compatible with applications that support the GeoPackage standard.

Step 3: Choose the Output Coordinate Reference System (CRS)

Select the appropriate Coordinate Reference System for your GPKG file based on your specific requirements. This ensures that your data is correctly georeferenced, which is crucial for accurate mapping and analysis.

Step 4: Execute the Conversion

Once your options are set, finish the conversion process. The tool will successfully process the MapInfo file, converting it into the GPKG format.

Step 5: Review and Download

After the conversion is complete, review the output to ensure that the data has been accurately converted. Finally, download the GPKG file, which is now ready for further analysis.

Conclusion:

The MAPOG Converter Tool simplifies the process of converting data between different formats, making it an invaluable resource for GIS professionals. By following these simple steps, you can easily convert MapInfo files to GPKG format, ensuring that your data is ready for a wide range of applications. If you need to download any data file in CSV or in any other formats like KML, DXF, TOPOJSON. visit GIS DATA. Here we have 900+ data layers for 200+ countries.

Additional Tools for Further Analysis:

With MAPOG’s versatile toolkit, you can effortlessly upload vectors and upload Excel or CSV data, incorporate existing layers, perform polygon splitting, use the converter for various formats, calculate isochrones, and utilize the Export Tool.

Learn About MAPOG:

For users who wish to create dynamic and eye-catching maps that visually engage, MAPOG is ideal. By combining maps with multimedia components like text and photographs, it enables you to create compelling stories. Making shareable content is simple with MAPOG, whether you’re leading a tour, presenting research, or promoting a project.

Here are some other blogs you might be interested in:
Exit mobile version
💬 Book a Meeting
%%footer%%