Convert Online GPS to GPX and in other formats

This guide will walk you through the simple process of converting GPS files to the GPX format using the Converter Tool within MAPOG. Whether you’re a first-time user or a seasoned expert, you’ll find that converting GPS to GPX is straightforward when broken down into clear, manageable steps.

Key Concepts in File Conversion

The Converter Tool in MAPOG Map Analysis is a powerful feature designed to transform your data from one format to another seamlessly. Think of it as a magic tool that takes your data in one form and outputs it in another, perfectly tailored for your needs. With GIS data, you have the flexibility to download in any format, making it adaptable for various uses.

Online GPS to GPX GIS Conversion

Step 1: Upload Your Data

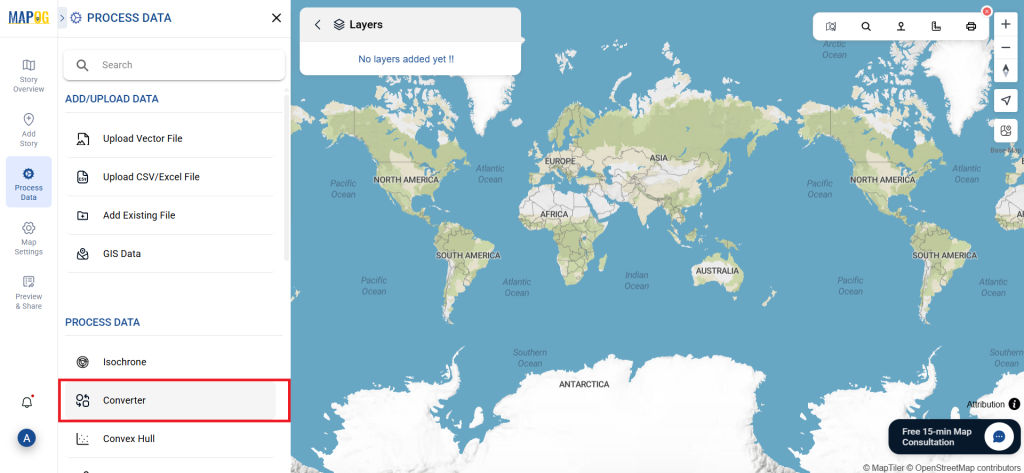
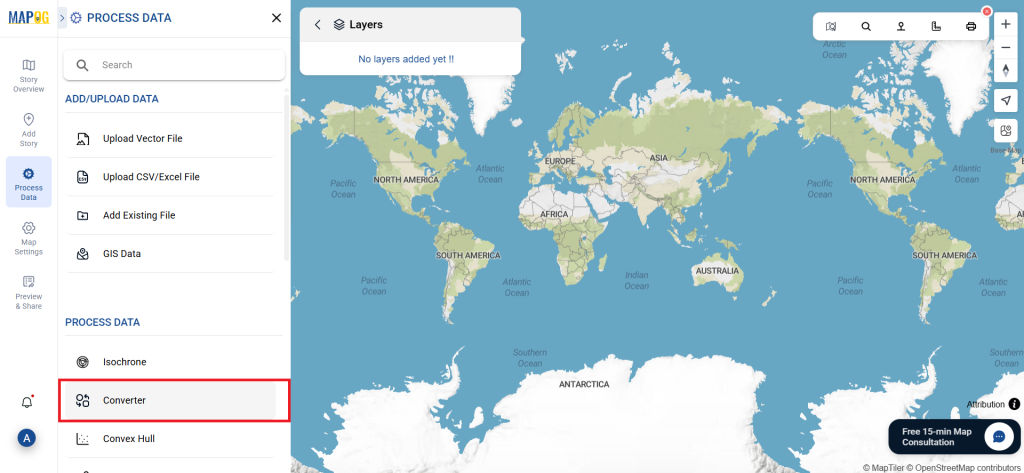
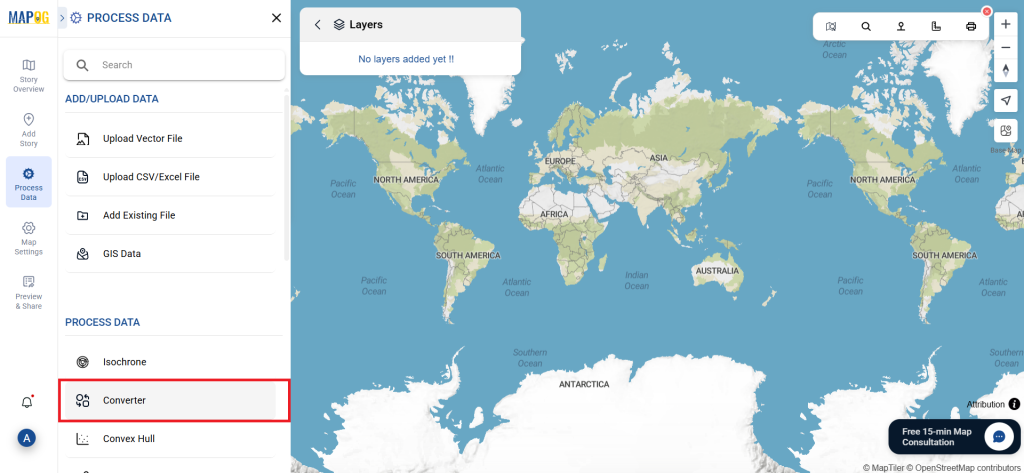
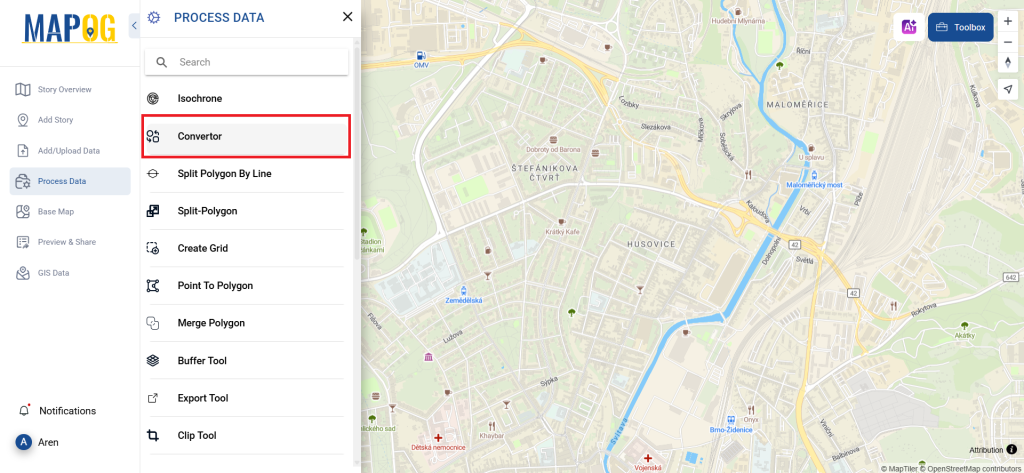
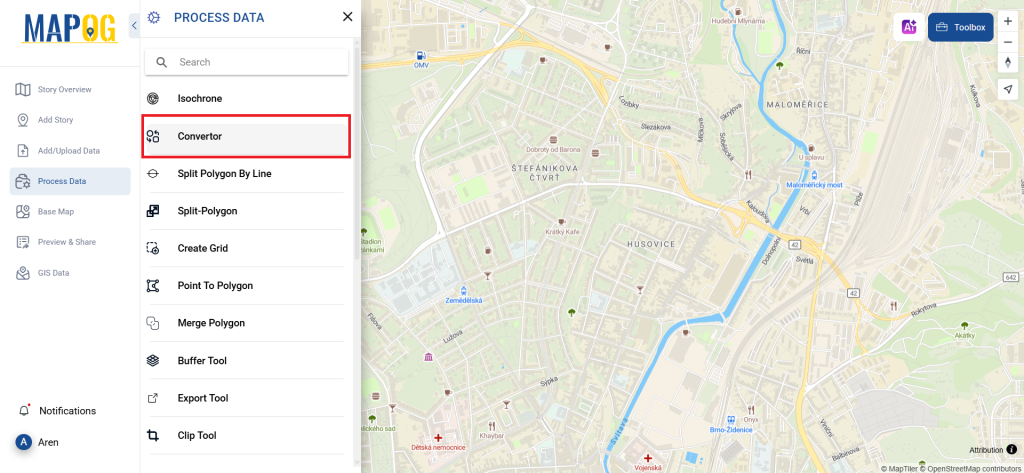
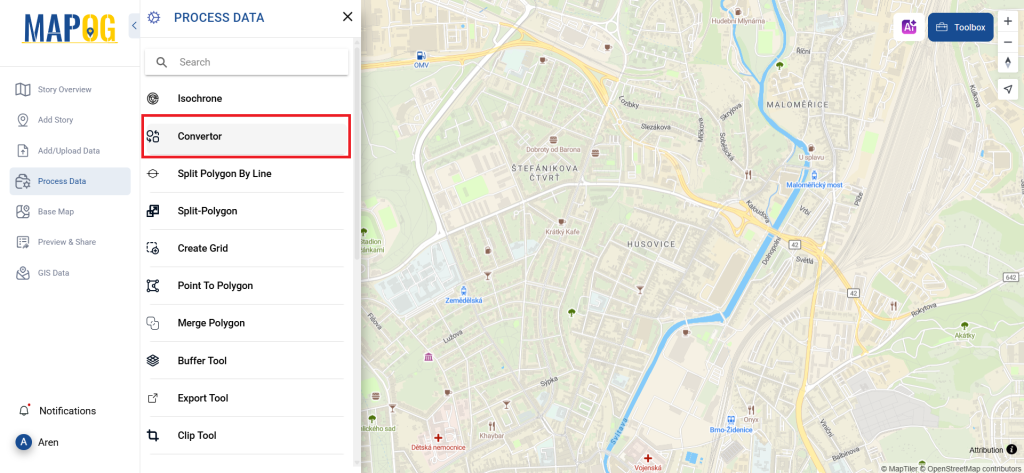
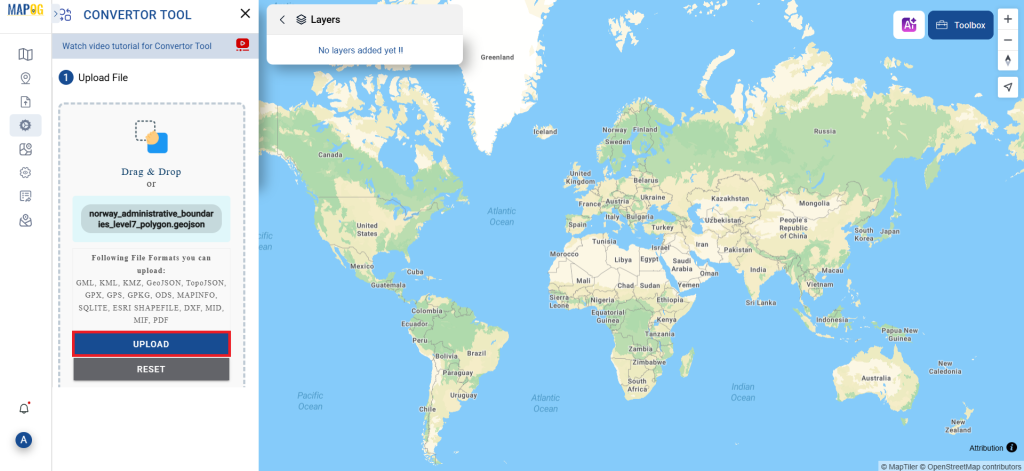
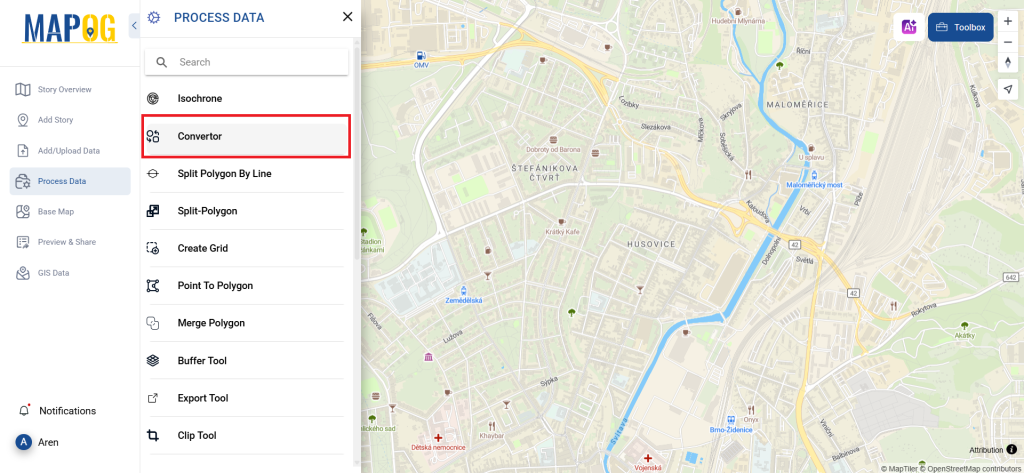
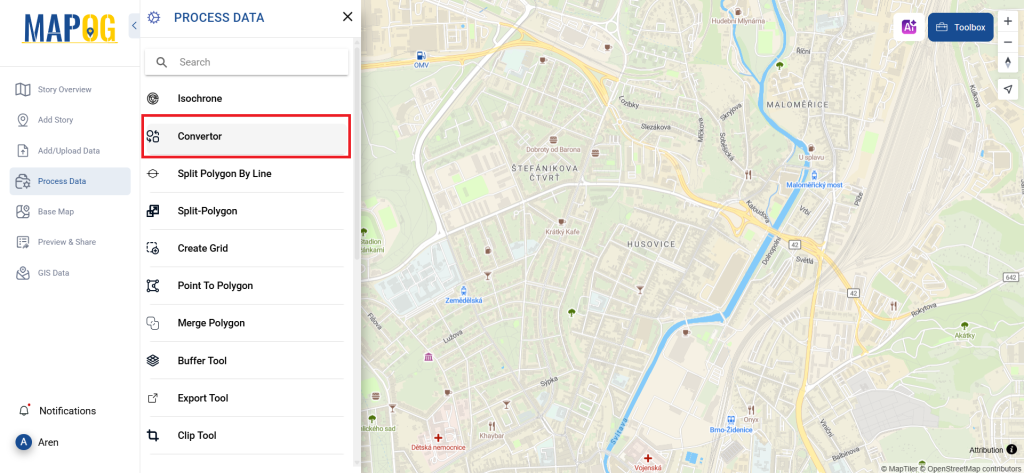
To begin, select your data by going to the “Process Data” section and then navigate to the “Converter Tool.”

GPS to GPX

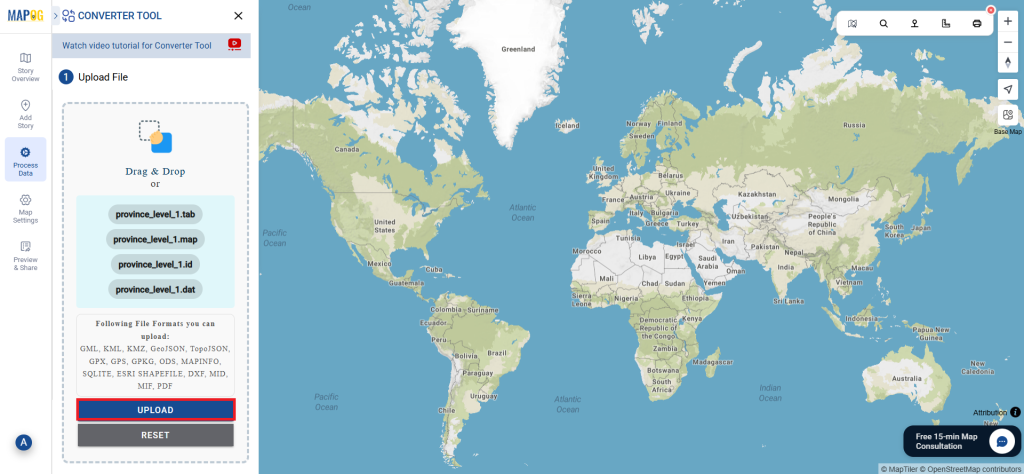
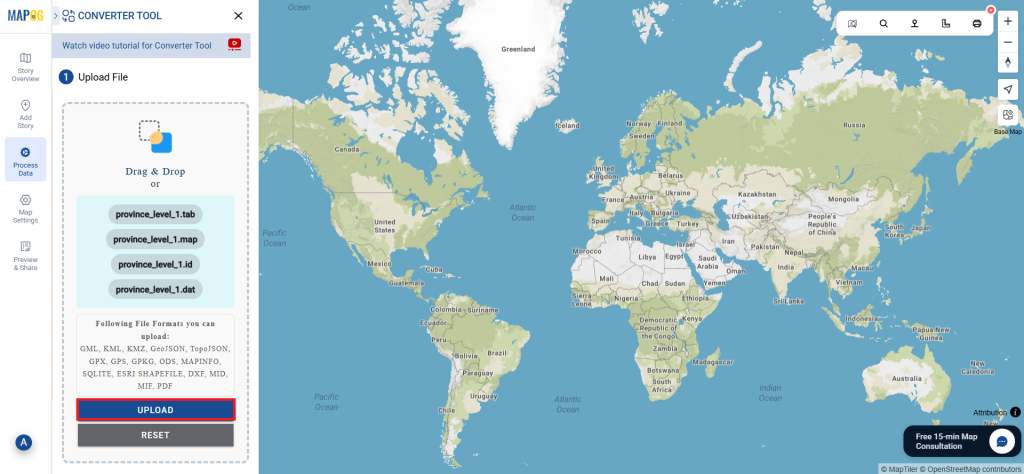
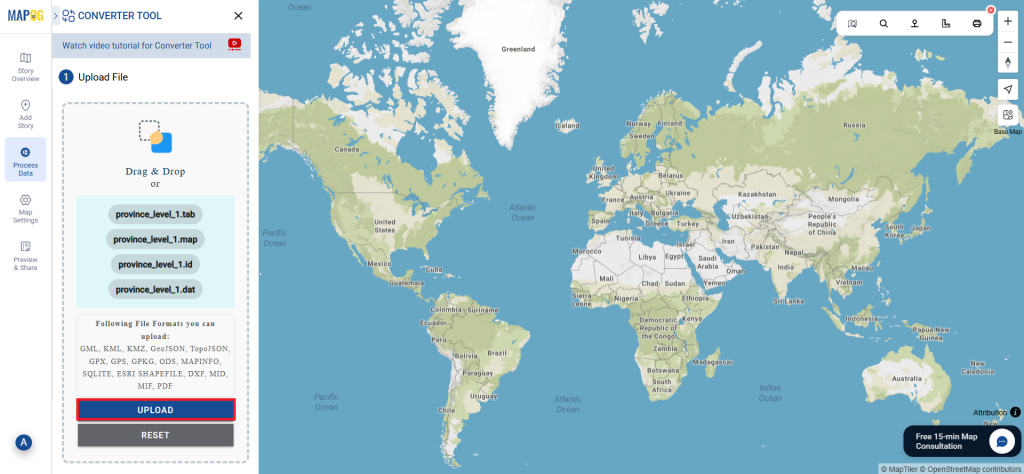
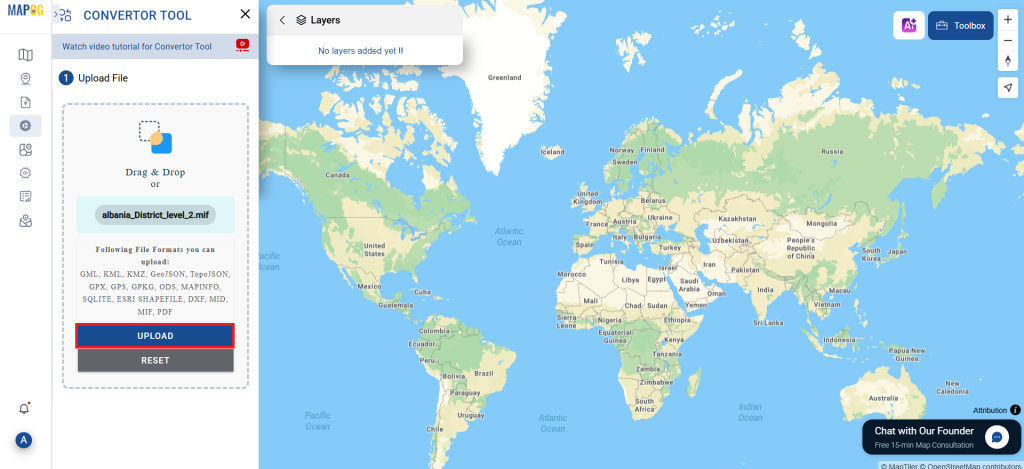
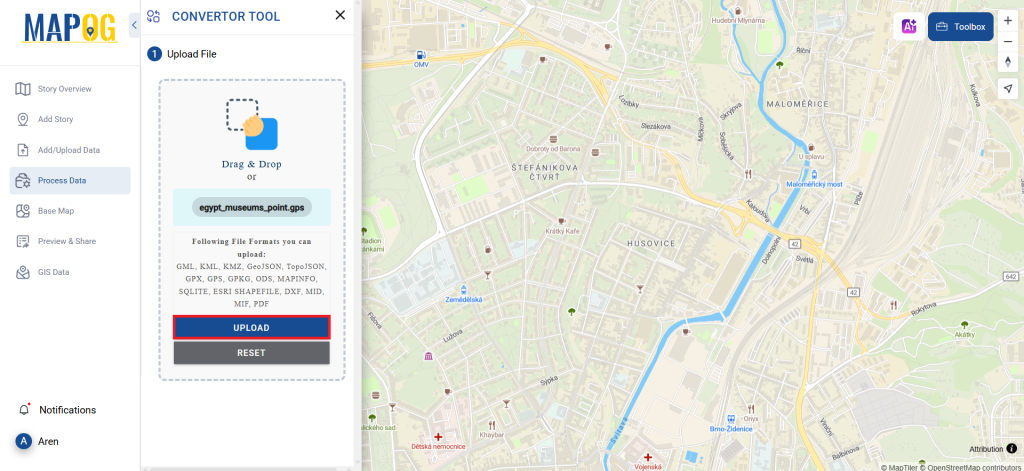
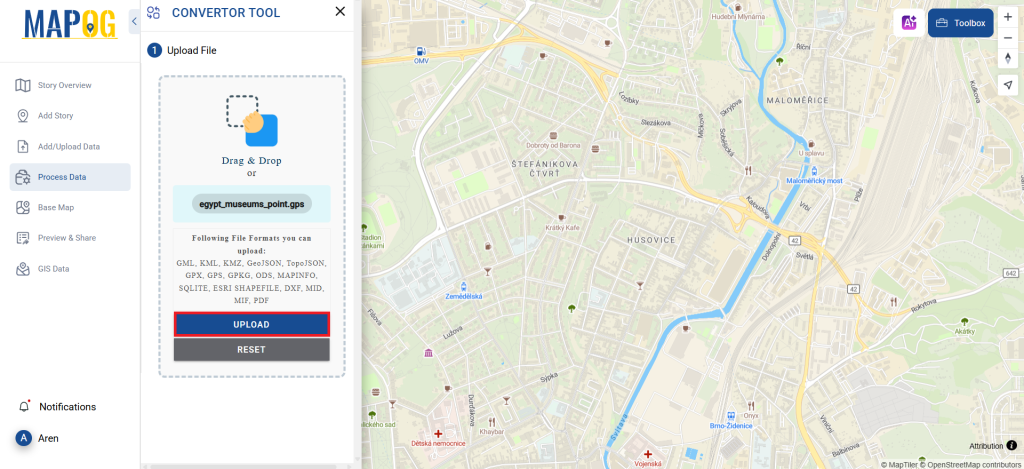
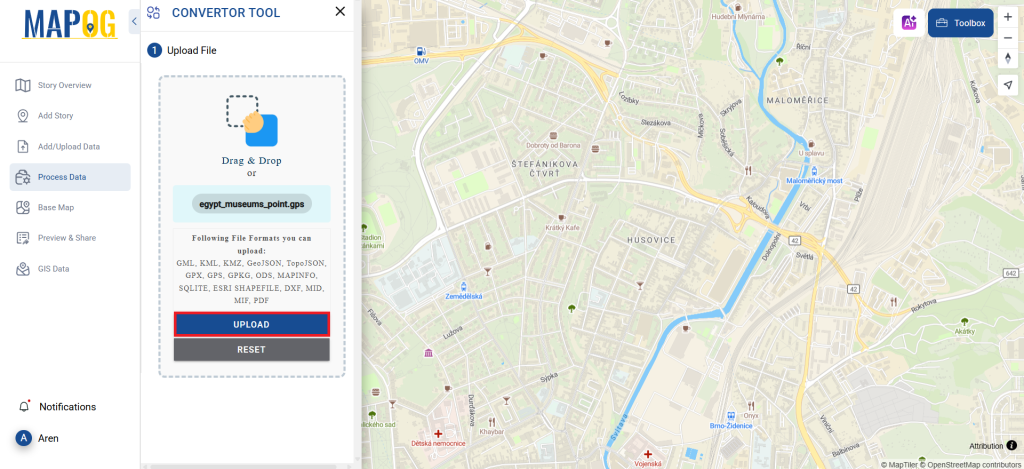
Upload your GPS file, which serves as the starting point for the conversion process.

GPS to GPX

Step 2: Choose the Output Format

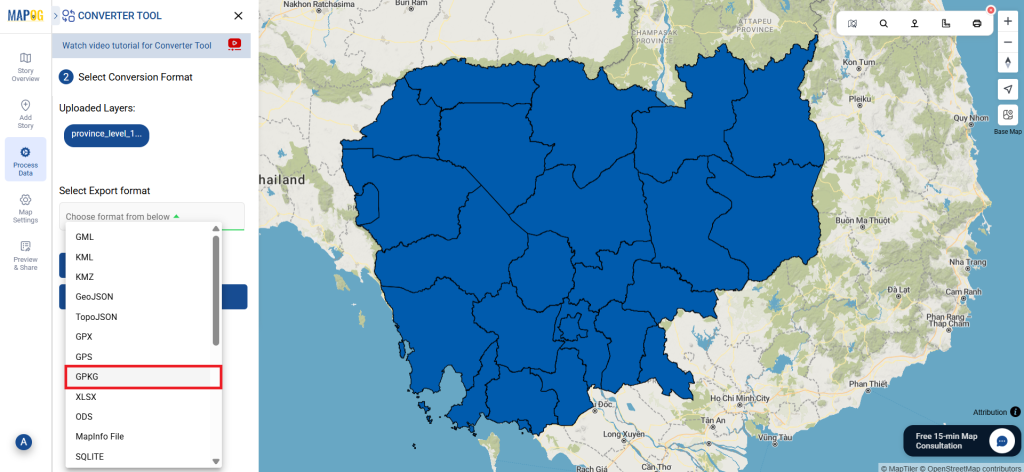
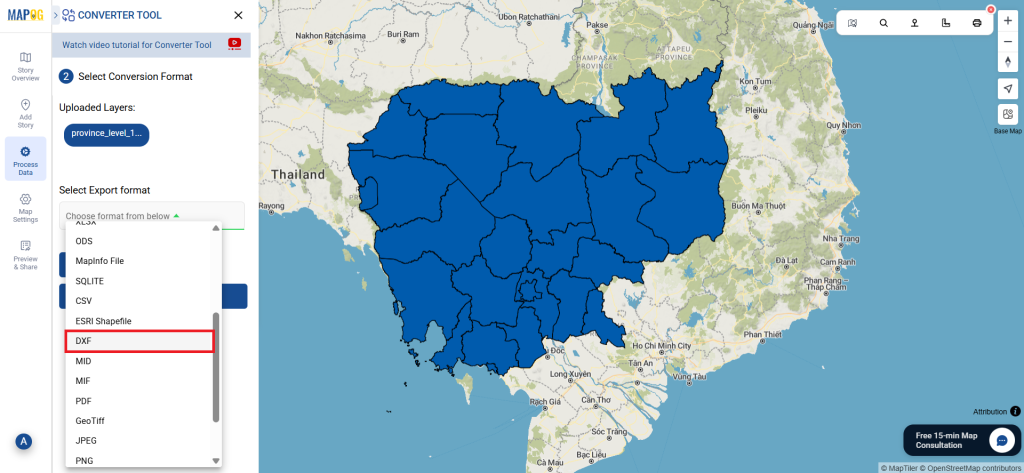
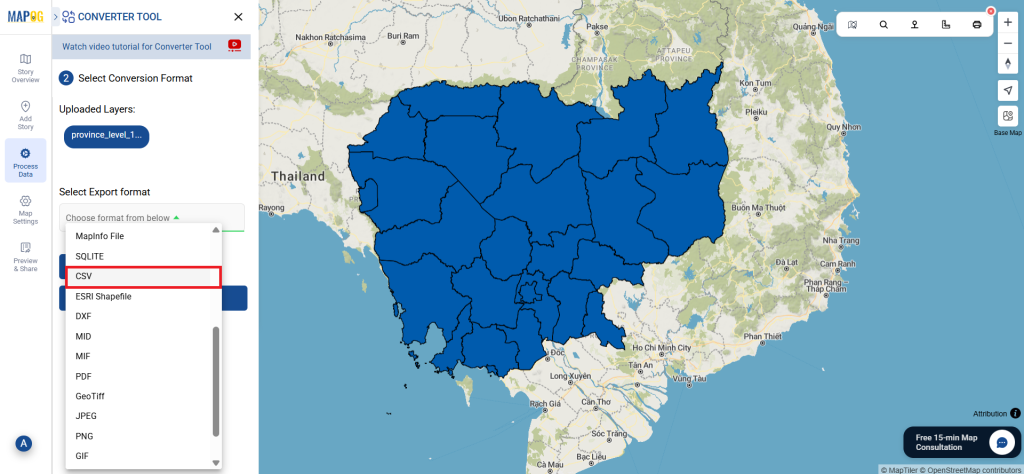
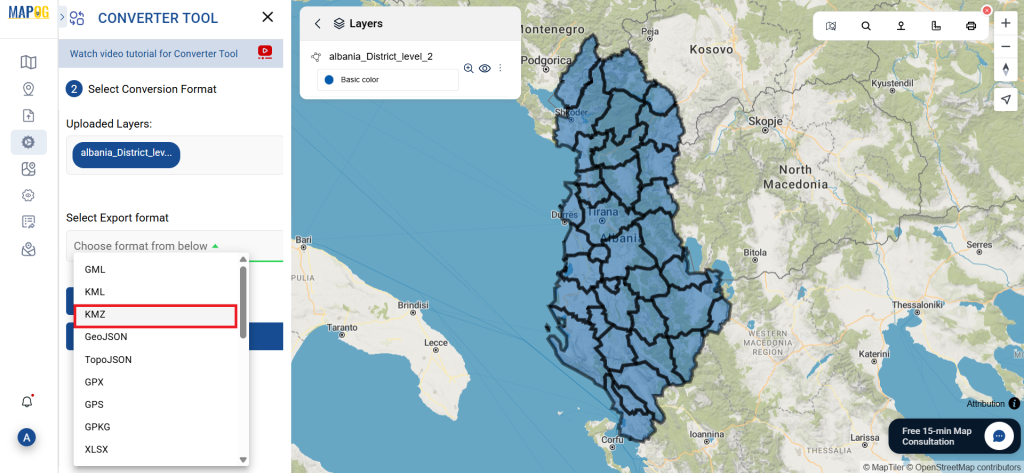
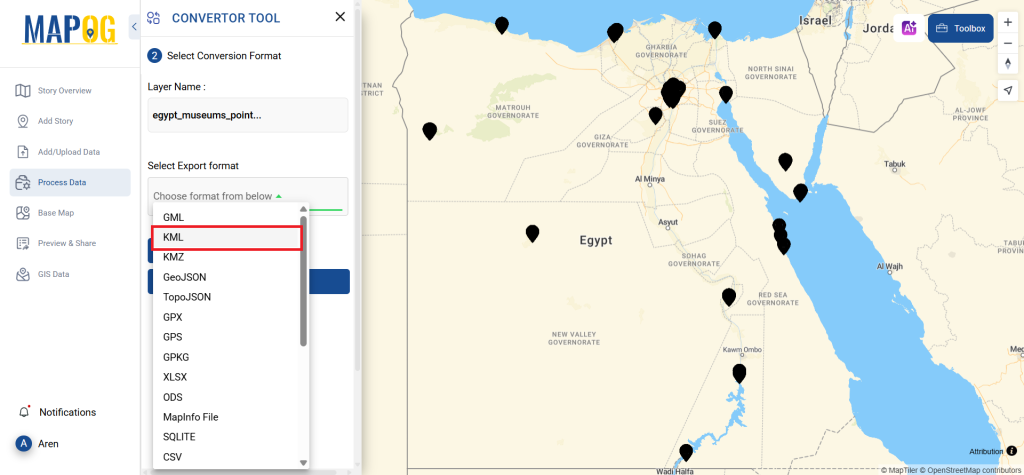
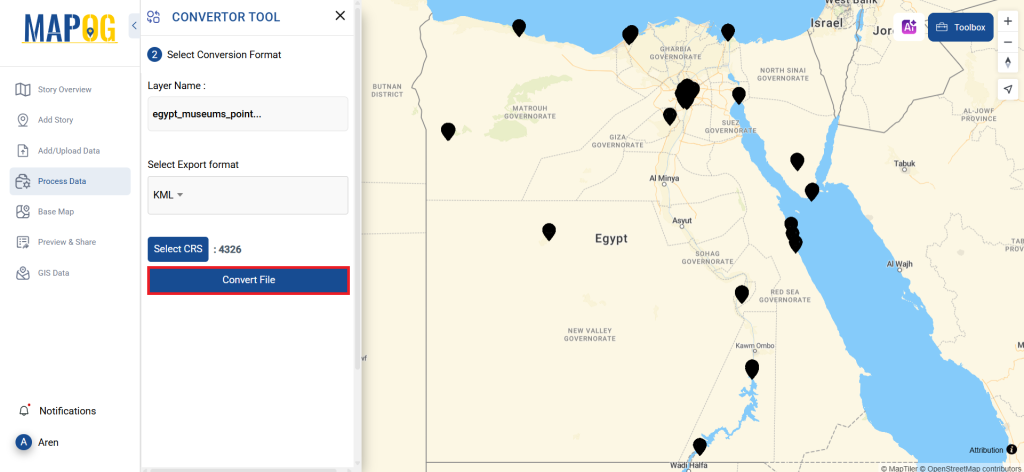
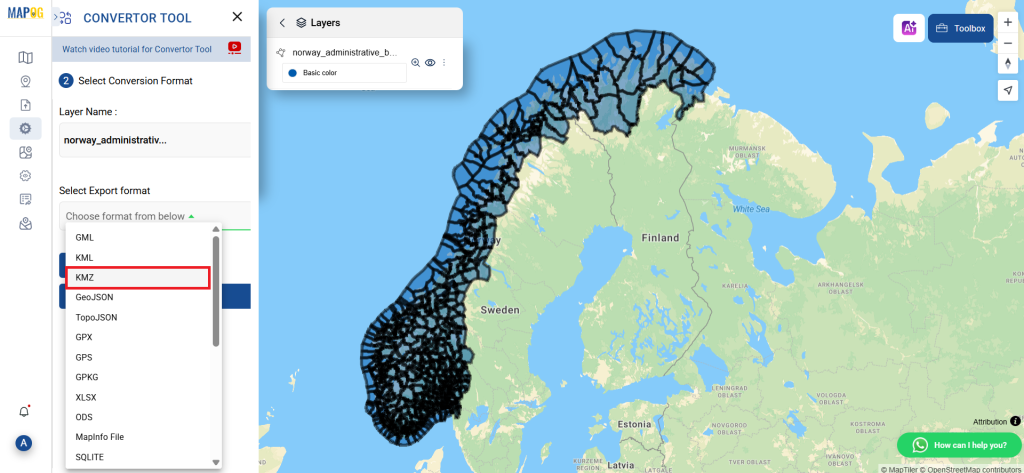
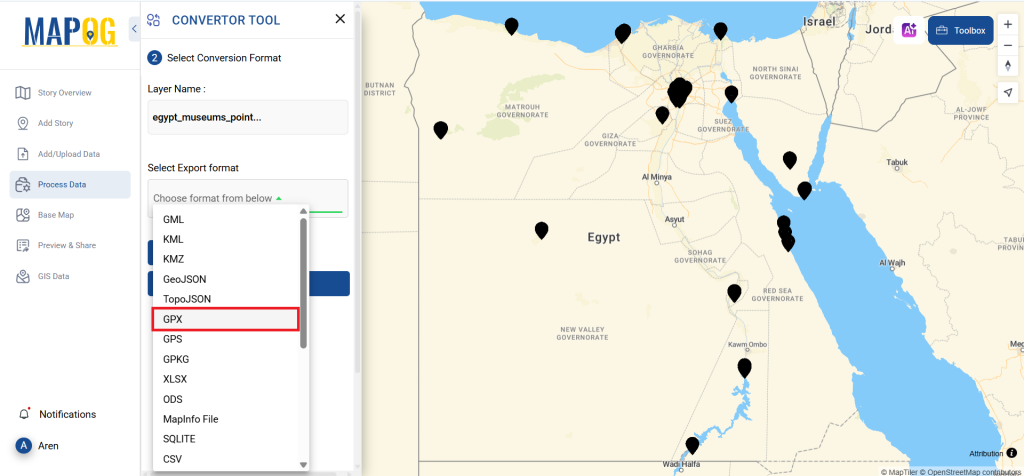
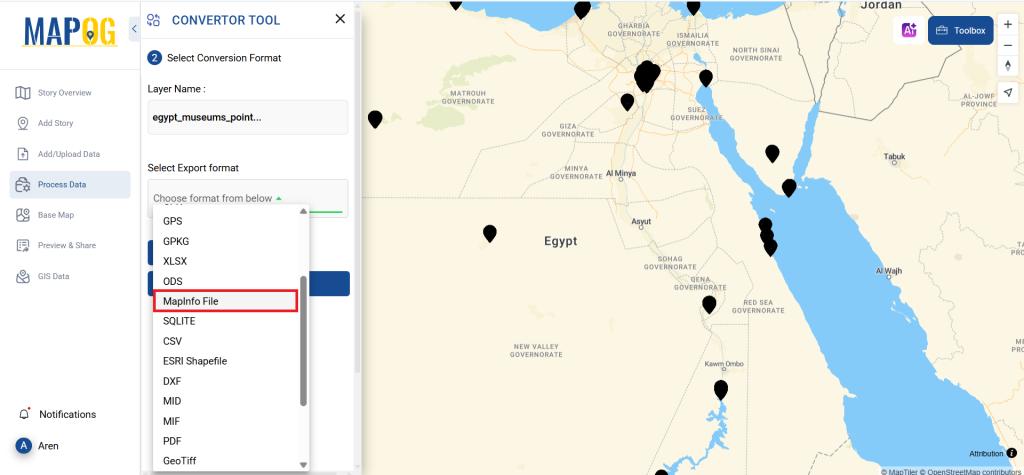
Next, select GPX as the output format. Although the tool offers multiple options for conversion, this guide focuses on converting your GPS file to GPX, ensuring the process is as straightforward as possible.

GPS to GPX

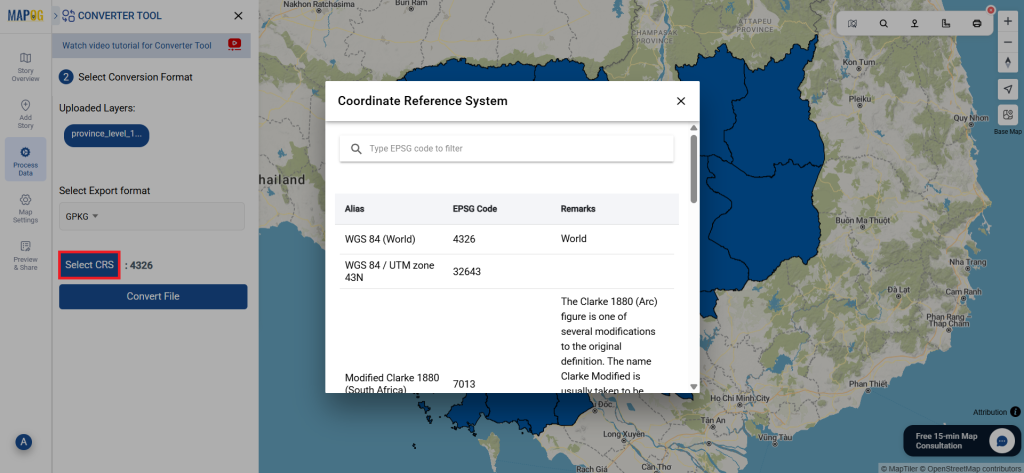
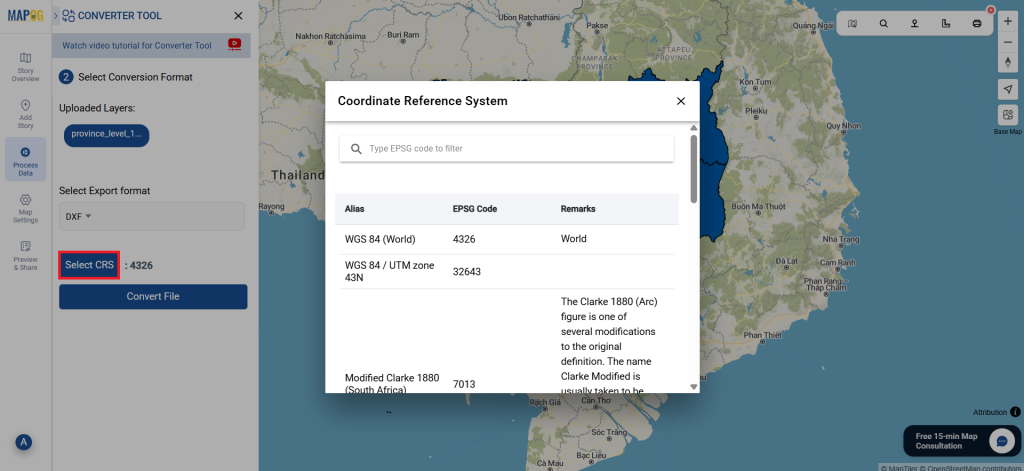
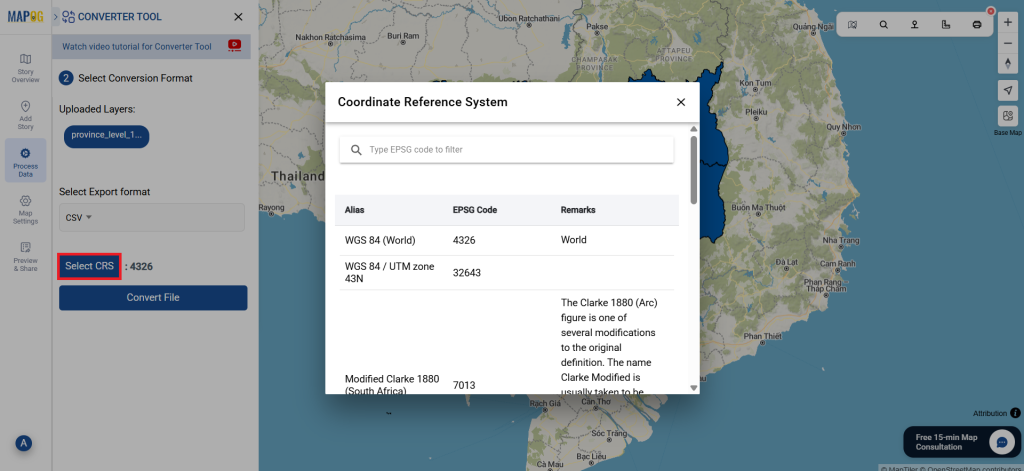
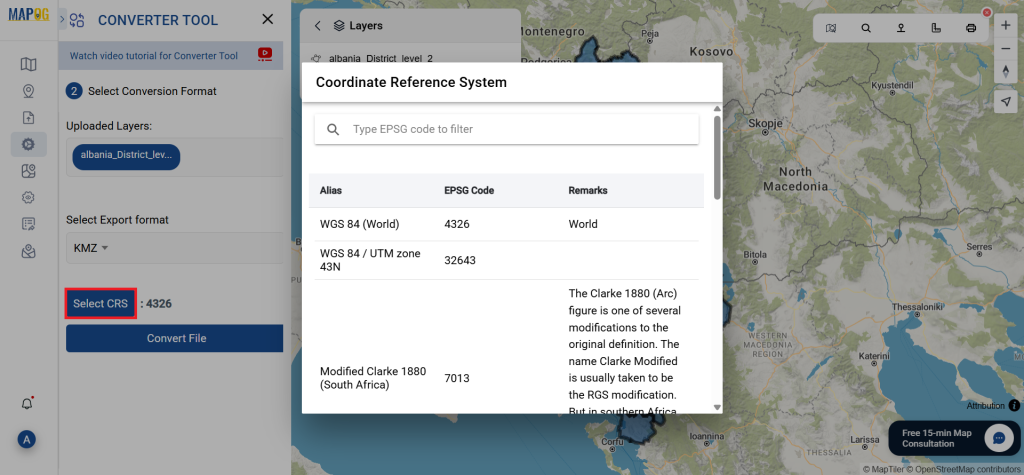
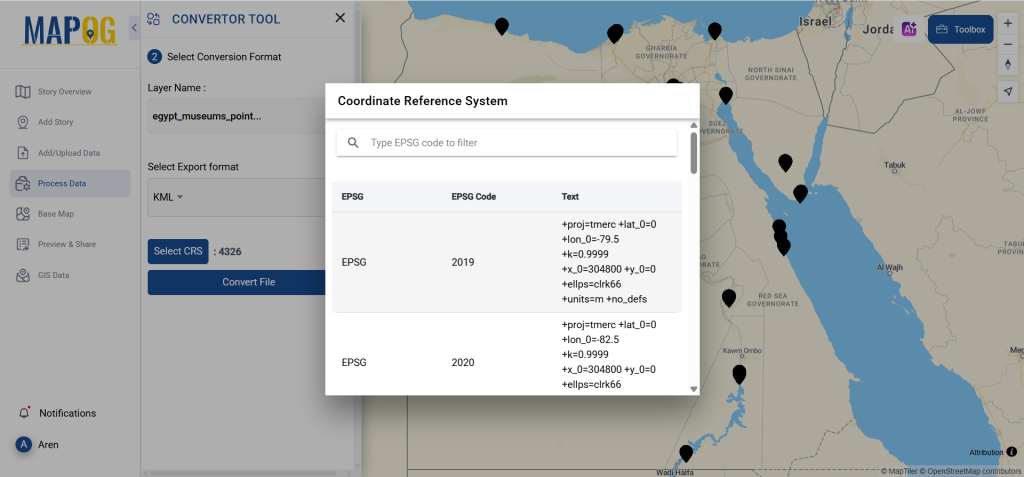
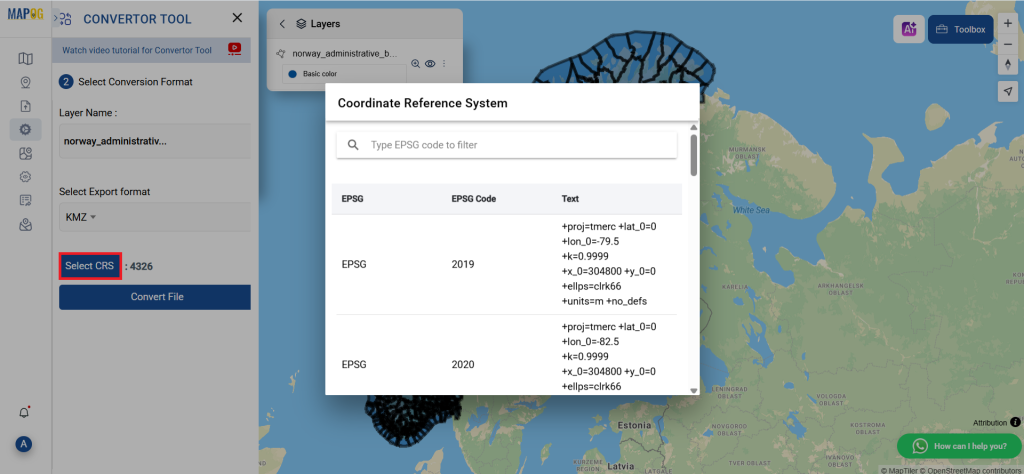
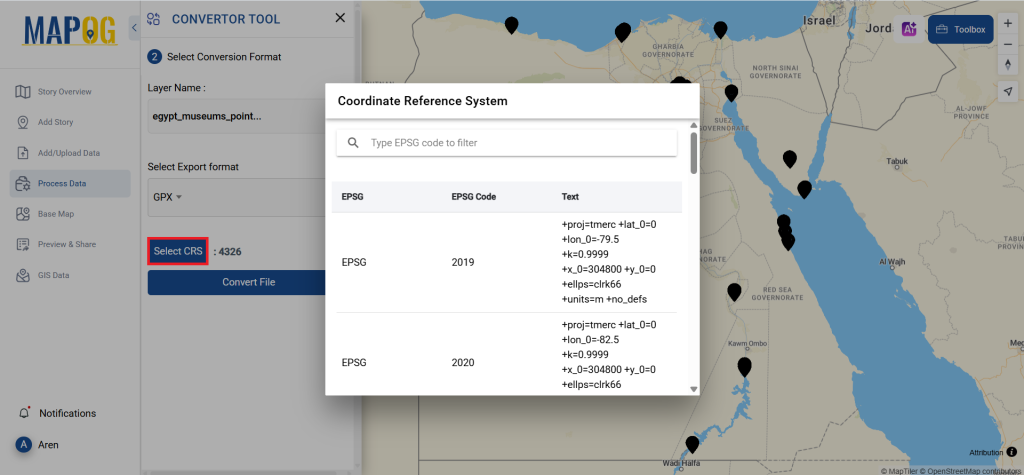
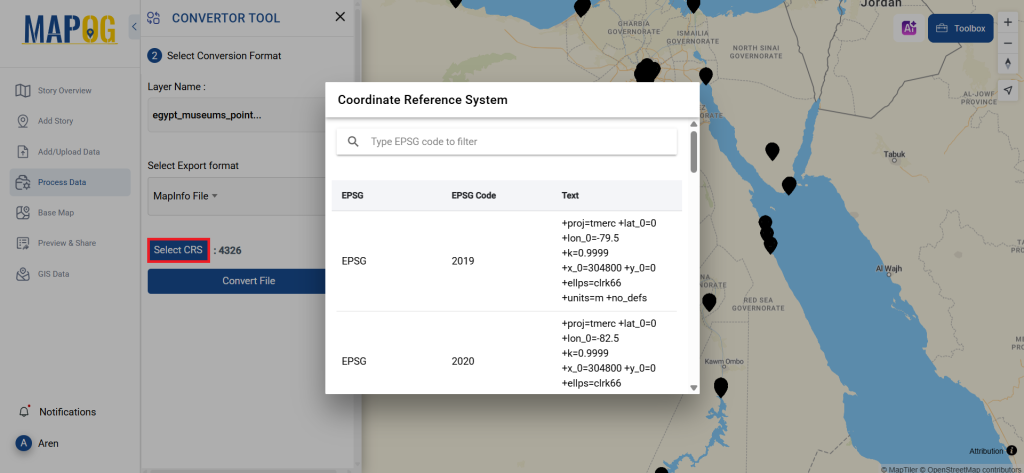
you can also set the CRS to make sure your data aligns perfectly with the needs of your spatial analysis.

GPS to GPX

Step 3: Execute the Conversion

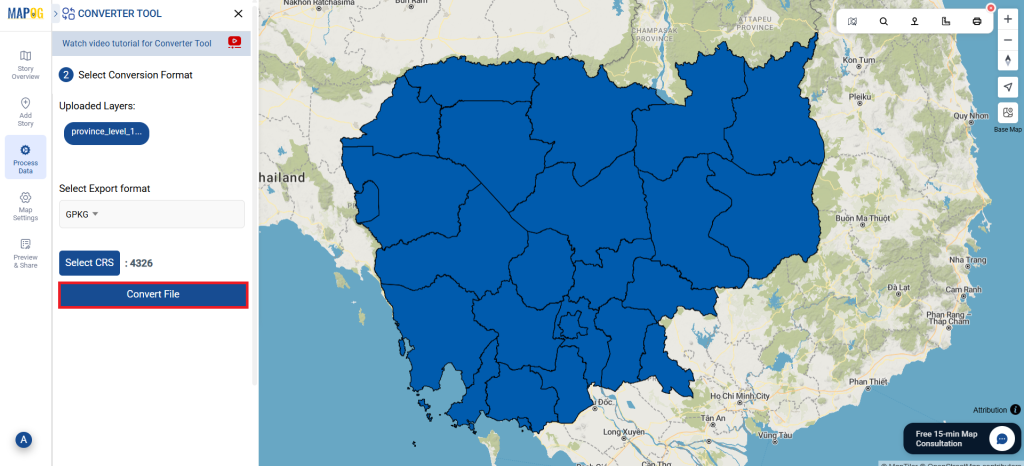
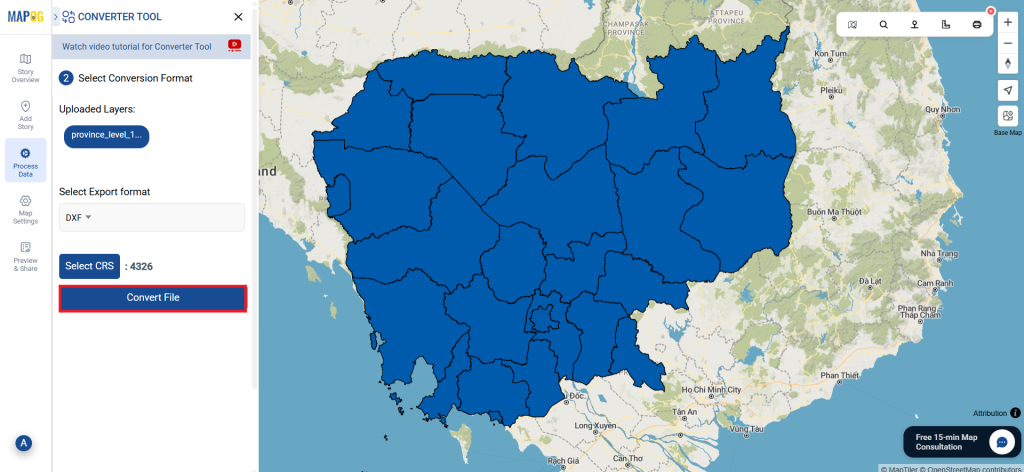
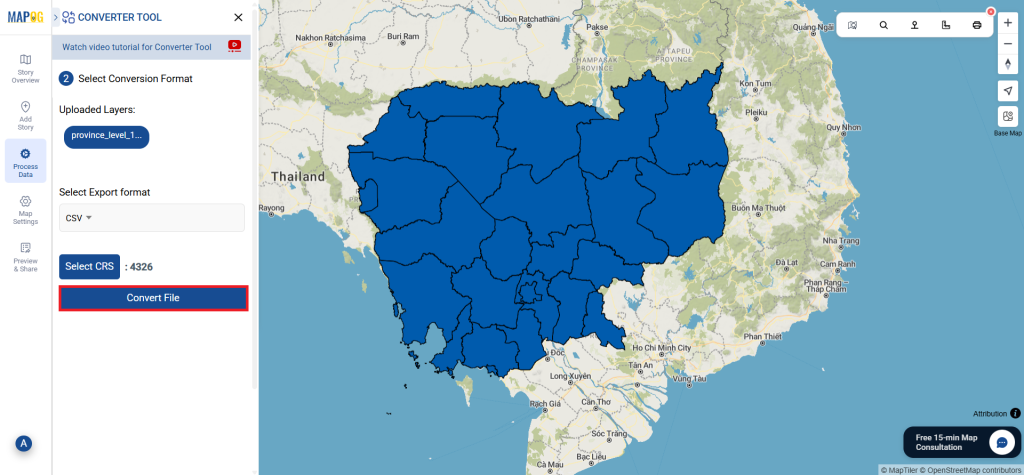
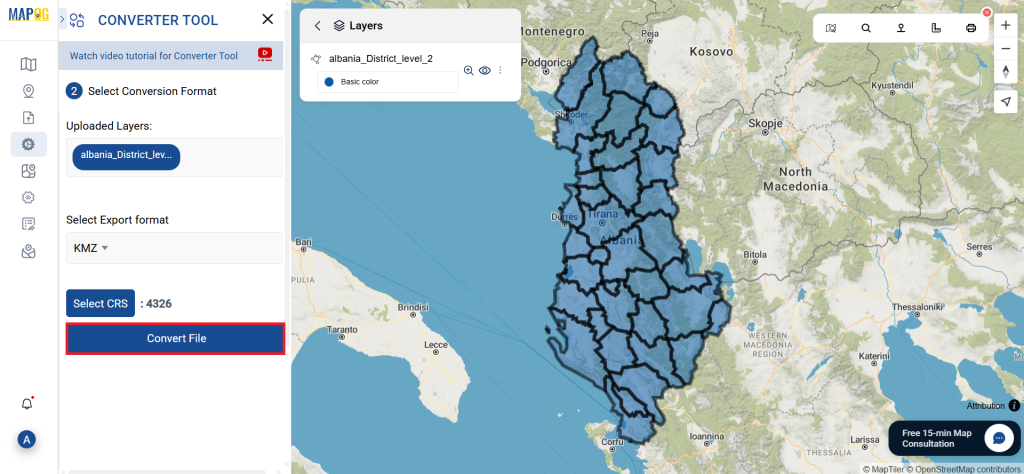
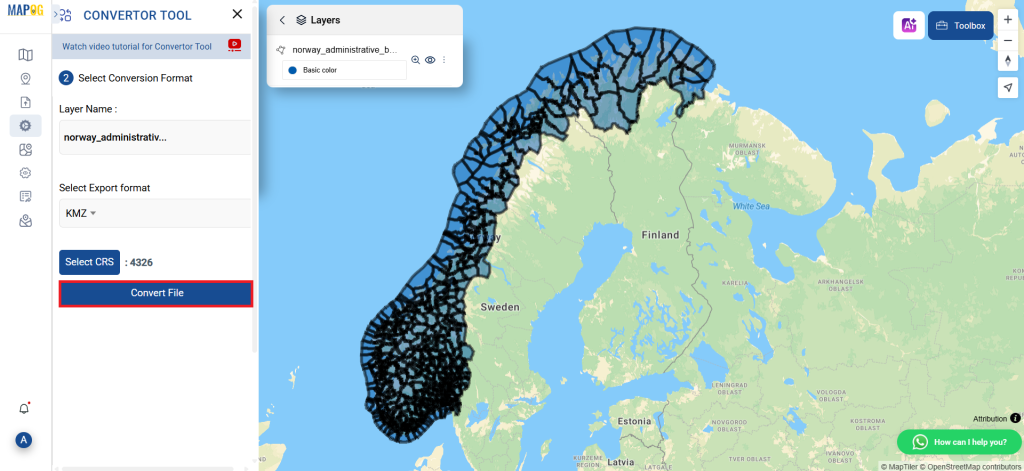
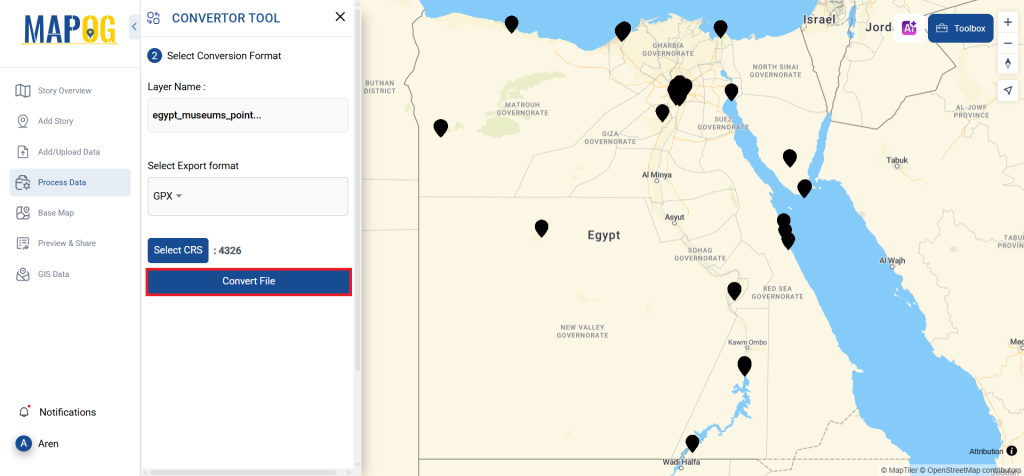
After selecting your format, proceed to the ‘Convert Files’ option. The Converter Tool will then work its magic, transforming your GPS data into the GPX format.

GPS to GPX

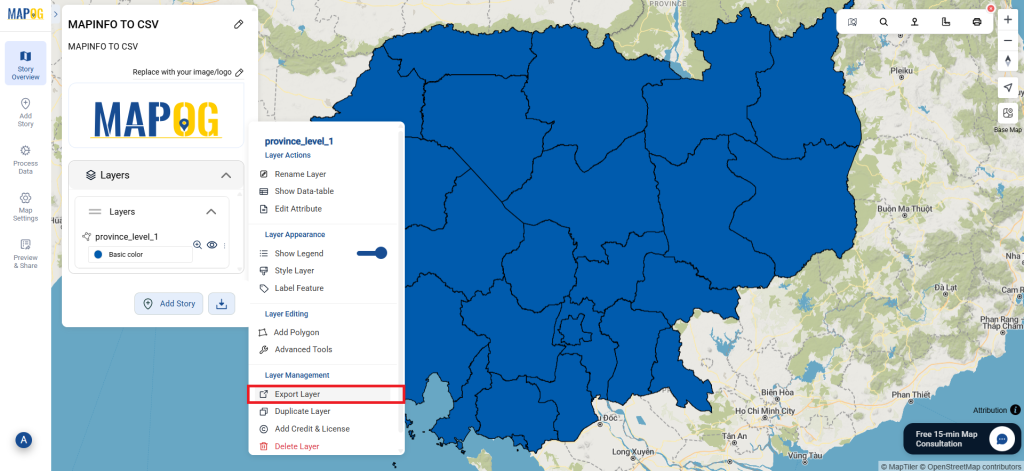
Step 4: Review and Download

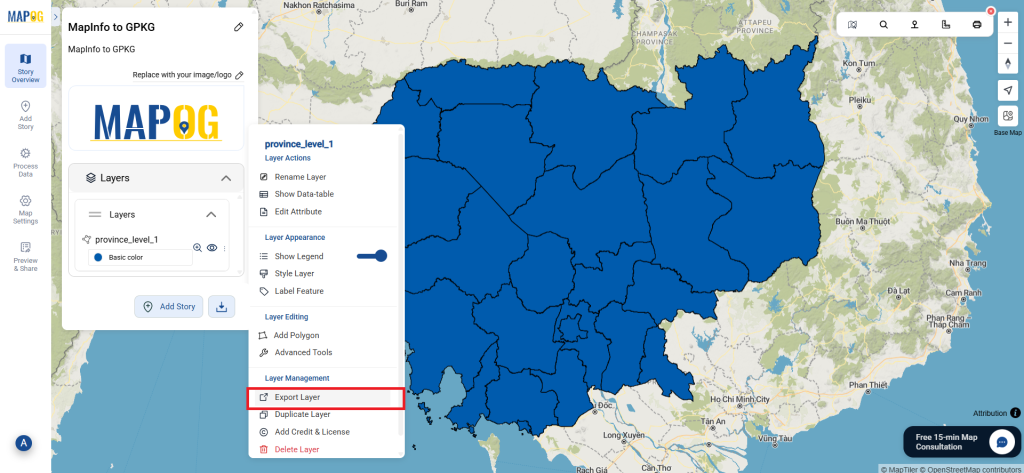
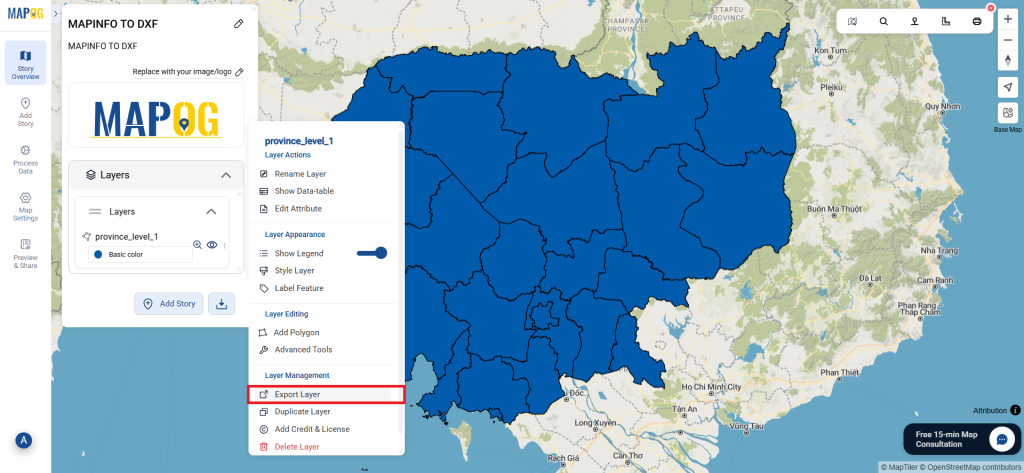
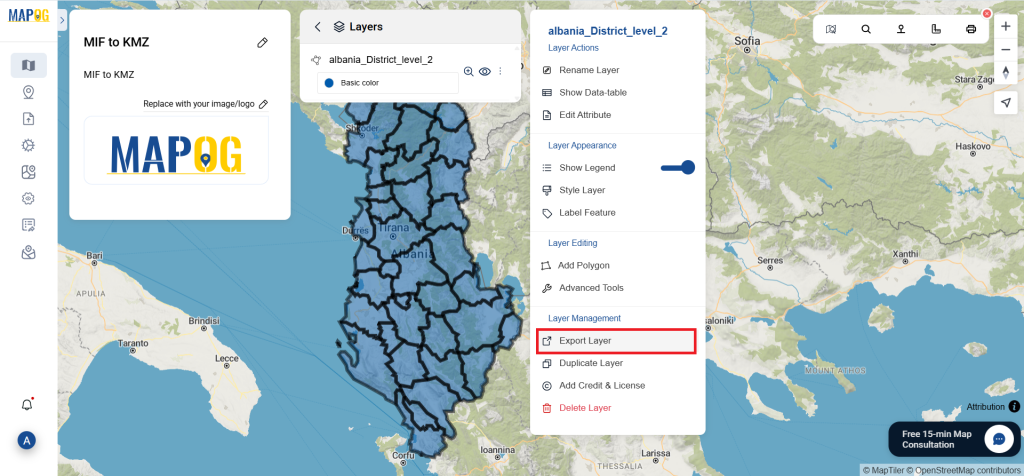
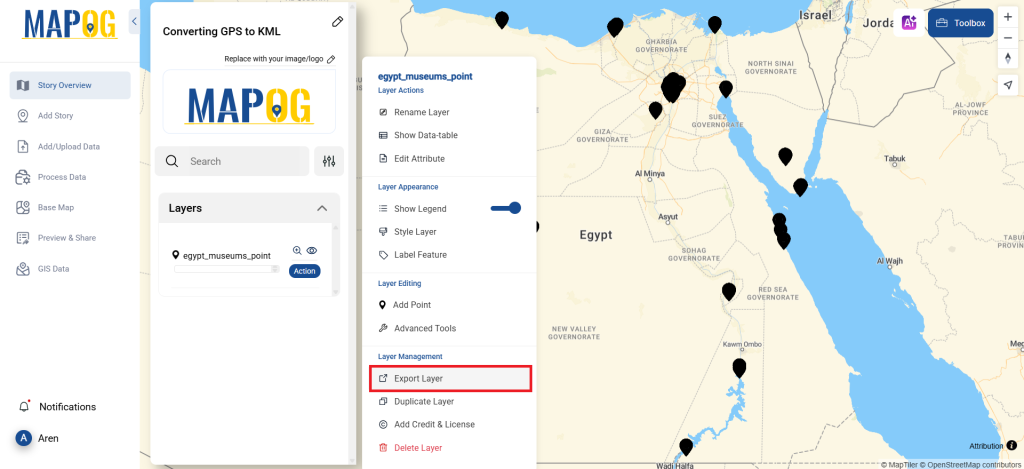
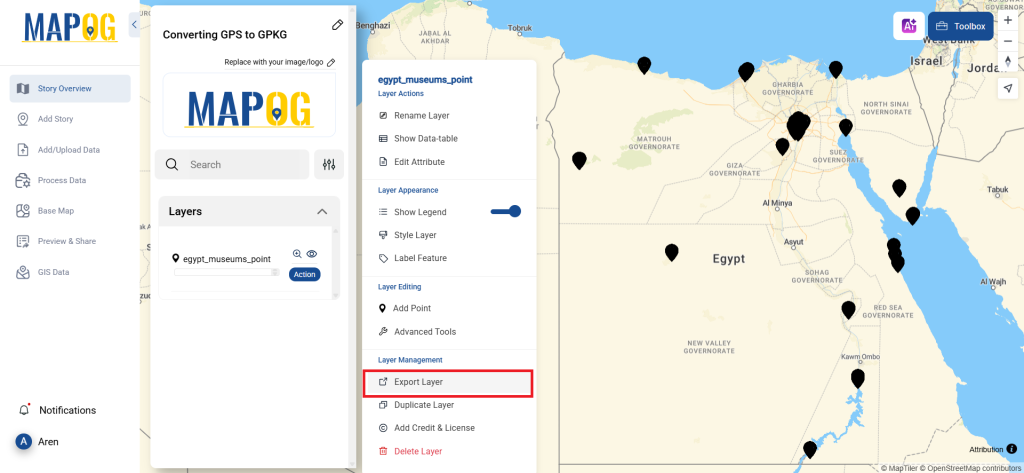
Once the conversion is complete, take a moment to review your GPX file. This step is crucial to confirm that everything has converted correctly. If all looks good, you can download the GPX file, confident that the conversion was successful and your data remains intact.

GPS to GPX

Step 5: Create Isochrones

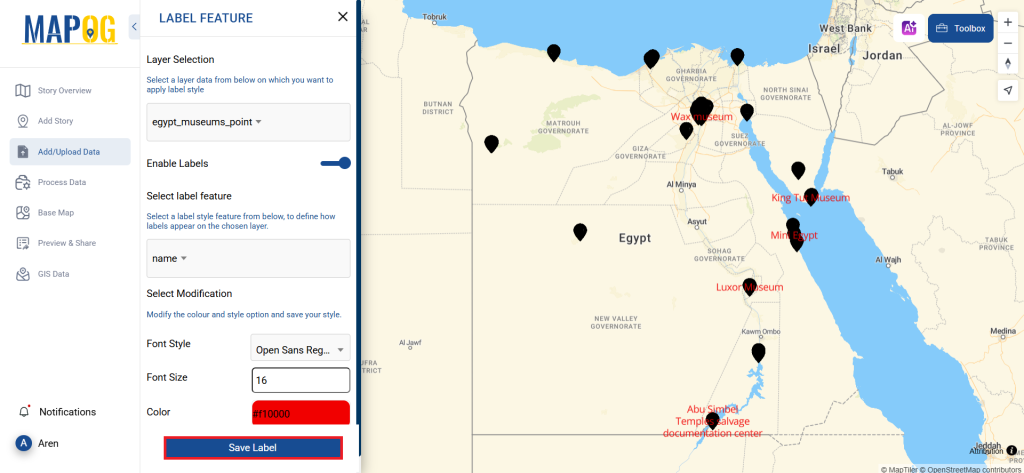
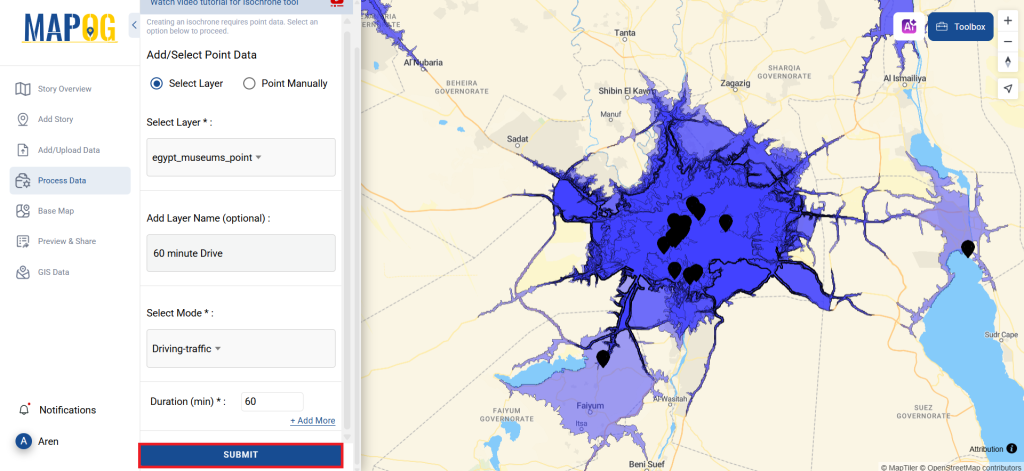
To create isochrones, click the Process data option, select the Isochrone Option, enter the converted file in the select layer option, then provide a layer name and select the mode, provide duration and click on submit. By doing that isochrones will be created around the Museum points.

GPS to GPX

And there you have it! You’ve successfully converted your GPS files to GPX using the MAPOG Converter Tool. This feature simplifies the task of managing various data formats, making your workflow smoother and more efficient. Now, you’re all set to use your converted data for any analysis you require.

MAPOG has a lot of feature tool. These feature tools allow us to perform a variety of tasks. For example, you can clip or crop your data with the clip tool, style your numeric data with the quantity style tool, create grid on your map with the create grid tool, and more.

Here are some other blogs you might be interested in:

Convert Online GPS to MAPINFO

This guide will walk you through the process of converting GPS files to the MAPINFO format using the Converter Tool in MAPOG. Whether you’re new to the tool or a seasoned user, you’ll find the entire process explained in straightforward steps.

Understanding File Conversion

The Converter Tool in MAPOG is designed to transform data from one format to another effortlessly. Imagine it as a magic wand—input your data in one format, and it emerges in another, ready for your analysis. Additionally, GIS data can be downloaded in any format, making it versatile for various uses.

Online GPS to MAPINFO GIS Converter

Step 1: Upload Your Data

Start by selecting the “Process Data” section, then proceed to the “Converter Tool.”

GPS to MAPINFO

Here, you’ll upload your GPS file, which serves as the starting point for the conversion process.

GPS to MAPINFO
Step 2: Choose the Output Format

Next, select MAPINFO as your desired output format. While the Converter Tool offers several options for achieving the final result, this guide focuses on converting your file to MAPINFO.

GPS to MAPINFO

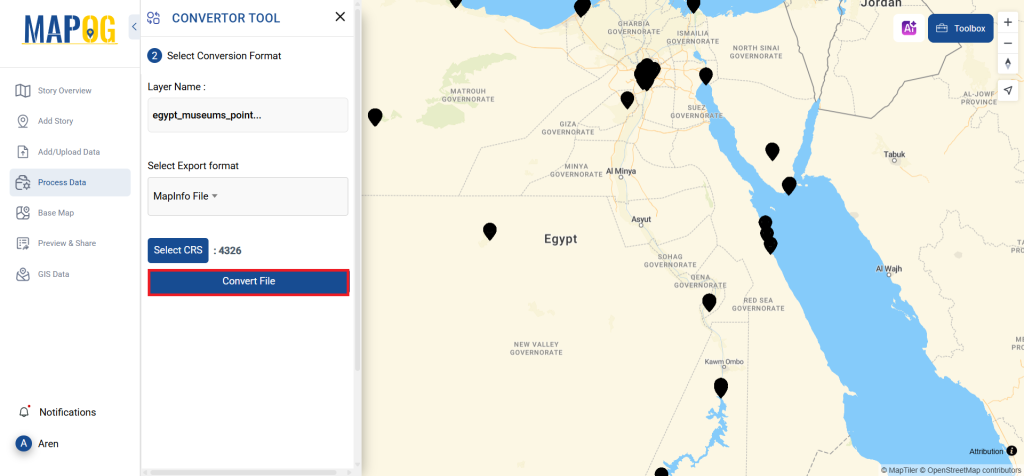
You can also set the CRS to make sure your data aligns perfectly with the needs of your spatial analysis.

GPS to MAPINFO
Step 3: Execute the Conversion

Now, head to “Convert Files” and let the tool work its magic. It will seamlessly convert your GPS data into the MAPINFO format.

GPS to MAPINFO
Step 4: Review and Download

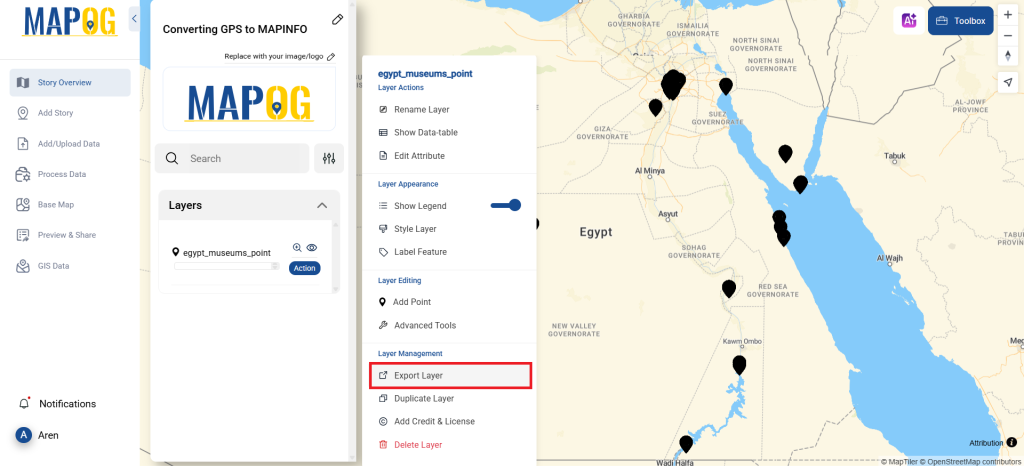
Before wrapping up, take a moment to review your newly converted MAPINFO data to ensure accuracy. Once you’re satisfied with the conversion, download the file. This final step is crucial to confirm that all your data has been correctly transformed and is intact.

GPS to MAPINFO
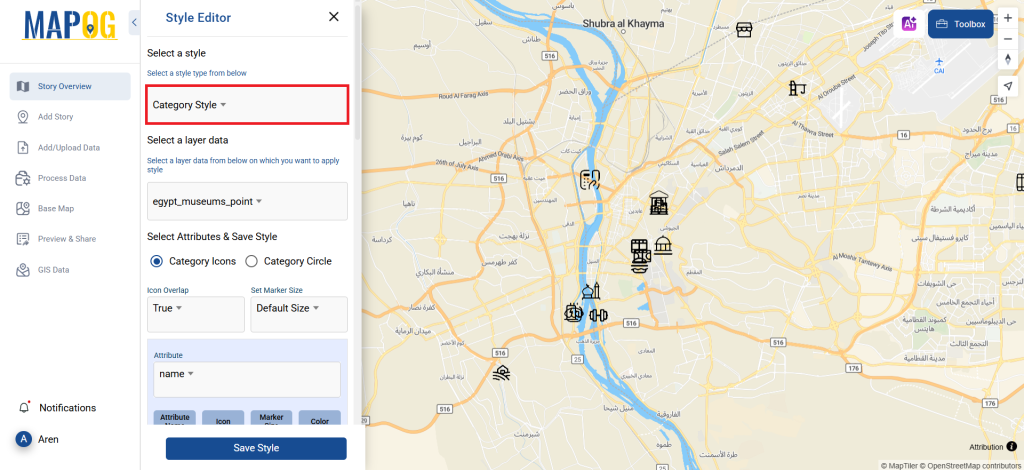
Step 5: Add Category Style

You can even apply category styles in map analysis to make the map clearer and more understandable at a glance. Just go to the action button of newly converted file and click on edit style to get category style. The provide your layer, provide attribute & save style. Here you get to select icons, choose their style and you can have true & false view for better visualization.

GPS to MAPINFO

And that’s it! You’ve successfully used the Converter Tool in MAPOG Map Analysis to convert GPS files to MAPINFO. Now, transforming your data is simpler than ever, allowing you to be more productive and efficient in your analysis.

MAPOG has a lot of feature tool. These feature tools allow us to perform a variety of tasks. For example, you can create buffer zones using Buffer Tool, style your numeric data with the quantity style tool, create isochrones on your map using Isochrone tool, and more.

Here are some other blogs you might be interested in:

Download Angola Administrative Boundary Shapefiles – National, Provinces and more

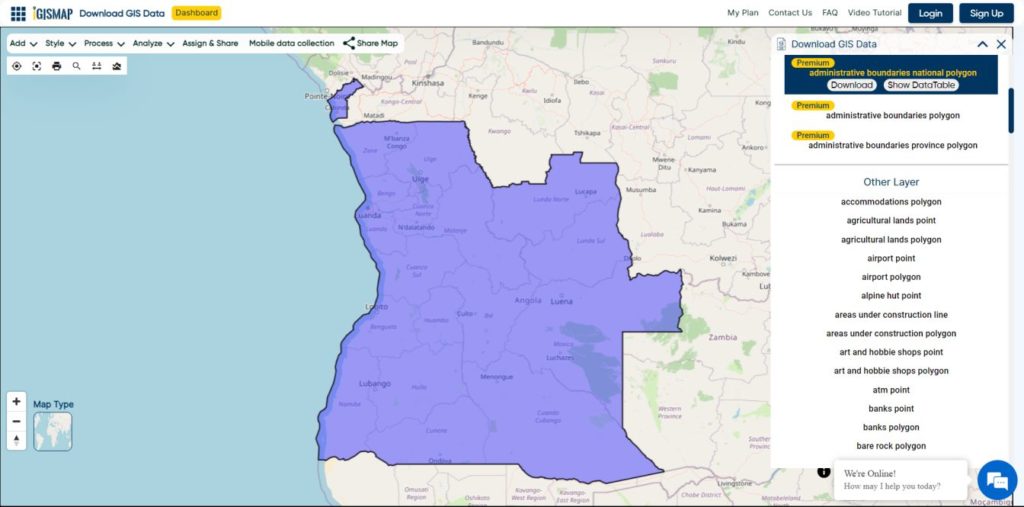
Download GIS data of Angola such as Angola National Boundary, Provinces, Municipalities and more. Download in Shapefile or CSV formats

Are you struggling to find accurate and up-to-date GIS data for your desired country? Worry no more, as MAPOG is here to be your ultimate solution! Our platform offers a comprehensive collection of GIS data covering more than 150 countries. You’ll find an impressive selection of over 150 GIS datasets available for each nation in the MAPOG GIS Data Collection. The hallmark of our GIS data lies in its exceptional accuracy, especially when representing administrative divisions. Moreover, our users can access a diverse range of data pertaining to natural and man-made geographic features, including rivers, roads, railway lines, airport locations, and much more, all meticulously represented in appropriate geometric structures (points, lines, and polygons). Facilitating seamless access to this invaluable data are two essential tools – Download GIS Data and Add GIS Data, thoughtfully integrated into the MAPOG platform. To delve deeper into the functionalities of the Add GIS Data tool, check out our enlightening article – “Add GIS data from IGISMap GIS data collection

With MAPOG’s versatile toolkit, you can effortlessly upload vector and raster filesadd WMS (Web Map Service) layers, upload Excel or CSV data, incorporate existing files, perform polygon splitting and merging, generate new polygon and polyline data, use the converter for various formats, conduct buffer analysiscreate gridstransform points into polygons, calculate isochrones, and utilize the geocoder for precise location information.

We offer an extensive array of data formats, including KML, SHP, CSV, GeoJSON, Tab, SQL, Tiff, GML, KMZ, GPKZ, SQLITE, Dxf, MIF, TOPOJSON, XLSX, GPX, ODS, MID, and GPS, ensuring compatibility and accessibility for various applications and analyses.

Note:

  • All data available are in GCS datum EPSG:4326 WGS84 CRS (Coordinate Reference System).
  • You need to login for downloading the shapefile.

Download Shapefile Data of Angola

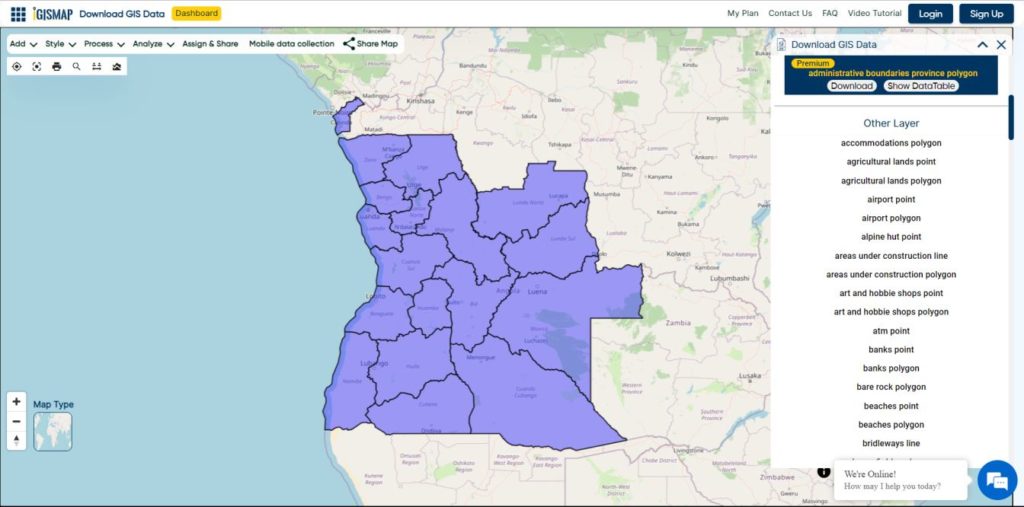
Angola is located on the western Atlantic Coast of Southern Africa between Namibia and the Republic of the Congo. It also is bordered by the Democratic Republic of the Congo and Zambia to the east. The country consists of a sparsely watered and somewhat sterile coastal plain extending inland for a distance varying from 50 to 160 km (31 to 99 mi). Slightly inland and parallel to the coast is a belt of hills and mountains and behind those a large plateau. The total land size is 1,246,700 km2 (481,400 sq mi). It has an Exclusive Economic Zone of 518,433 km2 (200,168 sq mi).

Angola National Boundary

Download Angola National Boundary Shapefile

Download Angola Provinces Shapefile Data

Angola is divided into eighteen provinces, known in Portuguese as províncias:

  • Bengo
  • Caxito
  • Benguela
  • Bié
  • Cabinda
  • Cuando Cubango
  • Cuanza Norte
  • Cuanza Sul
  • Cunene
  • Huambo
  • Huíla
  • Luanda
  • Lunda Norte
  • Lunda Sul
  • Malanje
  • Moxico
  • Namibe
  • Uíge
  • Zaire
Angola Provinces Boundaries

Download Angola Provinces Boundaries Shapefiles

Other GIS Data:

Download Shapefile for the following:

  1. World Countries Shapefile
  2. Australia
  3. Argentina
  4. Austria
  5. Belgium
  6. Brazil
  7. Canada
  8. Denmark
  9. Fiji
  10. Finland
  11. Germany
  12. Greece
  13. India
  14. Indonesia
  15. Ireland
  16. Italy
  17. Japan
  18. Kenya
  19. Lebanon
  20. Madagascar
  21. Malaysia
  22. Mexico
  23. Mongolia
  24. Netherlands
  25. New Zealand
  26. Nigeria
  27. Papua New Guinea
  28. Philippines
  29. Poland
  30. Russia
  31. Singapore
  32. South Africa
  33. South Korea
  34. Spain
  35. Switzerland
  36. Tunisia
  37. United Kingdom Shapefile
  38. United States of America
  39. Vietnam
  40. Norway
  41. Chile
  42. Crotia

Disclaimer : If you find any shapefile data of country provided is in correct do contact us or comment below, so that we will correct the same in our system as well we will try to correct the same in OpenStreetMap.

Download Paraguay Administrative Boundary GIS Data – Regions , Departments and more

download-paraguay-administrative–province-departments-and-more

It’s fantastic to hear that MAPOG has expanded its GIS data collection to include data for more than 100 new countries, bringing the total coverage to over 150 countries. This is undoubtedly a valuable resource for GIS enthusiasts and professionals around the world. The availability of detailed information on administrative divisions, rivers, roads, and airports can greatly enhance various geospatial projects and analyses.

The option to access the data through tools like “Download GIS Data” and “Add GIS Data” seems convenient and user-friendly. Providing data in different formats such as Shapefile, KML, GeoJSON, and CSV ensures compatibility with a wide range of GIS software and applications, making it easier for users to integrate the data into their workflows.

This article will walk you through downloading administrative-level GIS data for Paraguay using the Download GIS Data tool. Experience a seamless geospatial journey with MAPOG as your trusted partner!

Note:

  • All data available are in GCS datum EPSG:4326 WGS84 CRS (Coordinate Reference System).
  • You need to login for downloading the shapefile.

Download Paraguay Regions Shapefile Data

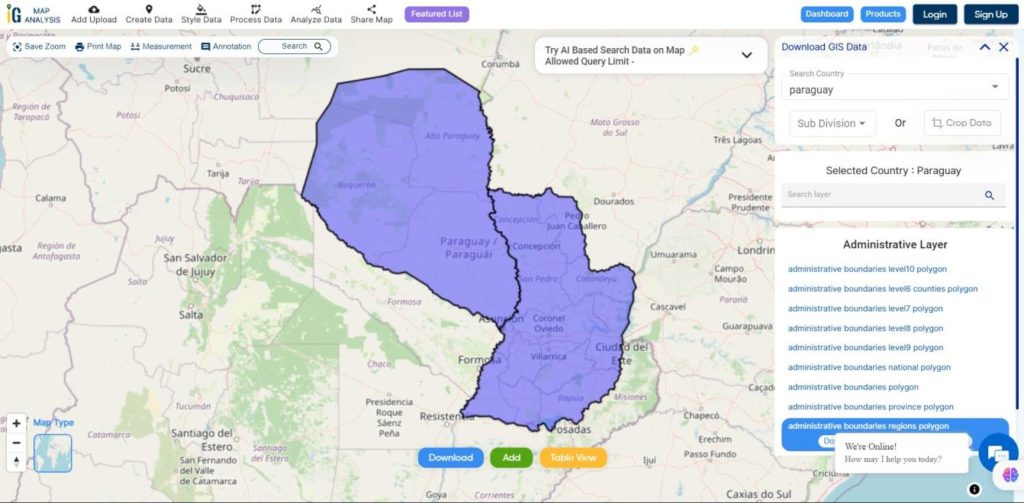
Paraguay is divided into 2 Regions

  •  Western Paraguay
  • Eastern Paraguay
 Paraguay Regions Boundaries
 Paraguay Regions Boundaries

Download Paraguay Regions Boundaries Shapefile

Download Paraguay Departments Shapefile Data

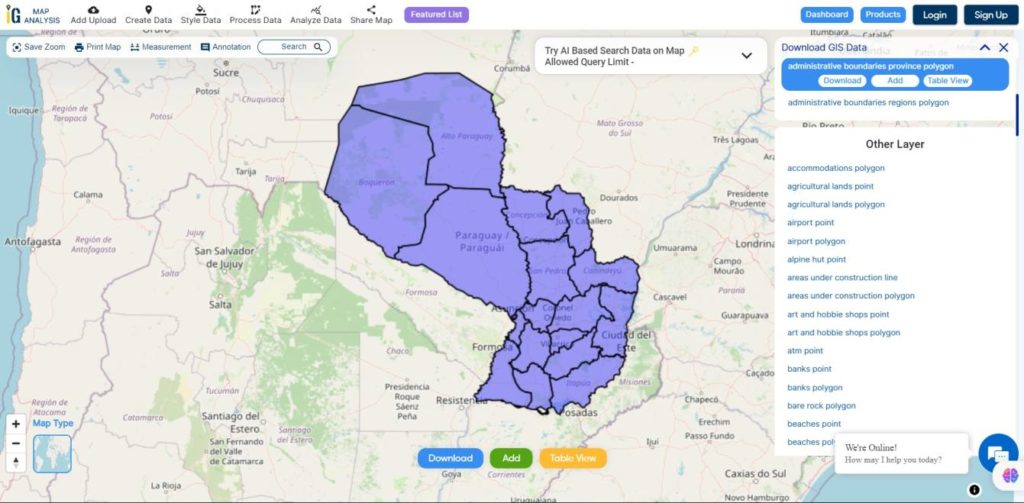
Paraguay is divided into 17 Departments

  •  Concepción  
  • San Pedro
  •  Cordillera
  •  Guairá
  •  Caaguazú
  •  Caazapá
  •  Itapúa
  •  Misiones
  •  Paraguarí  
  • Alto Paraná
  •  Central  
  • Ñeembucú
  •  Amambay
  •  Canindeyú
  •   Presidente
  • Hayes
  •  Alto Paraguay  
  • Boquerón
Paraguay Departments Boundaries

Download Paraguay Departments Boundaries Shapefile

Other GIS Data:

Download Free Shapefile for the following:

  1. World Countries Shapefile
  2. Australia
  3. Argentina
  4. Austria
  5. Belgium
  6. Brazil
  7. Canada
  8. Denmark
  9. Fiji
  10. Finland
  11. Germany
  12. Greece
  13. India
  14. Indonesia
  15. Ireland
  16. Italy
  17. Japan
  18. Kenya
  19. Lebanon
  20. Madagascar
  21. Malaysia
  22. Mexico
  23. Mongolia
  24. Netherlands
  25. New Zealand
  26. Nigeria
  27. Papua New Guinea
  28. Philippines
  29. Poland
  30. Russia
  31. Singapore
  32. South Africa
  33. South Korea
  34. Spain
  35. Switzerland
  36. Tunisia
  37. United Kingdom Shapefile
  38. United States of America
  39. Vietnam
  40. Norway
  41. Chile
  42. Croatia
  43. Estonia
  44. Laos
  45. Hungary
  46. Libya
  47. Comoros
  48. Colombia
  49. Bhutan
  50. Maldives
  51. Iraq
  52. Azerbaijan
  53. Portugal

Disclaimer : If you find any shapefile data of country provided is incorrect do contact us or comment below, so that we will correct the same in our system as well we will try to correct the same in OpenStreetMap

Convert – Degree Minute Seconds to Degree Decimal Minutes to Decimal Degree format – Latitude Longitude

Convert – Degree Minute Seconds to Degree Decimal Minutes to Decimal Degree format. Geographical location information is represented in terms of Latitude and Longitude, where Latitude gives the angular distance of a point from equator to elevation either north or south, and Longitude gives the angular distance of a point east or west of the meridian. This Angular distance values of Lat and Lon is either represented in Degree, Minute, Seconds(dd,mm,ss) number system or Decimal Degree number system. So let us discuss about, how to represent the location with Latitude and Longitude, their value range and how to convert them with the tool.

Latitude values Range:

Point on Equator line is calculated as 0° latitude, while North pole as 90°N and South pole as 90°S. Latitude values range in between 0° and 90° in positive
(representing north) and in negative (representing south) values.

Longitude values Range:

Prime Meridian or Greenwich meridian is defined as 0° longitude. Longitude values ranges from 0° to 180° east or from 0° to 180° west.

Convert - Degree Minute Seconds to Degree Decimal Minutes to Decimal Degree format
Convert – Degree Minute Seconds to Degree Decimal Minutes to Decimal Degree format

Latitude and Longitude Representation – Different converted formats:

Generally in three formats, latitude and longitude values are represented. Let us take example of each format, by taking latitude longitude of San Antonio.
1.) Degree Minutes Seconds :
For example: 29° 25′ 26.5152″, -98° 29′ 37.6974″

2.) Degree Decimal Minutes:
For example: 29° 25.441916666667’ , -98° 29.6283’

3.) Decimal Degree:
For example: 29.424032, -98.493805

Format of Lat lon - Degree Minute Seconds, Degree Decimal Minutes, Decimal Degree format
Format of Lat lon – Degree Minute Seconds, Degree Decimal Minutes, Decimal Degree format

Convert – Degree Minute Seconds to Degree Decimal Minutes to Decimal Degree format

Earth equator line is divided in 360 equal parts, each part represents a degree distance, where 1°=111.32 Km. Every Degree is further divided in 60 minutes. This means, 1 minute = 111.32/60 = 1.85 Km, and every minute is divided in 60 seconds. So 1 seconds = 1.85/60 = 0.0309 Km.

Convert Degree Minute Seconds to Degree Decimal for the Latitude Longitude values:

As 1°=60’=3600”, so we can compute degree decimal by:

d = degree + minute / 60 + seconds/3600

Let us take an example: Compute 29° 25′ 26.5152″, -98° 29′ 37.6974″ to degree decimal:

Latitude to Degree Decimal = d = 29 + 25/60 + 26.5152/3600 = 29.42432
Longitude to Degree Decimal = d = -(98 + 29/60 + 37.6974/3600) = -98.493805

Tool to convert lat lon values from degree minute seconds to degree decimal:


LATITUDE :Degree= Minute= Seconds=

LONGITUDE :Degree= Minute= Seconds=


Latitude :

Longitude :

Convert Degree Minute Seconds to Degree Decimal:

Again, as 1°=60’=3600”, we would compute Degree, Minute and Seconds separately from Degree Decimal.

  • Degree = integer part of Decimal degree = int(ddd.dd) = ddd.
  • Minute = integer part of ((Decimal degree – Degree computed above) * 60) = int(ddd.dd – ddd) * 60.
  • Seconds = (Degree Decimal – degree – Minute/60) * 3600 = (ddd.dd – ddd – m/60)*3600

Let us take an example. Compute 29.424032, -98.493805 to Degree Minute Seconds format:

Degree = int(29.424032) = 29
Minute = int((29.424032 – 29) * 60) = int (25.44192) = 25
Seconds = (29.424032 – 29 – 25/60) * 3600 = 26.5152″

So latitude = 29° 25′ 26.5152”

Similarly computing longitude of -98.493805, we get the degree minute second to -98° 29′ 37.6974.

Tool to convert lat lon values from Degree Decimal to Degree Minute Seconds:


LATITUDE :
LONGITUDE :


Latitude :

Longitude :

Convert – Degree Minute Seconds to Degree Decimal Minutes:

Fetch the Seconds number, and divide it by 60, and then add the result with minute,

For example: Convert 29° 25′ 26.5152” to Degree Decimal Minute:

  • Here Seconds = 26.5152,
  • so dividing it by 60 i.e 26.5152/60 = 0.44.
  • Now add this with Minute, we will get 29° 25.44, which is in Degree Decimal Minutes format. If you multiply again 0.44 by 60 you will get again Degree Minute seconds format.

You may find further link, to find the tool for conversion of Latitude longitude format, with Map view:

Latitude Longitude format Conversion – Degree Decimal, Degree Minute Seconds and Degree Decimal Minutes

Do comment below, if you have any doubt or if you want share any other related information with us by commenting below.