QGIS Server is one of the best server for web map rendering and it can be also used as back end for the GIS logic. This post summarizes notes about QGIS Server – Installation in Ubuntu 16.04 LTS. As we know QGIS Server is a FAst Common Gateway Interface application and it is written in C++ which works smoothly with a web server like Apache, Lighttpd and etc.
QGIS is an open source server which implements excellent quality cartographic features for mapping. QGIS uses cartographic rules as a configuration language, both for the server configuration and for the user-defined cartographic rules. QGIS is performant, scalable and reliable server which allows user customisation of maps. QGIS also allows printing pdf data and QGIS is so easy to use as It has Python plugin support which allows it for fast and efficient development and deployment of new features.
QGIS desktop and QGIS Server use the same visualization libraries, the maps that are published on the web look the same as in desktop GIS. QGIS is a Desktop based Geographic Information System (GIS) Application for creating maps, editing, viewing and analyzing Geospatial data. Quantum GIS is a cross platform, free and open source application. It can be run on multiple operating system like Mac OS X, Windows, Ubuntu, Linux and Unix.
Lets begin the process of QGIS Server – Installation in Ubuntu 16.04 LTS and we will also be installing the QGIS desktop application.
QGIS Server Installation
In this post we are going to give you a short and simple installation tutorial with the simplest execution here.
First, as my server runs “xenial”, lets add the following package sources to /etc/apt/sources.list.d/xenial-gis.list (as described in the QGIS Installation Documentation)
deb http://qgis.org/debian xenial main
deb-src http://qgis.org/debian xenial main
Now We need to update the package list and for that we need to add the key for further installation and for that write these lines of code in the command line prompt.
sudo gpg --keyserver keyserver.ubuntu.com --recv-key 1F9ADD375CA44993 sudo gpg --export --armor 1F9ADD375CA44993 | sudo apt-key add -#updating the package listsudo apt-get update && sudo apt-get upgrade
Now we are almost ready for the QGIS Server – Installation, we just need to add one more package i.e Apache2. It’s better to remove and re-install apache2 web server so that we start from the same set up:-
To remove Apache2:-
sudo apt-get --purge remove apache2

sudo apt-get autoremove
To re-install Apache2:-
sudo apt install apache2 Now we can surely install the QGIS Server and the necessary Apache2 package.
sudo apt-get update

sudo apt-get install python-qgis qgis-server libapache2-mod-fcgid
In case you would like to install QGIS Desktop (note that it’s not a common practice to install both client and server applications on the same machine), type:
sudo apt-get update

sudo apt-get install qgis-server python-qgis
Install the Apache server in a separate virtual host listening on port 81. Enable the rewrite module to pass HTTP BASIC auth headers:
sudo a2enmod rewrite#edit file qgis-server-port.conf and write Listen 81 and then save itsudo gedit /etc/apache2/conf-available/qgis-server-port.conf sudo cat /etc/apache2/conf-available/qgis-server-port.conf Listen 81 sudo a2enconf qgis-server-port
Now edit the virtual host configuration, type:
sudo gedit /etc/apache2/sites-available/qgis-server.confthen edit this file by writing this configuration:
<VirtualHost *:81>
  ServerAdmin webmaster@localhost
  DocumentRoot /var/www/html

  ErrorLog ${APACHE_LOG_DIR}/qgis-server-error.log
  CustomLog ${APACHE_LOG_DIR}/qgis-server-access.log combined

  # Longer timeout for WPS... default = 40
  FcgidIOTimeout 120
  FcgidInitialEnv LC_ALL "en_US.UTF-8"
  FcgidInitialEnv PYTHONIOENCODING UTF-8
  FcgidInitialEnv LANG "en_US.UTF-8"
  FcgidInitialEnv QGIS_DEBUG 1
  FcgidInitialEnv QGIS_SERVER_LOG_FILE /tmp/qgis-000.log
  FcgidInitialEnv QGIS_SERVER_LOG_LEVEL 0
  FcgidInitialEnv QGIS_PLUGINPATH "/opt/qgis-server/plugins"

  # Needed for QGIS HelloServer plugin HTTP BASIC auth
  <IfModule mod_fcgid.c>
      RewriteEngine on
      RewriteCond %{HTTP:Authorization} .
      RewriteRule .* - [E=HTTP_AUTHORIZATION:%{HTTP:Authorization}]
  </IfModule>

  ScriptAlias /cgi-bin/ /usr/lib/cgi-bin/
  <Directory "/usr/lib/cgi-bin">
      AllowOverride All
      Options +ExecCGI -MultiViews +FollowSymLinks
      # for apache2 > 2.4
      Require all granted
      #Allow from all
  </Directory>
 </VirtualHost>
now we have to enable the virtual host we just created and restart the Apache2 server
sudo a2ensite qgis-server
sudo service apache2 restart
we have finally completed the QGIS Server – Installation For Ubuntu 16.04 LTS.
Let’s test the installation before we proceed. The GetCapabilities request should already work, run this in your browser
http://localhost:81/cgi-bin/qgis_mapserv.fcgi?SERVICE=WMS&VERSION=1.3.0&REQUEST=GetCapabilities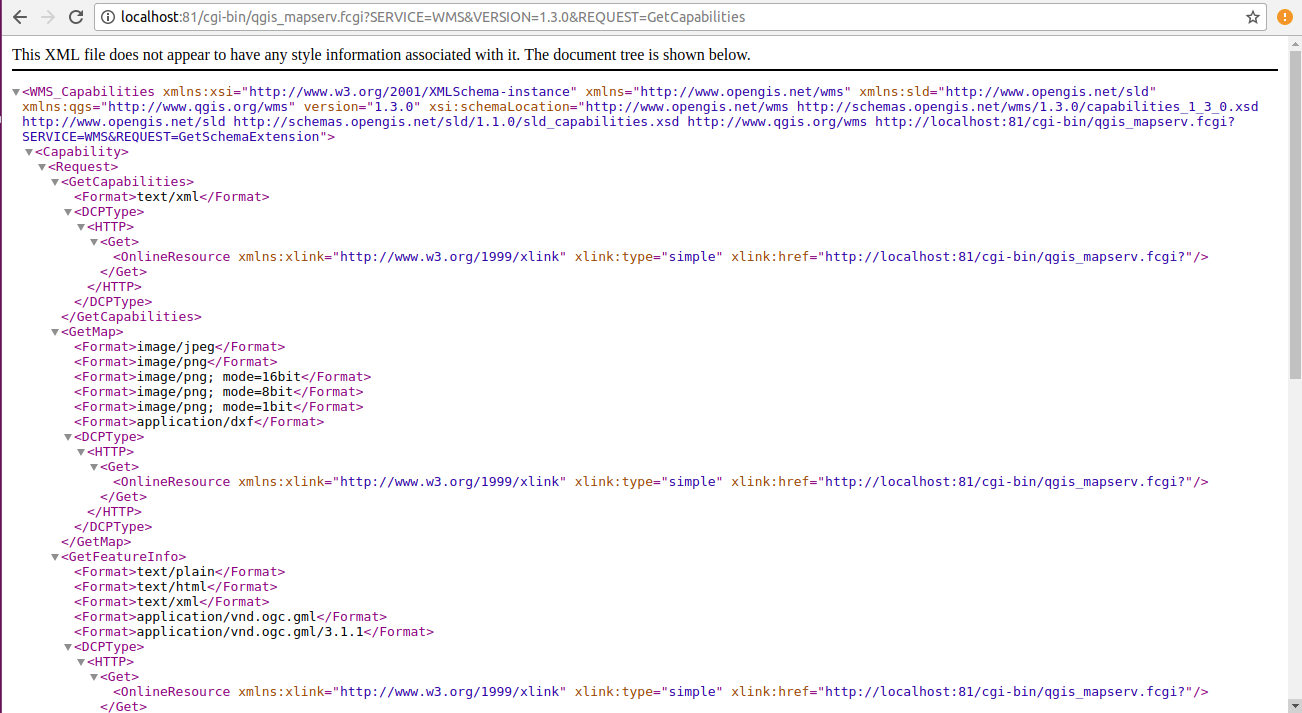
You will get a result screen like this.
Congratulations! … We have Successfully created the QGIS server. Now create a QGIS project with some vector layers and save it in /home/username/file.qgs.
Adding a QGIS project file
It’s time to add a QGIS project to our server. To do that, we move to the QGIS Server folder
cd /usr/lib/cgi-binwhere you should find ‘qgis_mapserv.fcgi’ and ‘wms_metadata.xml’.
Now have one folder for each project file. Lets make the first project “myProject”.
sudo mkdir myProject
cd myProject
qgis_mapserv.fcgi and wms_metadata.xml can now be linked into this new folder
sudo ln -s ../qgis_mapserv.fcgi && sudo ln -s ../wms_metadata.xml The only thing that is missing anymore is a QGIS project file. Which we will be linking into the folder. After restarting Apache, we should be good to go.
sudo ln -s /home/username/file.qgs /usr/lib/cgi-bin/myProject/file.qgsNow update the Apache2 Server again
sudo service apache2 restartYour ‘GetCapabilities’ request should now include the added ‘myProject’ folder:
http://localhost:81/cgi-bin/myProject/qgis_mapserv.fcgi?SERVICE=WMS&VERSION=1.3.0&REQUEST=GetCapabilities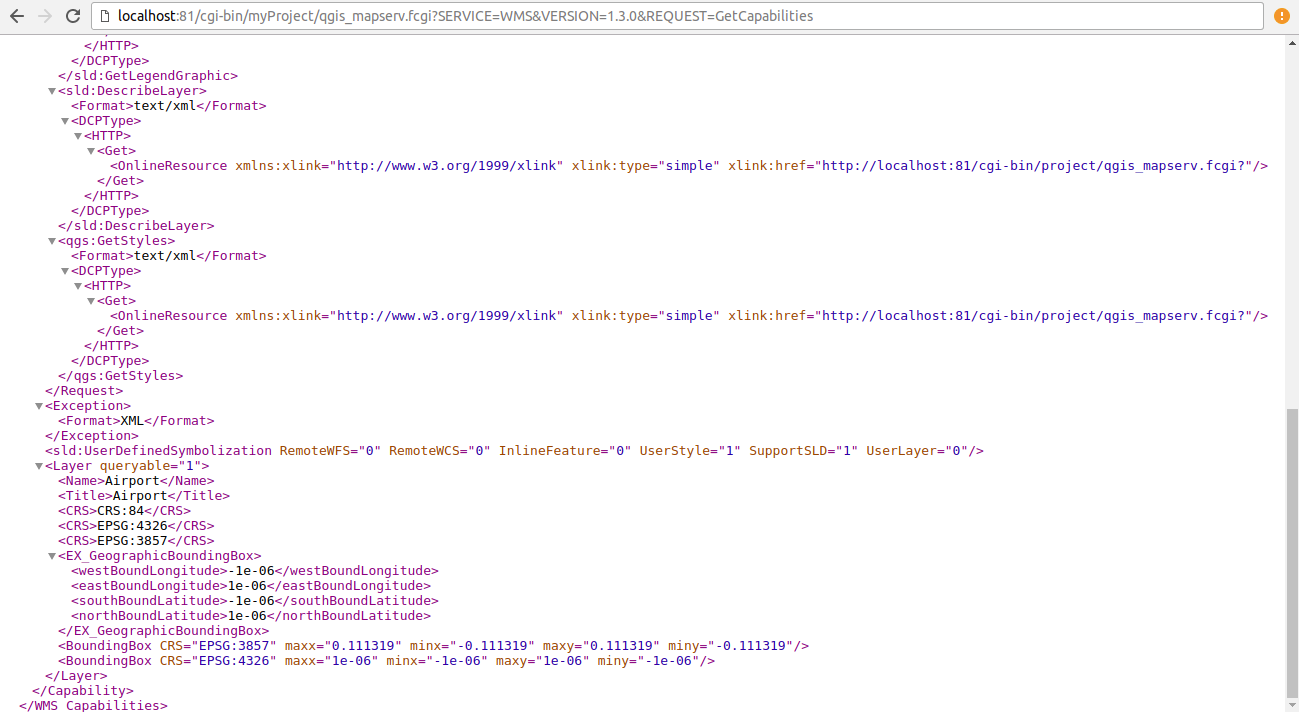
which gives a output like:
QGIS Server can serve as many project files as you want. There are different ways to organize your server but I would simply add a new folder (like the “myProject” folder in this example) and link in the executable and project file.
Thanks
Hi,
thanks for this tutorial.
I have problems getting my project displayed. Can you may explain more easy how to link the files together?
Hello, thanks for sharing this tutorial. Taking advantage, this configuration mode is valid for the current versions of qgis-server, but specifically, version 3.14?