
Publish Style Raster Dataset On GeoServer. Do you have raster data and want to host the data on geoserver and create a proper map with styling according to dataset? Well GeoServer gives you a direct and simple method to create a styled map. Before implementing steps to publish and sytle raster dataset on geoserver you need to install first GeoServer on Windows, mac or Ubuntu Pc or Server. If you are looking for publish and style vector dataset on geoserver, you can check this link.
Raster Dataset GeoServer coverage:
Coverage/raster data that geoserver can access are,
1. GeoTIFF (Tagged Image File Format with Geographic information)
2. GTOPO30
3. WorldImage
4. ImageMosaic
5. GeoPackage
In this article we will discuss how we can publish GeoTIFF (.tiff/.tfw format) data on server. The data for this article has been downloaded from the links provided in this article. The raster data contains 3 bands (red, blue, green) information. Here we will use GeoTiff data to demonstrating raster dataset to publish and style in GeoServer.
To publish Raster Dataset data – Steps – Publish Style Raster Dataset
Here we will first publish the geotiff raster dataset in geoserver as an example:
Step 1:
First of all you need to login to GeoServer then create a workspace, which can be done by selecting workspace option on the right side of screen under data section. Add the new workspace give a name and URI. In information technology, a Uniform Resource Identifier (URI) is a string of characters used to identify a resource, which can be same as name and submit the information.

Step 2 of Publish Raster Dataset on GeoServer:
Now add the store by selecting stores option under same section. Click Add new store and select GeoTIFF option in Raster Data Sources list.
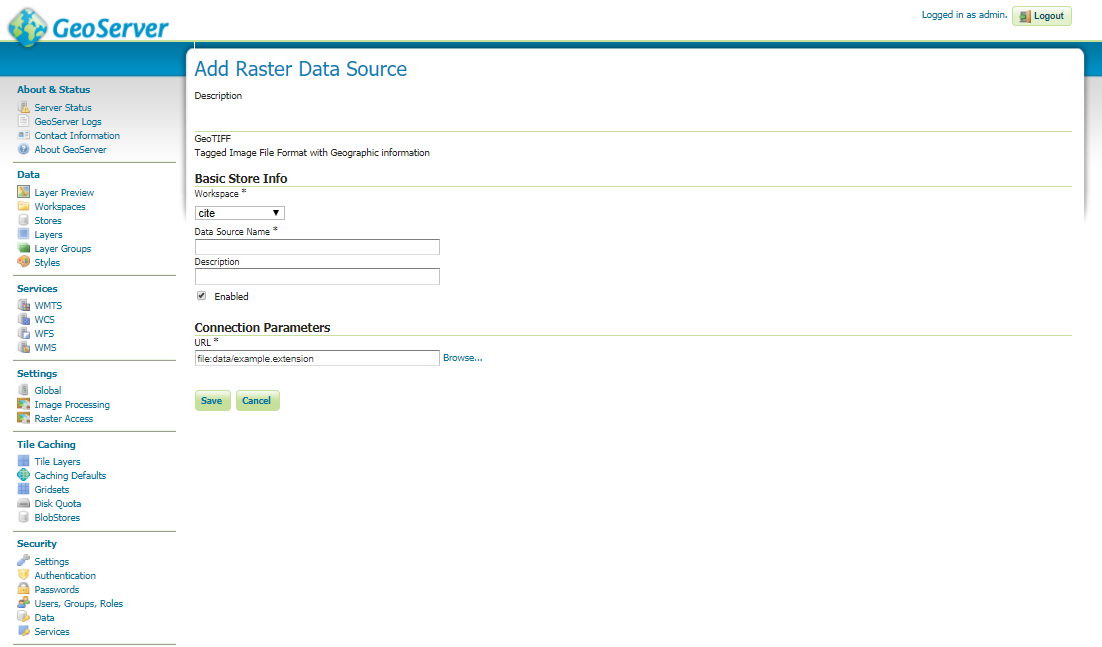
Under this option add the workspace, you created and give data source name. Provide the description about your data. Now browse the GeoTIFF file to add and publish this data.
Step 3:
Check the Coordinate Reference Systems and the Bounding Boxes fields are properly set and click on Save.
Step 4 of publish raster dataset on geoserver:
Now you can see the layer and get the WMS link. For this go to Layer Preview option in data section and open the published data as OpenLayer option.
To Style Raster Dataset on GeoServer Steps – Publish Style Raster Dataset
To add built in style to your GeoTIFF file follow the given steps.
Step 1:
First of all make sure your file has been added on server. Then open that layer using layer option in data section.
Step 2 to style raster dataset in geoserver:
There will be 4 tabs as data, publishing, dimensions and tile caching. As on adding layer you already have visited data tab and set SRS coordinates. Now click publishing tab.
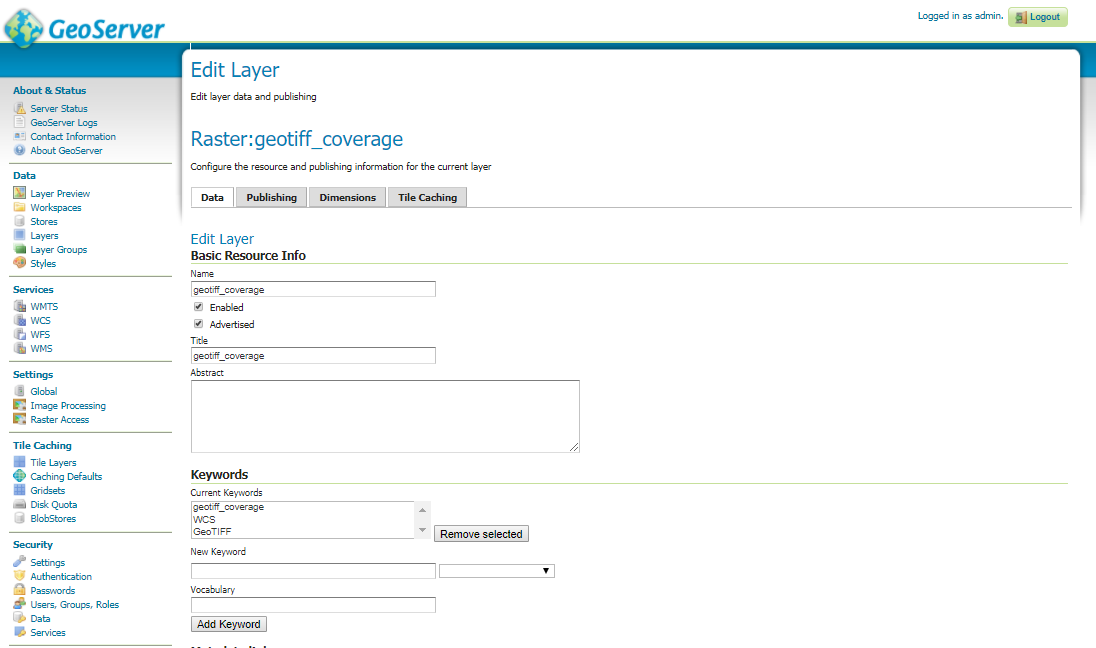
In publishing tab find the WMS setting option, under that option check the Queryable check box and select style in default style drop down.
There are styles for point, line, polygon and raster in Geoserver:
1. Burg: point
2. Dem: raster
3. Capitals: points
4. Roads: line
5. Lakes: polygon
6. Raster: raster
7. Point: point
8. Line: line
9. Polygon: polygon
10. Rain: raster
11. Population: raster
According to your shape file you can add the style and click to save.
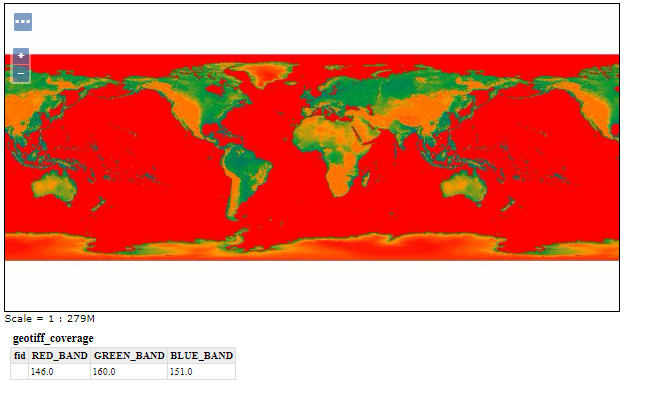
Step 3:
Now to check the styling, add Raster option as style and click the layer preview option under same data section. Open as openLayer.
You can add your own SLD (Styled Layer Descriptor) profile to style the GeoTiff data. For this you can follow this article and for more information you can visit http://docs.geoserver.org/latest/en/user/styling/sld/reference/rastersymbolizer.html link.
The Styled Layer Descriptor (SLD) supported in geoserver raster dataset:
Profile of the Web Map Service (WMS) Encoding Standard defines an encoding that extends the WMS standard to allow user-defined symbolisation and colouring of geographic feature (vector data) and coverage data (raster data).
SLD has some elements as:
- <StyledLayerDescriptor> Which is the root element for an SLD. It contains a Layers and Styles elements which describe how a map is to be composed and styled.
<NamedLayer>: A reference to a named layer in the server catalogue - <UserLayer>: A layer defined in the style itself
- <FeatureTypeStyle>: The FeatureTypeStyle element specifies the styling that is applied to a single feature type of a layer. It contains a list of rules which determine the symbology to be applied to each feature of a layer.
<Rule>: Styling rules define the portrayal of features. A rule combines a filter with any number of symbolizers. Features for which the filter condition evaluates as true are rendered using the symbolizers in the rule. - <RasterSymbolizer>: styles raster coverages.
The <Opacity> element sets the transparency level for the entire rendered image. As is standard, the values range from zero (0) to one (1), with zero being transparent, and one being opaque. - The <ChannelSelection> element specifies how dataset bands are mapped to image colour channels. Named dataset bands may be mapped to red, green and blue channels, or a single named band may be mapped to a grayscale channel.
- Here we can select any of the band or all three band. But particularly in this article we have selected a single band of an RGB image as a grayscale channel and re-colorizing it via a ColorMap.
- A color map is defined by a sequence of <ColorMapEntry> elements. Each <ColorMapEntry> element specifies a color and a quantity attribute. The quantity refers to the value of a raster pixel. The color value is denoted in standard hexadecimal RGB format (#RRGGBB). <ColorMapEntry> elements can also have opacity and label attributes. As in the code quantity is given as 0, 150, 200 and 255. Then the pixels having other values get interpolated range of color.
- In the last close all the elements and save the style.
After that open the layer option and select the geotiff file. Add the style in publishing tab and save the layer. To view this style over layer, open layer preview option and open this layer as Openlayer option.
Full length code Publish Style Raster Dataset On GeoServer
<?xml version=”1.0″ encoding=”UTF-8″?>
<StyledLayerDescriptor version=”1.0.0″
xsi:schemaLocation=”http://www.opengis.net/sld StyledLayerDescriptor.xsd”
xmlns=”http://www.opengis.net/sld”
xmlns:ogc=”http://www.opengis.net/ogc”
xmlns:xlink=”http://www.w3.org/1999/xlink”
xmlns:xsi=”http://www.w3.org/2001/XMLSchema-instance”>
<NamedLayer>
<Name>default_raster</Name>
<UserStyle>
<Title>Default Raster</Title>
<FeatureTypeStyle>
<Rule>
<Name>rule1</Name>
<Title>Opaque Raster</Title>
<Abstract>A raster with 100% opacity</Abstract>
<RasterSymbolizer>
<Opacity>1.0</Opacity>
<ChannelSelection>
<GrayChannel>
<SourceChannelName>1</SourceChannelName>
</GrayChannel>
</ChannelSelection>
<ColorMap extended=”true”>
<ColorMapEntry color=”#0000ff” quantity=”0″/>
<ColorMapEntry color=”#009933″ quantity=”150″/>
<ColorMapEntry color=”#ff9900″ quantity=”200″ />
<ColorMapEntry color=”#ff0000″ quantity=”255″/>
</ColorMap>
</RasterSymbolizer>
</Rule>
</FeatureTypeStyle>
</UserStyle>
</NamedLayer>
</StyledLayerDescriptor>
Hope this article to Publish Style Raster Dataset On GeoServer is helpful for you and you might be easily able to create a beautiful colour map with the help of geoserver. If you find any problem in following the steps to style and publish the raster layer of geoserver do comment below with the problem in the box provided below.