Image Classification in QGIS: Image classification is one of the most important tasks in image processing and analysis. It is used to analyze land use and land cover classes. With the help of remote sensing we get satellite images such as land satellite images. But these images are not enough to analyze, we need to do some processing on them. So to use these images for analysis we need image classification. In this post we will see how to download a Landsat satellite image and image classification in QGIS.
There are many software tools available for image classification such as ArcGIS, ERDAS IMAGIN, but these are not open source software. QGIS(Quantum GIS) is very powerful and useful open source software for image classification. QGIS 3.2.1 for beginners
The basic requirement for image classification is image itself but the other important thing is knowledge of the region for which we are going to classify the image. For this either you need to do manual survey or else you can use google earth. Definitely Manual survey leads to better result.
There are two types of image classification methods..
- Supervised classification
- Unsupervised classification
Unsupervised classification is not preferred because results are completely based on software’s knowledge of recognizing the pixel. For unsupervised classification you can use K Means classification. In this post we will see Supervised classification only.
Download the Sample Image data for classification
Let us see how to download a satellite image first to take out sample image. One of the source is Earth Explorer and register. If you already have an account then sign in.
Note: Please read terms and condition and usages of data.
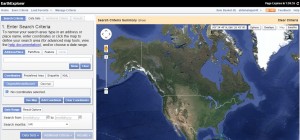
Here you will see search criteria tab on your left hand side, select it. Enter date and month in the options provided, so that if you want to download image for specific season we can get that image. In rainy season cloud cover is more so it is recommended that we download a image free from cloud cover and mostly of summer of winter season to yield good results.
After zooming in to the location of interest on map click on data sets. And then search for landsat archive. Expand landsat archive option. Depending on our criteria of image we can select more than one option here. We can also set additional criteria based on our requirement.
After setting the criteria click on results. It may take some time to get the results.
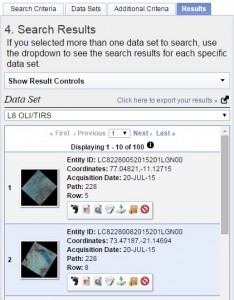
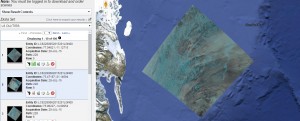
Now analyze the results available on your screen. There are some options given for our convenience. Click on show browse overlay and check if your location comes within the image or not. An image on your screen will appear. It will take some time to display depending on your internet speed as shown below in image.
When you find image of your choice click on download button. Click on the download button of the file which have largest size. Don’t download other data. The download file in the folder is with extension .tar. extract that file and you will get a folder containing all the images and a text document.
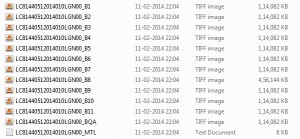
You can see there are 12 images and one MTL text document. This text file is very necessary if this file is not downloaded then image classification will not be possible. We need only 7 images B1 to B7 for image classification, however we can use all the images but it will be very bulky for QGIS to handle and as you start image classification you will understand why we have used 7 images only. You may also consider to look more tutorial on QGIS.
Image Classification in QGIS :
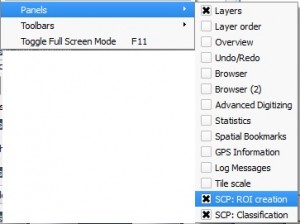
1.) Now open QGIS and install SEMI AUTOMATIC CLASSIFICATION plug-in from the plugin option. After installation of the plugin if toolbox on the screen of the same is not showing by default then, then click view and click panels. And Check both the panels SCP: ROI creation and SCP: classification.
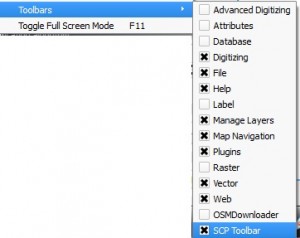
2.) Now click toolbar and activate SCP toolbar.
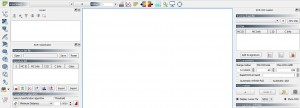
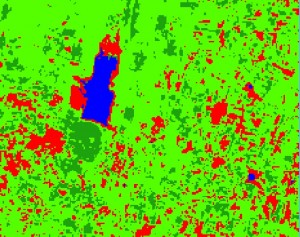
 3.) Your Desktop QGIS screen will look like this below image.
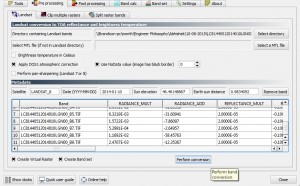
4.) Now Click on pre-processing tool and Select the folder in which all the images and MTL file is present.
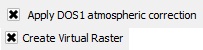
5.) Check these two options i.e Apply DOS1 Atmospheric Correction and Create Virtual Raster as shown below.
6.) Now click on perform conversion. The processing may take too much time. Be patient
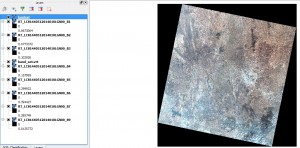
7.) All the images are loaded into Layers and virtual raster with name landsat.vrt is also created.
8.) We can remove image 8,9, 10 and 11. Click on band set icon and select all raster.
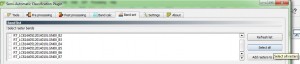
9.) Add rasters to band set.
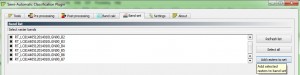
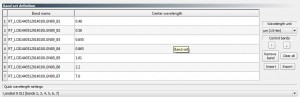
10.) Select landsat 8 only because we have downloaded a landsat 8 image.
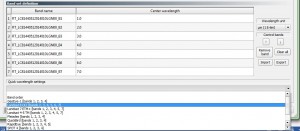
11.) Observe the changes in center wavelength.
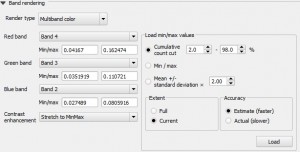
12.) Click close. Now Right click on landsat virtual raster and click properties.
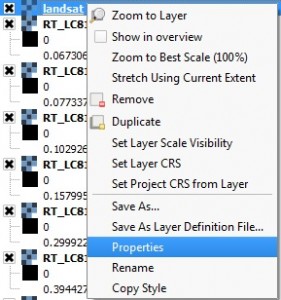
13.) Switch to style tab.
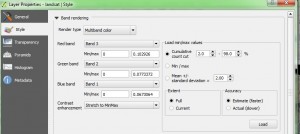
14.) Change the band set as shown in the image.
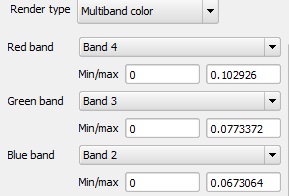
15.) Click apply and observe the changes in the image.
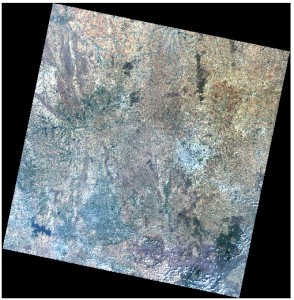
16.) You can set band set as per your convenience. Set the band set such that you can easily identify land cover and land use classes. For this example we are selecting the above band set. You may also set band set by zooming into your desired location and then load current value of canvas and then click apply. We can do this until we get proper colour for our image.
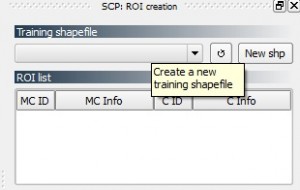
17.) Now in SCP: ROI creation panel click on new shp. ROI means Region of Interest.
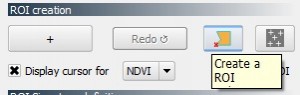
18.) Create a shape file in the same folder with name roi or as per your wish. Click on ‘+’ sign and then Click on create a ROI.
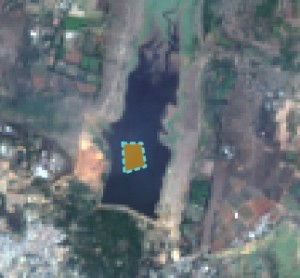
19.) Now as per your knowledge of the location zoom in and create a polygon. We are creating polygon because it will take pixels of same colour with slightly difference in the value. Right click to end the polygon.
20.) Give Macroclass name and class name.
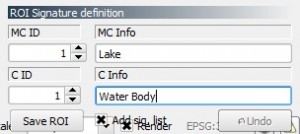
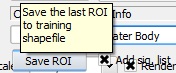
21.) Click on save ROI and check add sigg. List.
22.) The roi is added to the signature list.
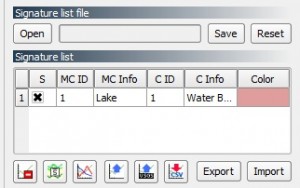
23.) Save this signature list in the same folder, and create new ROI’s for different classes. You can also change the color. Within same class you can have different Macroclass so that you can classify precisely. You can see the color convention for classes that are used generally on internet.
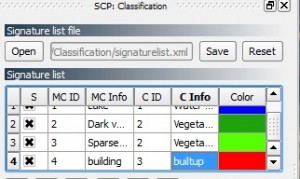
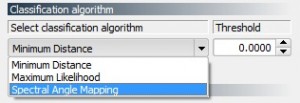
24.) Save all the roi. Select algorithm for classification.
25.) Before going for classification you can see a preview with the option provided as classification preview. Now Click on the plus sign and click on the area where you want to see the preview.
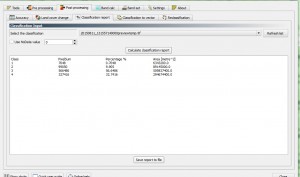
26.) Take a look at the preview. If this is the output you want you can go for final classification or you can make other ROI. Click on perform classification for final classification. This process will take time for classification. After the classification is done. Click on post processing tool icon and generate classification report.
Explore this plugin for more option. You will have a good classified image after practicing. Hope this tutorial helps you to explore the tool for classification with the help of QGIS software. If you want to share or have doubts or facing difficulty in implementing the steps, do comment below in the space provided below.
More on QGIS:
Thanks step by step discription and we can easily under statnd the things
Splendid!. I love your tutorial.
This tutorial is well detailed thank you for this
Hey Hi I tried to follow up tutorial and steps but I did not get the same macroclass thing. How to do this? please email me..
The assumption that unsupervised is not superior to supervised classification is incorrect in many cases. Both classification methods require that one know the land cover types within the image, but unsupervised allows you to generate spectral classes based on spectral characteristics and then assign the spectral classes to information classes based on field observations or from the imagery. Unsupervised assumes you do not know all the land cover categories beforehand, which is often the case, especially when working with natural land cover types. Supervised might be better for land cover types that are well defined by discrete cover types like one might find with agricultural fields. I have taught image processing for 30 years and have hundreds of publications on image classification, and I almost always find unsupervised statistical generators to be superior to supervised approaches. I was very disappointed to find that you skipped over the ISODATA unsupervised approach because you assumed it was an inferior approach. It is a very powerful approach when in the hands of a skilled image processor.
Hi Kevin, I interested on your publication on image classification especially using unsupervised classification method for land use/ land cover image analysis. Right now I am doing comparative assessment of unsupervised land use classification and I need some of literatures. Is it possible to get some of your publication?
Thank you, very good explanation.
can you please tell how to prepare geomorphology map of study area.
This is simply good.
Hi, I just wanted to ask if it is possible to do the same thing using drone images instead of satellite images.
Thank Yuo, Continue to prode such interesting topics.