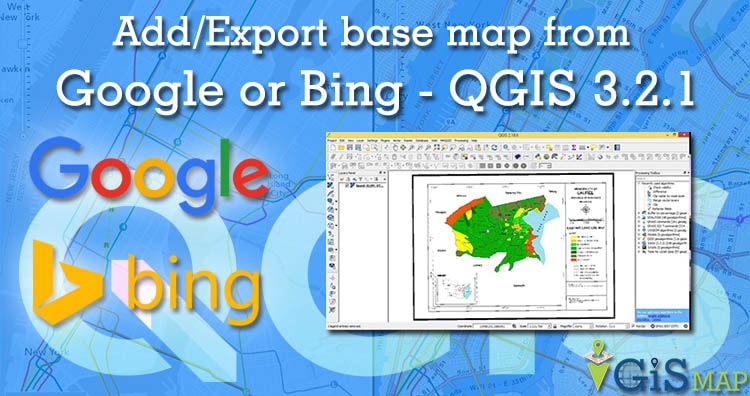
With the release of new version of QGIS, many new features are implemented like new zipped project files, geometry and advanced map tool. So today we learn how to add/export basemaps from google or bing – QGIS 3.2.1 .
Add Google Map layer and print them in QGIS 3.2.1 by following steps:
Go to Browser Panel. If you are new to QGIS 3.2.1 then check Add Browser Panel.
Right Click on XYZ tiles, Choose New connection. XYZ tile server provider has a UX enhancements for tiled services.
Enter the name for example: Google Map then copy and paste the URL given below. And tap on OK. Enter the URL of the service which you would like to use, replacing x, y and z parts with curly brackets substitution
URL for adding basemaps from different sources:
For Google Map: https://mt1.google.com/vt/lyrs=r&x={x}&y={y}&z={z}
Google Satellite: https://mt1.google.com/vt/lyrs=s&x={x}&y={y}&z={z}
For Bing aerial: http://ecn.t3.tiles.virtualearth.net/tiles/a{q}.jpeg?g=1
Google Roads: https://mt1.google.com/vt/lyrs=m&x={x}&y={y}&z={z}
In the same way you can add from bing map by putting above URL. Hope this may help you. If you like the post please comment and share. All suggestions are welcome.
Add a new vector layer and create a project. In the tutorial we used world continents shapefile. You can do selection by two ways. First option click select feature icon. Choose select features and select the required layer from multiple layer.
Selected screen is shown below.
Second method of selection is for very precise value.
>> Select Features by Expresion. Dialog box of selection by expression will open.
Generate Query in QGIS 3.2.1
Before generating the query you can check attribute table in QGIS. Select the field and values then tap on all uniques and select the desired value. We generated for Australian region“NAME_0” = ‘Australia’
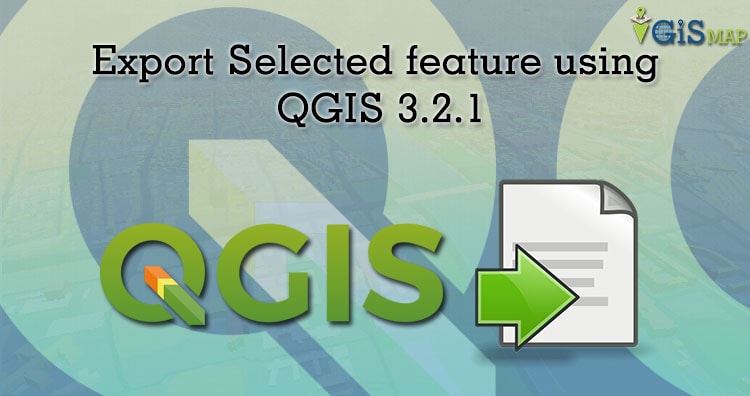
Export or Save into new layer
For Save as, right click on layer >> click on export and choose selected feature as
After choosing save selected feature as… dialog box will appear. Choose correct location where you want to save. Otherwise QGIS will give error message like failed to save.
This all about the Select, Save/Export feature as a new layer using QGIS 3.2.1. I tried my best by pictorial explanation. I hope this would help you. Any suggestion or feedback are welcome.
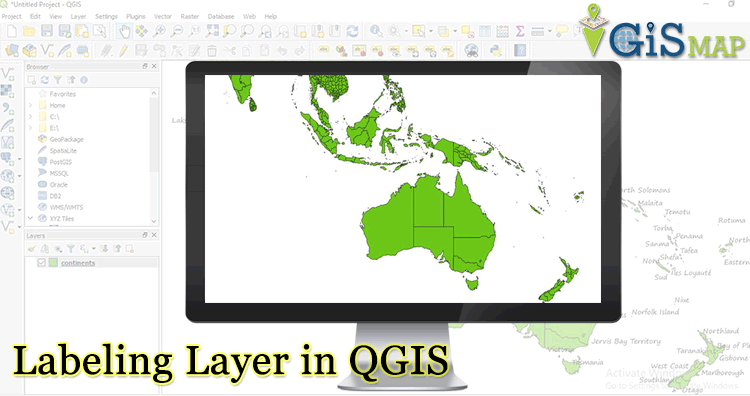
Map is not just a picture in GIS, they represent several hidden information of objects. So in the upcoming days we try to understand it more and unearth the hidden data. After creating Basic Map, today we try our hands on layer labeling in QGIS 3.2.1 – use and change label. For extracting more information about the object we do labeling. It makes the layer interactive.
Labels are for providing more information about the object. This layer property depends on the attributes of the layer. So, lets start
How to get label dialog box
You can reach Layer Labeling dialog box by 2 ways:
By right click the layer >> Properties>> label (icon shown below)Or, Go to layer menu, select labeling.
Above map is not looking so attractive and informative.
In Labeling Dialog Box, it will show no label.
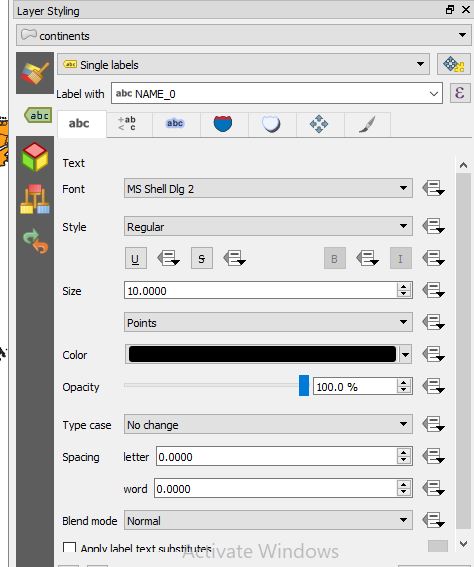
Click over it and select Single labels
Now come to the Label with (here you need to choose the field from attributes which is to be labeled). In the previous blog you learnt that. View attribute table
Lets select Name_0 from the drop down list.
Customize Font and Size.
Click Apply (live updates are available)
Now the map of continent is label like this.
So, this makes your map more informative. But still above map is not looking so good because off overlapping labels. These label are not placed in centre of object also. Multiple labels are also can be done in QGIS.
QGIS 3.2.1 works well for creating interactive maps, using good set of tools and symbology its become easy to implement. In the previous post we learn how to open and view vector data. So, today we are Creating a Basic Map – QGIS. For creating basic map we work with the vector data. Vector data is very common data format it describes the information in points, lines and polygons.
Creating a Basic Map: Adding vector layer
If you are not familiar with QGIS user interface then check our previous article QGIS 3.2.1 GUI
In the dialog box, click on the Browse button. And navigate to the exercise data. (before using make sure to download the Exercise data)
Select the appropriate file, let say select road.shp
Here you are, this is your basic map
Save the project.
View attributes
If you are absolute beginners then question comes in your mind what is attributes. No worries when we are here, attributes is a data which store information about spatial data. It gives where, what and why about spatial data in tabular form.
So for roads, the layer we loaded in our basic map we will view its attributes. ->> Click on this icon for opening attribute table or you can use F6 or Go to Layer>> Open attribute table.
->> This attribute table provides more data about road layer, the lines that you see in the map are spatial data. These lines represents the roads.
Current basic map is not so easy to read. We will make it more understandable and interactive using Symbology (use of symbol).
Symbology
In the cartography design, symbology is technique to use symbols to represent graphic features of map. Visual appearance is very much important. Follow the steps for making your map more attractive –
Click two times on layer>> Layer properties dialog box will appear. Select symbology OR right on the layer>> click the layer properties in the menu. Symbology window shown below.
This all the creating a basic map – QGIS. Symbology is useful but the information contained in the layer is still hidden. In the next blog we will learn how to represent this data on map.
Hope it will be useful for GIS professional. Suggestions and feedback are most welcomed.
In GIS , geographic features are often expressed in multiple data formats. Vector and raster data are prime data formats. In this post you will know about QGIS 3.4.4 open and view vector file – shapefile, kml, dxf, geosjon etc. Vector describes geographic data into three types of geometry. Data represented in terms of points, line and polygon.
Before using QGIS user interface we can add or remove panel by right click on toolbar. We can also do this in view menu. Enable browser panel and layer panel.
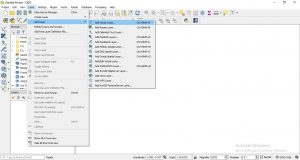
Click the “Add Vector Layer” icon Or use “Layer” menu from the toolbar and navigate to “Add Layer” -> “Add Vector Layer”.
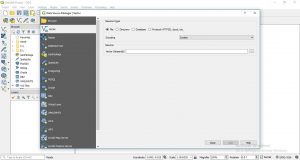
Set the Source Type to “File” and Encoding to “System”.
In most cases system encoding is fine but if you find strange characters in attributes table then you have to change appropriate encoding.
Click “Browse” and navigate to the appropriate files, using the appropriate
file types.
You can select and deselect layer from layer panel. Adjust the layer order by clicking and dragging layers up and down in the “Layers” panel.
You can move by Pan Map icon or you can find Pan Map in view menu
If you want to change any feature then choose Select Feature(s) and move feature to entire feature, where you want to do changes.
To save the project click the “Save” icon and designate a file location. When you re-open a project, any layers that you were using should be in the same
locations on your computer; if they are not, you will need to re-designate the appropriate file paths.
Check out step by step approach in video provided below:
Our goal is to provide new users a working knowledge of QGIS. Although we only had time for a handful of operations, I hope that you now have sufficient familiarity with QGIS to explore it further on your own. If you face any problem in implementing above steps please comment. Any suggestion are welcome.
You also publish your data on web without using QGIS visit MAPOG Tool
Quantum Geographical Information System is a open source platform for viewing, editing, managing and analysis of spatial data with various features which makes your analysis better. As we need word processor to deal with words similar to this for spatial information we require GIS application. In this blog I am providing Introduction of QGIS 3.4.4 for beginners. QGIS 3.2.1 ‘Bonn’ is released on 20 July 2018. QGIS 3.6.2 is the current version but its functionality is same as QGIS 3.4.4. With the help of QGIS you can also create Interactive Web Map.
Main area of QGIS is called as canvas. Likewise other GIS applications toolbars, panels, status bar and menu bar is also. Lets start its study in brief.
1. Menu Bar –
In the above image 1 number is showing main menu bar. You can access almost everything of QGIS from main menu. You can use various features and functions of the QGIS menu style. The Main Menu cannot be moved unlike the toolbars and panels.
2. Toolbar –
Toolbars have buttons that provide a one click access (i.e. shortcuts) to many of the features and functions found in the Main Menu. Toolbars are movable and free floating.
3. Canvas or Map Display Panel –
It shows geographic display of GIS layer or panel layers. It covers maximum area off course because of its function. Create a Basic Map on canvas
4. Browser Panel –
It provides a list of files on your computer. You can drag and drop GIS files into the Layers Panels to view them. This panel is movable and can be hidden/shown on the GUI. We can display it by right click at tool bar and choose the panels you want to use.
5. Layer Panel –
This panel shows map layers that are in your current project. Layers can be turned on/off, clubbed , change drawing order, etc. Extract or Select features in Layer.
6. Status Bar –
It display all the relevant information about the current project. It shows the current scale of the map display, coordinates of the current mouse cursor position,and the coordinate reference system (CRS) of the project.
Now, you get familiar with QGIS interface, how it works, what is the need. Hope this post is beneficial for amateur GIS professional. If you face any problem in downloading QGIS and in using QGIS 3.2.1 desktop drop you comments. Any suggestions are welcome.
GIS applications are tools that allow users to create interactive queries (user-created searches), analyze spatial information, edit data in maps, and present the results of all these operations. Geographic information science is the science underlying geographic concepts, applications, and systems and What goes beyond a GIS is a spatial data infrastructure, a concept that has no such restrictive boundaries. For handling the spatial data infrastructure we use tools like PostGIS and QGIS. this post will help guides you about How can we establish a Connection between PostGIS and QGIS with the help of some GIS operations.
Connection between PostGIS and QGIS
PostGIS and QGIS are two major platforms used for handling GIS operations. PostGIS adds support for geographic objects allowing location queries to be run in SQL. As PostGIS is a spatial database extender for PostgreSQL object-relational database. In our previous post you can read about PostGIS and PostgreSQL.
Now we are going the discuss the details of how We can establish connection between PostGIS and QGIS and before that let’s just discuss some important topics in brief.
QGIS
QGIS is one of the most common open source application used by GIS analyst, Geographers, Civil Engineers and many other professionals. QGIS is a Desktop based Geographic Information System (GIS) Application for creating maps, editing, viewing and analyzing Geospatial data. Quantum GIS is a cross-platform, free and open source application. It can be run on multiple operating system like Mac OS X, Windows, Ubuntu, Linux and Unix.
PostGIS
PostGIS is an open source software program that adds support for geographic objects to the PostgreSQL object-relational database. PostGIS follows the Simple Features for SQL specification from the Open Geospatial Consortium (OGC).
Technically PostGIS was implemented as a PostgreSQL’s extension. And There are a large number of software products that can use PostGIS as a database backend.
PostgreSQL
PostgreSQL is an open source relational database management system ( DBMS ) developed by a worldwide team of volunteers. PostgreSQL is not controlled by any corporation or other private entity and the source code is available free of charge.
When we installed PostgreSQL database server, the PostgreSQL installer also installed some useful tools for working with the database server. You can connect to the PostgreSQL database server by using the psql or pgAdmin tool.
psql is an interactive terminal program provided by PostgreSQL. You can do a lot with psql tool e.g., execute SQL statements, manage database objects, etc. and The second way to connect to a database is using pgAdmin GUI application. By using pgAdmin GUI application, you can interact with PostgreSQL database server via an intuitive user interface.
Connection between PostGIS and QGIS
Import Shapefile into PostGIS
Connection between PostGIS and QGIS
We are going to import some Shapefiles into PostGIS for creating a table in PostgreSQL database. Importing shapefiles into PostGIs using psql is already discussed in our previous post “Import Shapefile in Postgresql – shp2pgsql”. Shapefile: The most popular geospatial vector data format. First developed by ESRI. Because of it’s open specification it is now predominantly used to share GIS data between open source and proprietary software.
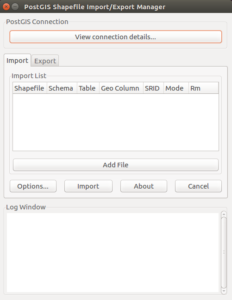
We can also do this import with pgShapeloader tool (also known as “PostGIS Shapefile Import/Export Manager” or “PostGIS Shapefile and DBF loader”). It provides another option for loading shapefiles into PostGIS database tables. It is the graphical user interface (GUI) equivalent of the command line shp2pgsql tool.
The pgShapeloader tool combines the two data loading stages, converting data into SQL commands and running those commands against the target database, into one operation.
On Linux pgShapeloader can be launched from the terminal with the shp2pgsql-gui command which generates this.
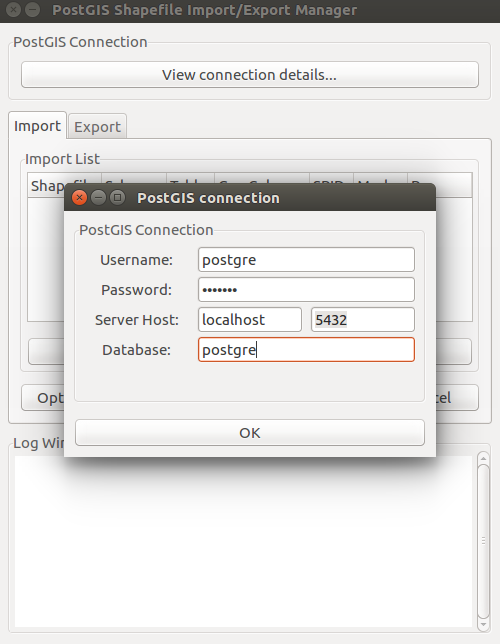
now click View connection details and enter the connection information in the PostGIS Connection section.
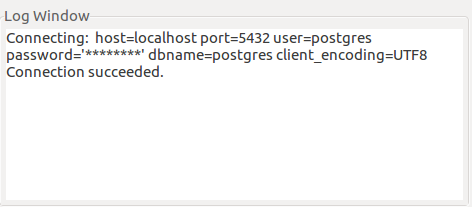
Click OK to return to the main application. The shapefile loader uses the supplied connection details to connect to the target database; the connection status is reported in the Log Window.
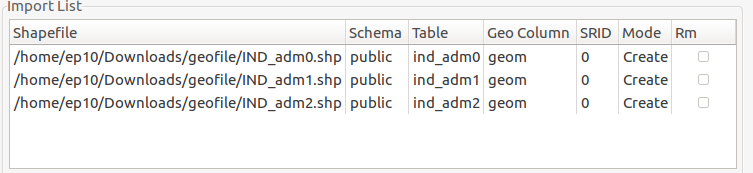
To select your source files, click Add File to open the Select a Shape File dialog box. Navigate to the location of your shapefile, click the shapefile you wish to load, and click Open. Multiple files can also be added in the same way. and Once all import options have been added and configured, click OK and click Import to start the conversion.
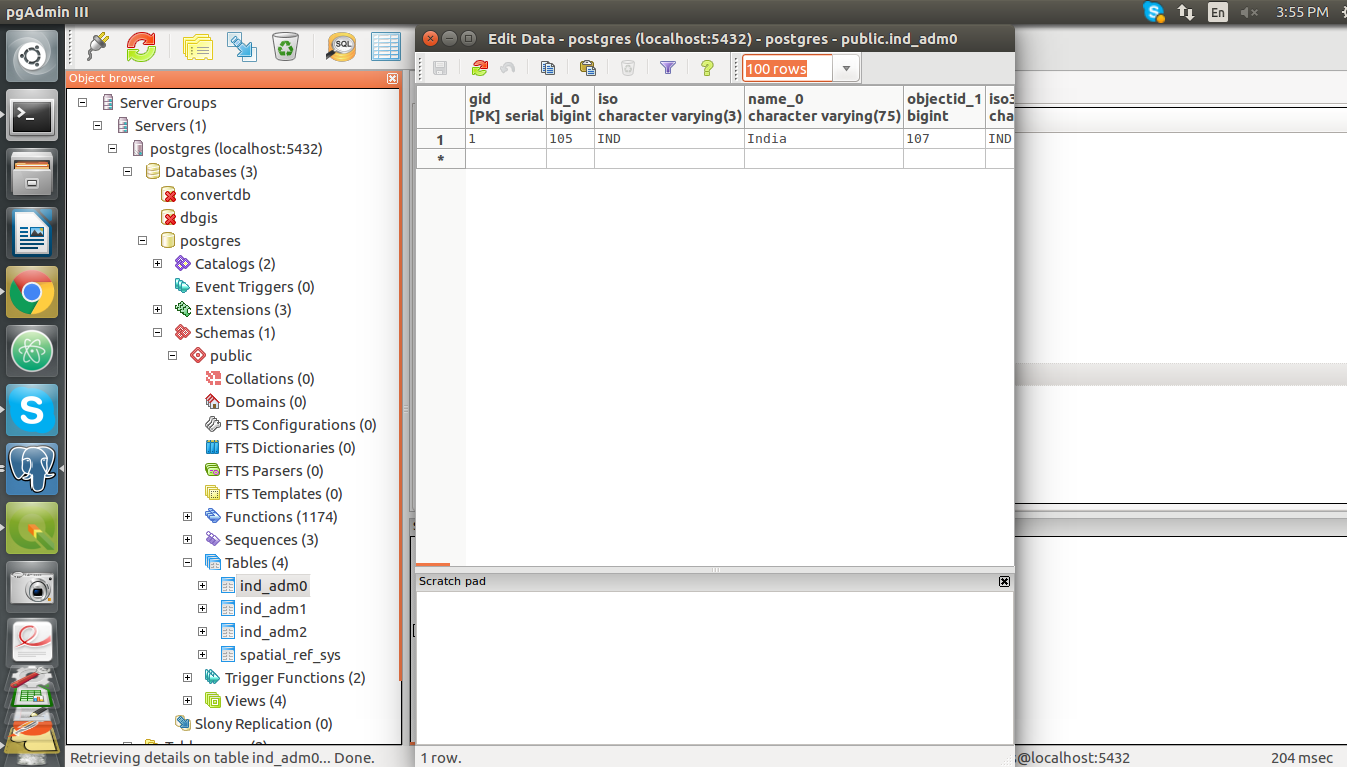
Now these shape files are added in the PostGIS databases as tables you can view them and their attributes in pgAdmin or psql.
Add and Modify PostGIS data files in QGIS
Now we are going to add and modify the PostGIS database files in QGIS application.
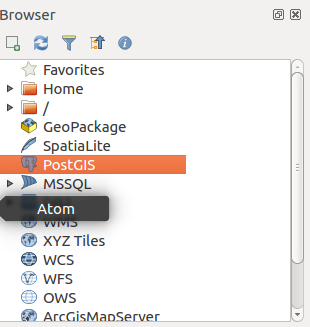
Open QGIS application, you will see PostGIS option in Browser toolbar here.
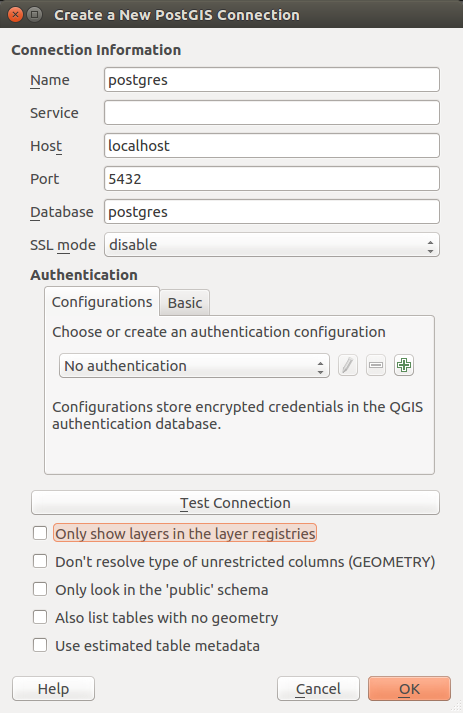
Right click on the PostGIS option and click on the “New Connection” that will open a “Create a New PostGIS connection” toolbar.
Connection between PostGIS and QGIS
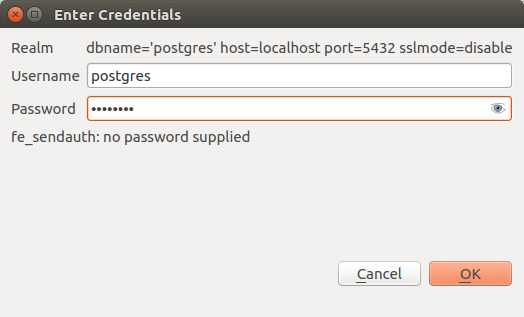
Enter the Database Connection details and then click the “Test Connection” button. this button will open up an authentication form for server details. fill the authentication details and click Ok.
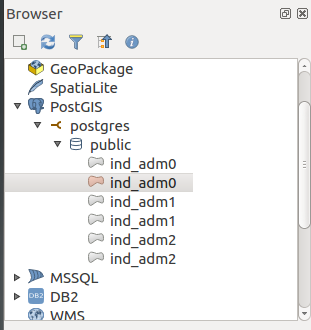
you will see a message on toolbar i.e connection to is successful. Now click OK and you have successfully connected your database with the QGIS. You can see the Database and the Shapefiles we imported in PostGIS below the PostGIS in browser window in QGIS.
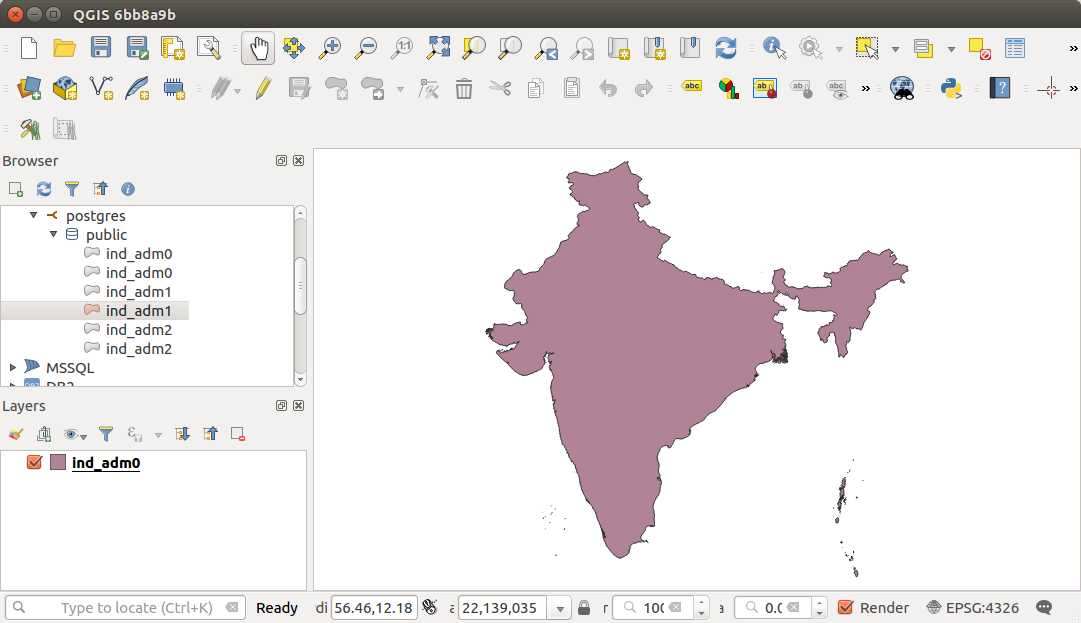
Now for adding these Shapefile as layers in QGIS, Right click on the files and select “Add Selected layers to Canvas” then the file will show as a layer on canvas and in layers window in QGIS. you can also see the attributes of the Shapefile by right-click on the filename in Layers window and selecting Open attribute table.
Now as we can see that the attributes of Shapefile after modifying has increased compare to the attributes when the file was imported from PostGIS database.
When the Shapefile is saved after modification in QGIS by default the file is also saved in PostGIS database with the new and changed attributes it has before.
The connection between QGIS and PostGIS is proves that if any data file is altered in QGIS, the file also gets modified in the PostGIS database system.
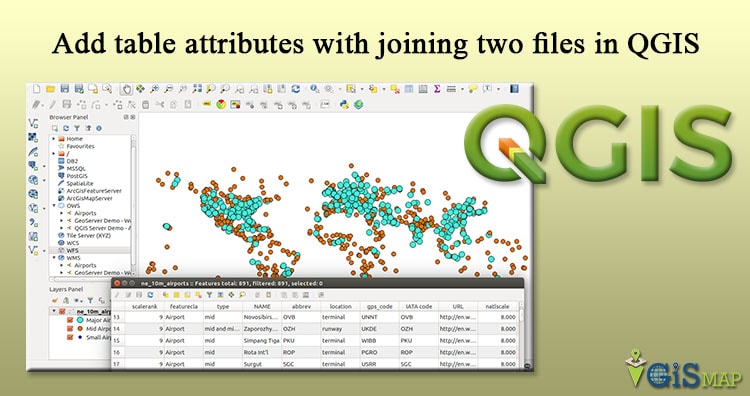
Want to add more attributes in your Shapefile to respective feature? QGIS an open source tool, which I recommend to every Geographer for use, can give you direct solution. Sometimes we need to join more attribute to a GIS vector files which ultimately provide more power to you for analysis with more attributes. For joining two file to add more attribute you need to have a common attribute field in both the files, same as like you need to have primary and foreign key to join two table data in SQL. QGIS provide us the facility to Add more table attributes with joining two files .
Steps to Add table attributes with joining two files in QGIS:
We are performing this steps with Shapefile and csv file, while you can also perform the same steps with other GIS vector file and csv file.
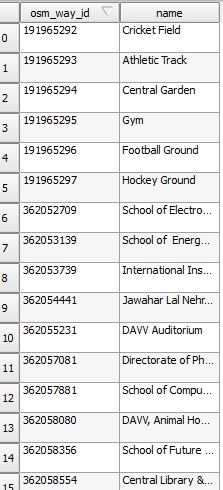
1.) Open QGIS and add a shapefile and observe its attribute table.
Here we have two columns.
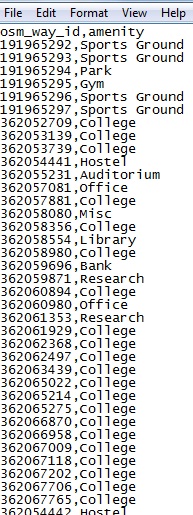
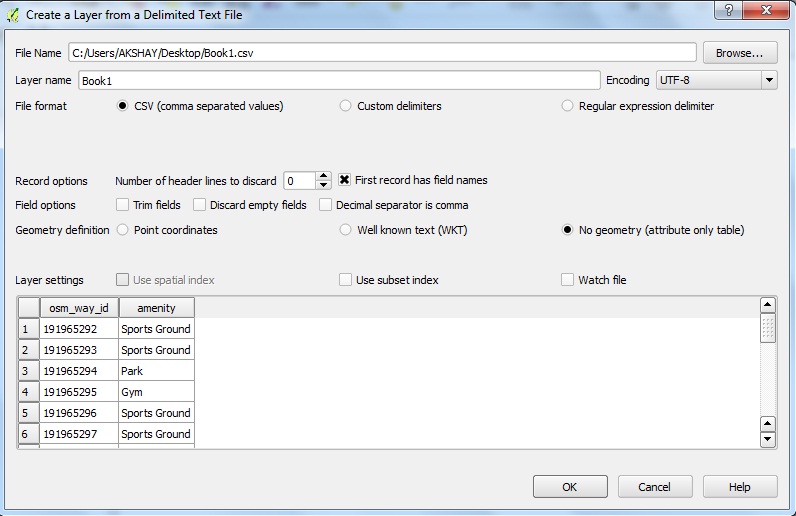
2.) Now We have a comma separated file(.csv) which has to be added. Having two columns i.e osm_way_id and amenity as shown below.
Add table attributes with joining two files
Note : Both the field will store in String format as we have not defined the field type. To define field type, create a new file with the same name of that of csv file but with csvt format in the same folder. For above instance the content should be written as :
“Integer”,”String”
in the file. We can see that osm_way_id is the column which is common in attribute table of shapefile and .csv file. So we can join this two using the same.
3.) First we have to import this file in QGIS. QGIS provide us the facility of importing files which do not have any geographic information also. While importing .csv file we have to take care that default type for .csv file is string if .csvt file is not present in the folder.
QGIS will look for .csvt file for data type in the same folder of same name. If not found all the data would be imported as default type i.e String. Now here all the columns are string so we are not creating a .csvt file.
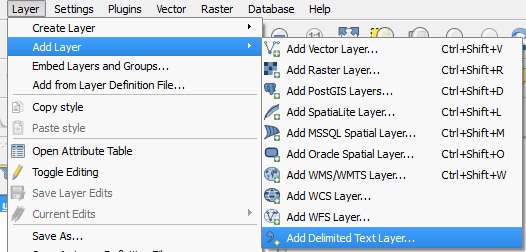
4.) Lets import this file in QGIS. Click layer than Add Layer and select Add Delimited Text Layer.
5.) Select csv radio button and then select no geometry radio button.
Add table attributes with joining two files
6.) Click ok. The file is imported.
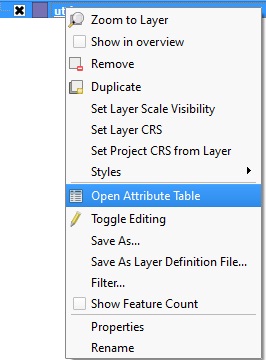
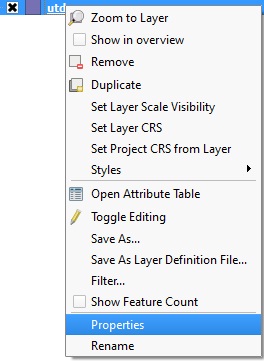
7.) Let’s join both tables. Open properties dialog box of the layer for which we want to perform join.
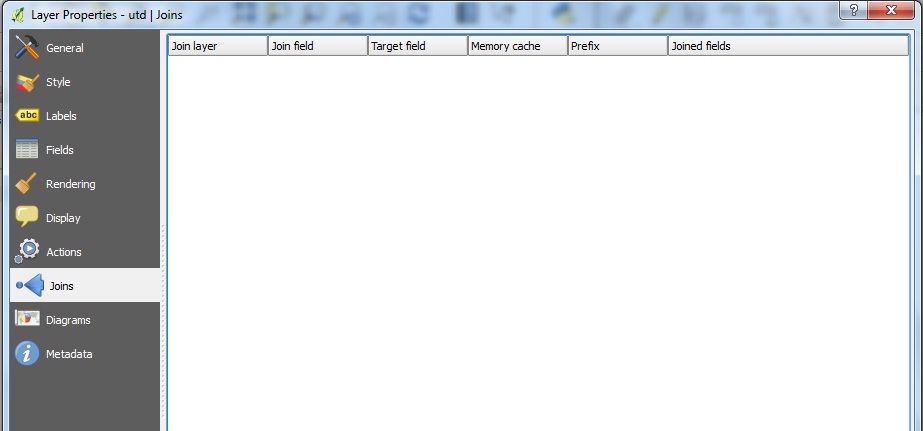
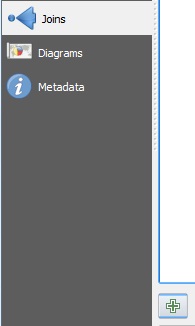
8.) Click on join.
9.) Click on plus sign.
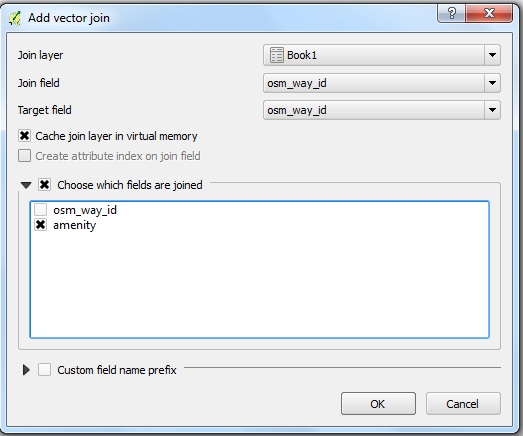
10.) Set the dialog box as in the image. We have chosen the field according to which we want to join and the field which we want to join with the table. By default all the fields are added.
Add table attributes with joining two files
11.) Click ok.
12.) Click ok for properties dialog box.
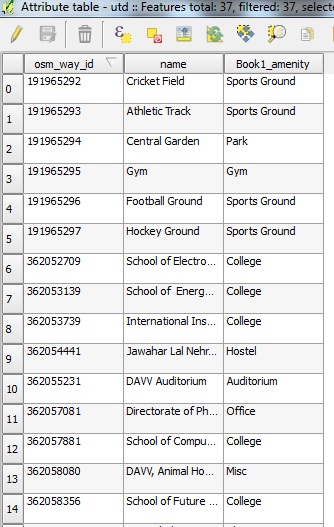
13.) The tables are joined. Open the attribute table for the layer for which you performed join. The column name Book1_amenity shows that it was imported from Book1.
Add table attributes with joining two files
Comment below if you are facing any problem in adding attributes data to respective features in QGIs with Join function.
How to connect QGIS to oracle spatial. QGIS can now connects to oracle to view spatial data and process it, great news for an open source software believers. As a newbie to QGIS user, i can just give a way, that i connected to it.
How to connect QGIS to oracle spatial :
1.) Firstly you should have downloaded QGIS with GDAL/OGR required oracle library for bridging oracle connectivity and must have installed oracle on your machine. If oracle library is not installed, see the following post : Install QGIS for oracle connection via OSGeo4w.
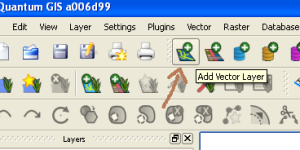
2.) After starting the QGIS application, select Add Vector Layer as shown below:
Connect QGIS to oracle spatial
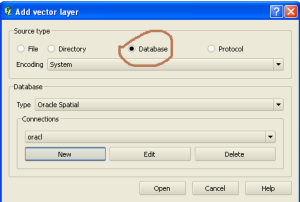
3.) A new window will pop up on clicking the above, now select Database Radio button as appeared in Source. Now in Database Type drop down box, select Oracle Spatial. If you have properly installed QGIS with the requirement stated above Oracle spatial would be present.
Connect QGIS to oracle spatial
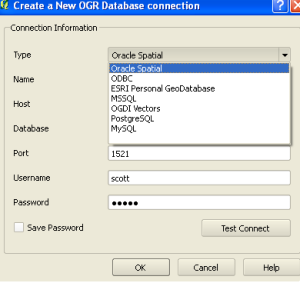
4.) In the same Add Vector Layer window, select new button under connection label. This will open up a simple form with following Connection information to be filled, i.e, Type, Name, Host, Database, Port, Username and Password.
Here is the way to fill up the information :
a.) Type : In type select oracle spatial from drop down box.
Type : Oracle Spatial
Connect QGIS to oracle spatial
b.) Name : Type in any desired name you wish to give to connection
c.) Host : For finding your host name, make a query in your oracle sql plus application as written below:
SELECT UTL_INADDR.GET_HOST_ADDRESS FROM DUAL;
This will return the 32 bit address as shown below in figure:
Connect QGIS to oracle spatial
d.) Database : Write database name, i.e the name you have given while installing oracle software.
e.) Port : Enter port number i.e 1521
f.) Username : Enter username
g.) Password : Enter corresponding password of username
Connect QGIS to oracle spatial
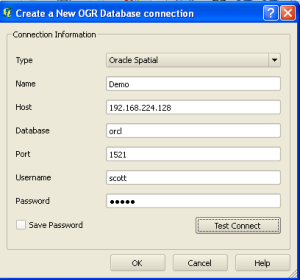
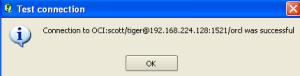
Now select Test Connection button. This will pop up another window which gives you an information of your successful connection, as shown below.
Note the string url connection to connect QGIS to oracle spatial and click OK.
5.) Again in the vector data layer window, select the connection that you made named as Demo and click on Open button.
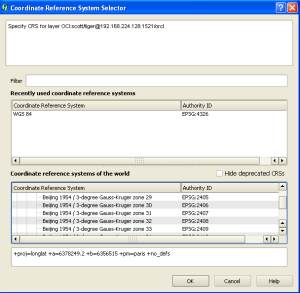
6.) Now select the coordinate system for your database, which will be prompted after proceeding from step 5.
Connect QGIS to oracle spatial
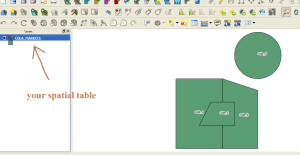
7.) If all steps are successfully done, you can see your spatial table, with your vector data spatial view as shown below:
Feel free to comment below, if you are having any problem to connect Oracle Spatial to QGIS QuantumGIS (Geographic information System) or if you want to discuss for the same topic. You can also see QGIS tutorial further. And yes, don’t forget to subscribe and follow on twitter for getting updates related to GIS post.
Convert Shapefile to kml by QGIS. Shapefile is ESRI based Vector file, While KML or Keyhole Markup Language is file which models and stores geographic features for display in Google Earth or Google maps. Many times you may require to convert the required shapefile to KML file, so that you can deploy the same over Google Earth for some reason. QGIS (Quantum GIS) is an open source GIS (Geographic Information System) tool, which let you upload the Shapefile and convert the same to KML file. Similarly ogr2ogr is also an open source tool, which let you to convert between GIS data formats. Look over shp to kml convert using ogr2ogr tool which can be marked as an alternative to this article. You can also see to convert Kml to Shapefile and also Shapefile to GeoJSON in QGIS.
1.) Open up the installed QGIS.
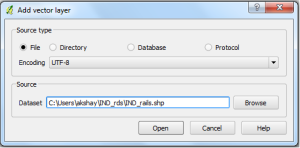
2.) In the menu bar, select Layer and press Add Vector Layer. Now select the source type in the pop up window opened as File and browse the source Shapefile(Note:Your shapefile .shp, .dbf and .shx file should be in same folder). Press open.
Convert Shapefile to kml by QGIS
Select the coordinate reference type system if coordinate reference window appears and press ok.
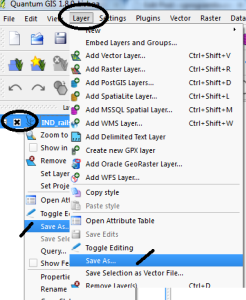
3.) Right click on the name of Shapefile layer Appearing in the Left upper side and select save as:
or
You can select layer from the menu, and click on save as. (Image below provide demonstrate both the options with the indicator displayed)
Convert Shapefile to kml by QGIS
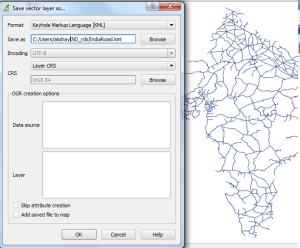
4.) In the Save vector layer as window, Select the format from the drop down box as Keyhole Markup Language(KML) and browse the folder in which you want to save the KML file . Name it and Press OK.
Convert Shapefile to kml by QGIS
Your KML file will be Exported in the directed folder. You can Verify the generated KML file for its validity by uploading the generated KML file to QGIS or uploading KML file in Google map. You may soon find the tool and the coding for the same on this site.
You may check in converting Geojson to Topojson and Shapefile to TopoJSON file. Hope this may help you in converting Shapefile to KML file easily. If you still find problem in converting the file, do let me know by commenting below.
We use cookies to ensure that we give you the best experience on our website. If you continue to use this site we will assume that you are happy with it.


 Second method of selection is for very precise value.


 So, this makes your map more informative. But still above map is not looking so good because off overlapping labels. These label are not placed in centre of object also. Multiple labels are also can be done in QGIS.
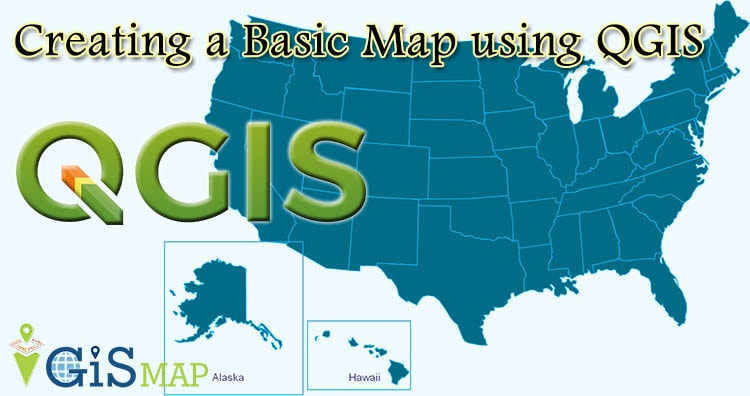


