Explore the world of WMS (Web Map Service) with IGISMAP! Easily view WMS layers on a map.
A Web Map Service (WMS) is an interface that lets a user access geospatial data, maps, and comprehensive information about certain features that are displayed on the map. Rather than the actual geospatial data, a “map” is described here as a visual depiction of such data. A web map service can create maps as images, collections of graphics, or packaged sets of geographic feature data. It can respond to simple questions about a map’s detail, and it allows us to know what maps it is capable of producing and which ones can be queried more deeply. Here in article you can Add View WMS Layer Online on your Map.
Exploring WMS Layers with Visual Guidance: Video Tutorial Roundup
Checkout video below for step by step process.
To open and view the WMS layer the user has to use any GIS software, which will require prior knowledge of GIS. However, the Add WMS tool on the MAPOG Tool website allows the user to open and view different layers and helps the data to interpret and analyze according to their own requirement. You can also download GIS data from MAPOG Tool and analyze in the same tool. From IGISMap Tool you can add data and share your map with others.
Get directed to Add WMS tool using the following –link
Let’s look into the application of Add WMS tool in MAPOG Tool.
Adding WMS file
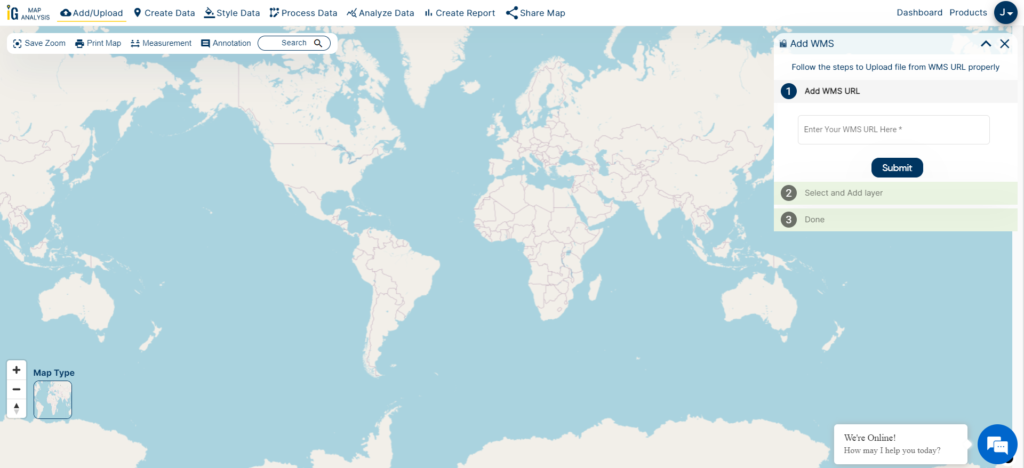
Firstly, open the Add WMS tool, and select the WMS URL layer file from your system.
Add WMS Tool
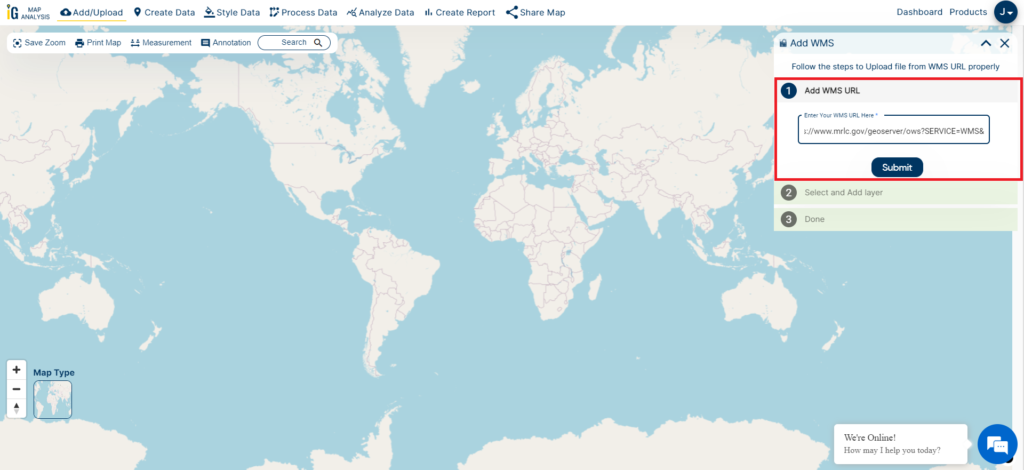
After selecting the WMS URL, click on the Submit option.
Add WMS URL
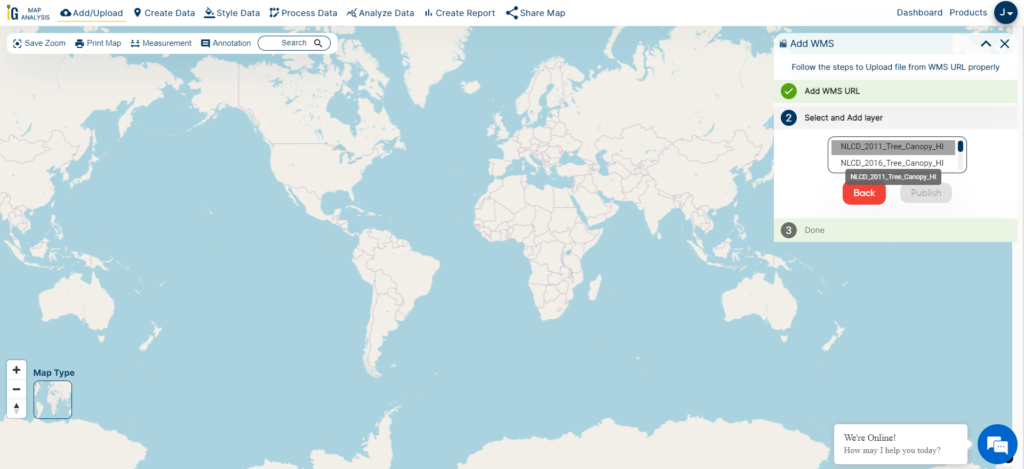
A WMS layer file can encompass either single or multiple layers, all accessible and visible on the IGISMap website. To initiate, choose the initial layer within the file and click on the “Publish” button.
Adding WMS Layer
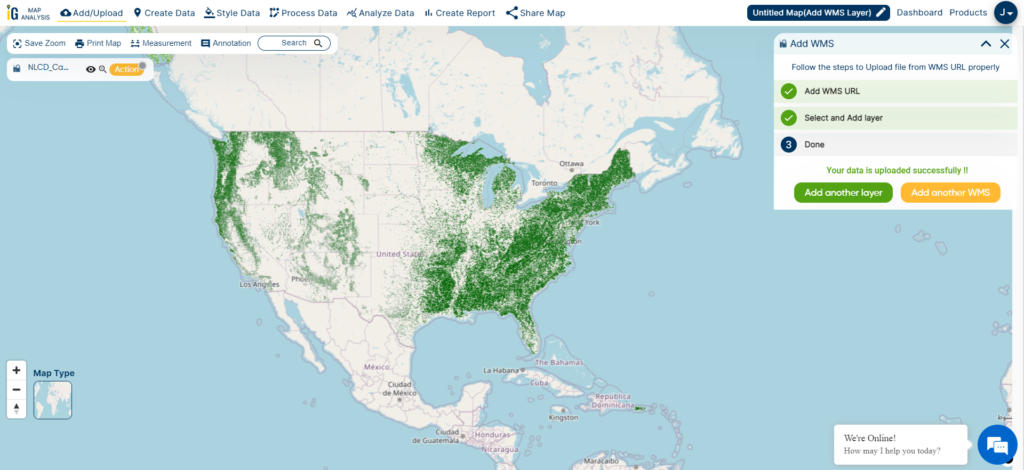
The chosen WMS layer can be published and displayed on the base map. Users have the option to add additional layers from the same WMS file by clicking the “Add another layer” button. Additionally, users can incorporate another WMS file by selecting the “Add another WMS” button. These straightforward steps allow users to effortlessly view and analyze both single and multiple-layered WMS files on the IGISMap website.
WMS Layer uploaded
Here are the other tools you can leverage within IGISMAP
Have you been hunting GIS data too long and couldn’t find the right data or a proper data collection hub for fulfilling your requirements? Worry no more, IGISMAP GIS solutions offer a comprehensive collection of GIS data for over 150 countries, providing access to more than 150 datasets per country. Each dataset is carefully curated and accurately represents the administrative divisions of the respective countries. IGISMAP provides two essential tools for accessing this data: the Download GIS Data and Add GIS Data functionalities. Users can download the data in multiple formats, including ESRI Shapefile, KML, GeoJSON, or CSV, depending on their preferences and requirements. The platform ensures that users have a seamless experience in accessing valuable GIS data for their projects. Check the article – Add GIS data from IGISMap GIS data collection to understand more about Add GIS Data.
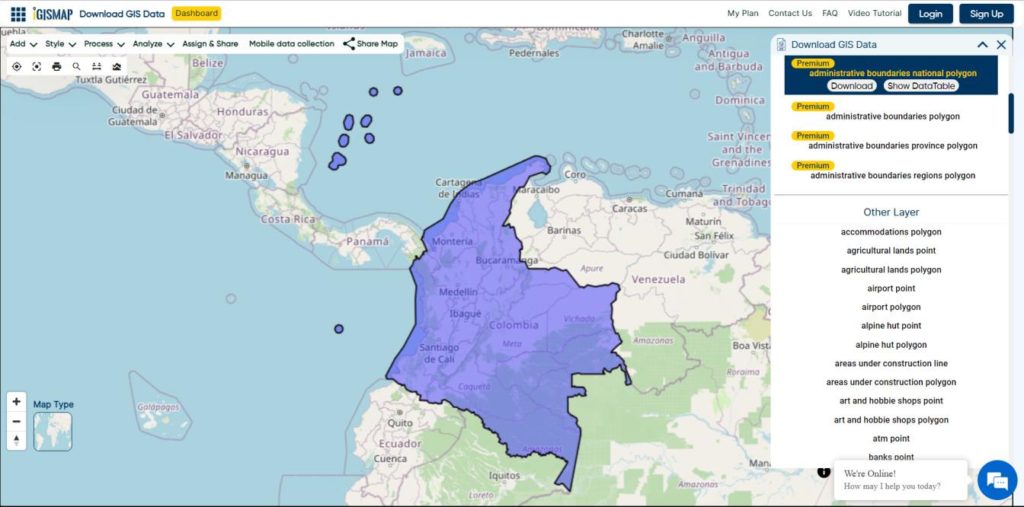
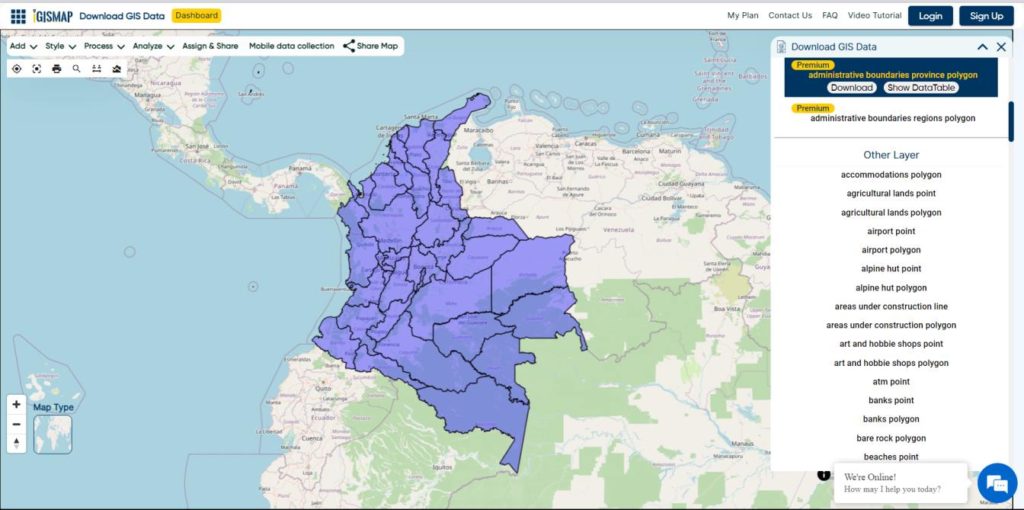
In this article, we will talk about administrative level GIS data of Colombia and how it can be accessed from Download GIS Data tool. GIS data of almost all natural and man made geographic features are available in IGISMAP for Colombia. This article will give you an overview of all the administrative divisions GIS data available for Colombia.
Note:
All data available are in GCS datum EPSG:4326 WGS84 CRS (Coordinate Reference System).
You need to login for downloading the shapefile.
Download Free Shapefile Data of Colombia
The geography of Colombia is characterized by its six main natural regions that present their own unique characteristics, from the Andes mountain range region shared with Ecuador and Venezuela; the Pacific Coastal region shared with Panama and Ecuador; the Caribbean coastal region shared with Venezuela and Panama; the Llanos (plains) shared with Venezuela; the Amazon rainforest region shared with Venezuela, Brazil, Peru and Ecuador; to the insular area, comprising islands in both the Atlantic and Pacific oceans. It share its maritime limits with Costa Rica, Nicaragua, Honduras, Jamaica, Haiti, and the Dominican Republic.
Disclaimer : If you find any shapefile data of country provided is in correct do contact us or comment below, so that we will correct the same in our system as well we will try to correct the same in OpenStreetMap.
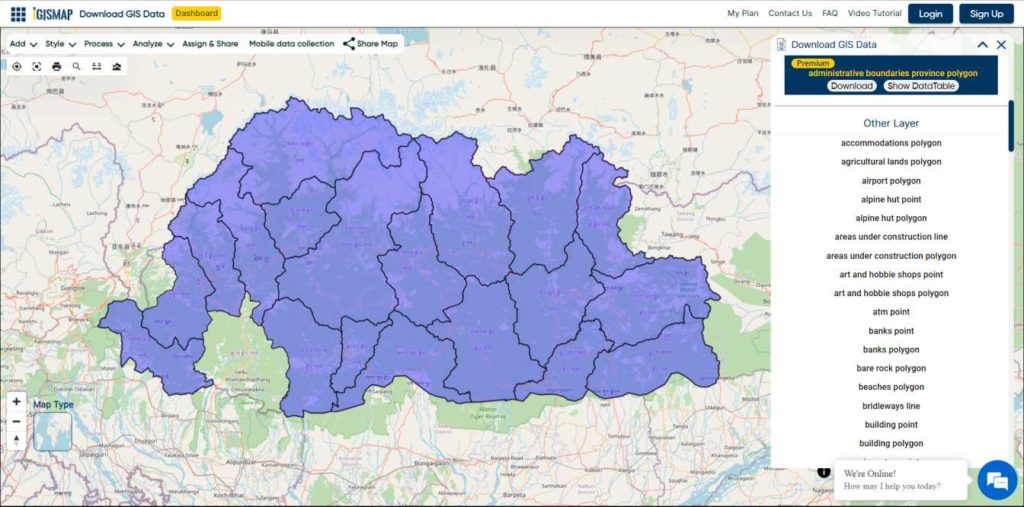
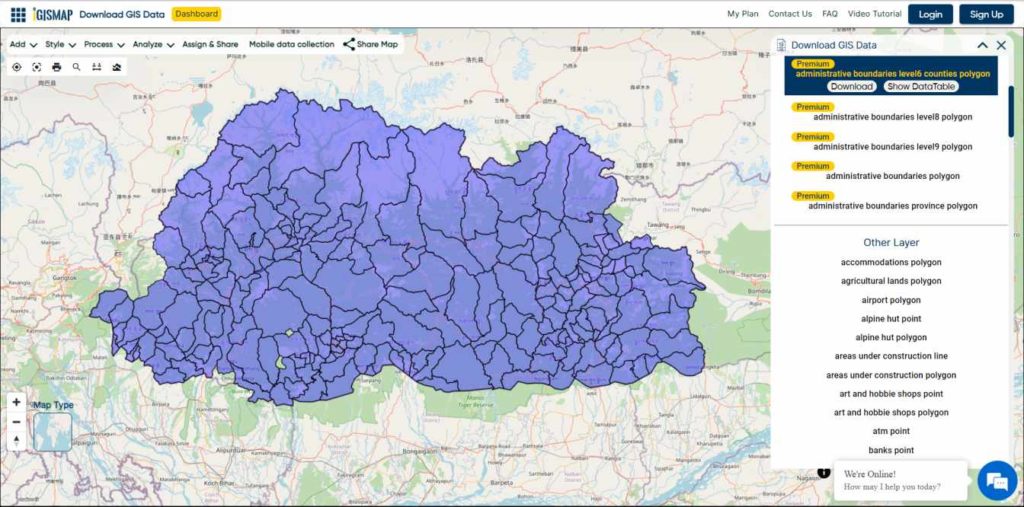
Download Bhutan Map Shapefile GIS Data, Bhutan Districts , Bhutan Villages Shapefile data. Available in Shapefile, KML, GeoJSON, CSV
Have you been hunting GIS data too long and couldn’t find the right data or a proper data collection hub for fulfilling your requirements? Worry no more, IGISMAP GIS solutions offer a comprehensive collection of GIS data for over 150 countries, providing access to more than 150 datasets per country. Each dataset is carefully curated and accurately represents the administrative divisions of the respective countries. IGISMAP provides two essential tools for accessing this data: the Download GIS Data and Add GIS Data functionalities. Users can download the data in multiple formats, including ESRI Shapefile, KML, GeoJSON, or CSV, depending on their preferences and requirements. The platform ensures that users have a seamless experience in accessing valuable GIS data for their projects. Check the article – Add GIS data from IGISMap GIS data collection to understand more about Add GIS Data.
In this article, we will talk about IGISMAP GIS data of Bhutan and how it can be accessed from Download GIS Data tool. GIS data of almost all natural and man made geographic features are available for Bhutan. This article will give you an overview of all the administrative divisions GIS data available for Bhutan.
Note:
All data available are in GCS datum EPSG:4326 WGS84 CRS (Coordinate Reference System).
In Bangladesh, a village is the smallest territorial and social unit for administrative and representative purposes. It is an elective unit of a Union Council from which a single council member is elected. Usually one village is designated as a ward and each union is made up of nine villages.
Disclaimer : If you find any shapefile data of country provided is incorrect do contact us or comment below, so that we will correct the same in our system as well we will try to correct the same in OpenStreetMap.
IGISMAP introduces the Maldives’ GIS data collection, encompassing administrative boundaries such as national boundaries and atolls, available for download in various formats including ESRI Shapefile, KML, GeoJSON, and CSV, providing GIS enthusiasts with the opportunity to explore and analyze geographic and administrative features for mapping projects.
Exciting news for GIS enthusiasts! IGISMAP has just released GIS data collections for over 100 new countries. You can now access the shapefiles of all essential administrative and other geographical features. The provided links allow you to download the Maldives Administrative Boundary GIS Data in ESRI Shapefile, KML, GeoJSON, and CSV formats.
Note:
All data available are in GCS datum EPSG:4326 WGS84 CRS (Coordinate Reference System).
You need to login for downloading the shapefile.
Here is the video tutorial to download data:
Download Shapefile Data of Maldives
Maldives, officially known as the Republic of Maldives, is a picturesque island nation situated in the Indian Ocean. Comprising a total of 26 atolls, which are formed by more than 1,000 coral islands, Maldives is renowned for its breathtaking beauty, pristine beaches, and crystal-clear turquoise waters.
Geographically, Maldives is located southwest of Sri Lanka and India, spanning an area of approximately 298 square kilometers (115 square miles). The country stretches over 820 kilometers (510 miles) from north to south and 120 kilometers (75 miles) from east to west. The nearest landmass is the Indian Lakshadweep Islands.
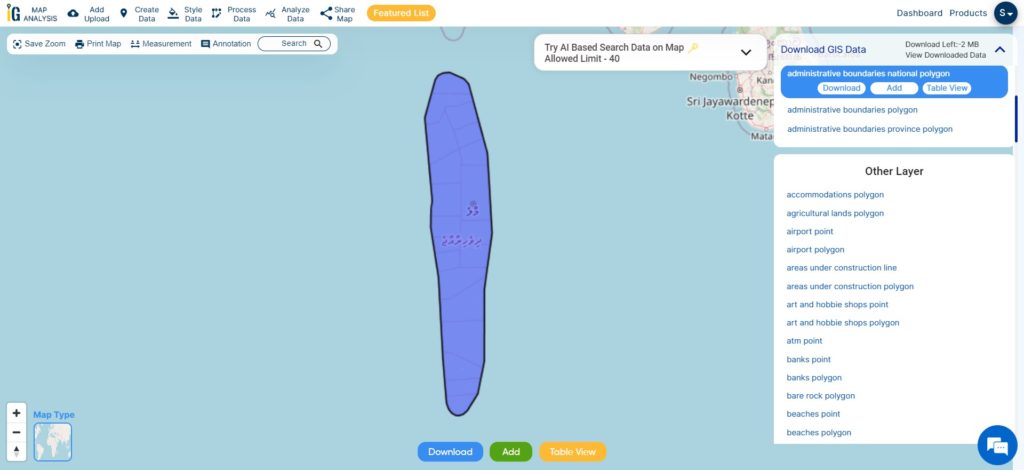
Maldives National Boundary
After logging in with a verified email ID, select the desired country. Next, choose the specific layer and format for the GIS data. Before downloading the Maldives GIS data, you have the option to check the data table for further details. Finally, click on the download button to initiate the download.
The Maldives, a tropical paradise in the Indian Ocean, is an archipelago consisting of 26 atolls, which are further divided into 20 administrative atolls. These atolls serve as the country’s primary administrative divisions. Each atoll comprises numerous coral islands, with some atolls boasting more than 200 individual islets. The capital city, Malé, located in the Kaafu Atoll, is not only the political and economic hub of the Maldives but also one of the most densely populated cities in the world. Despite facing challenges from climate change and rising sea levels, the Maldives’ administrative atolls remain a symbol of natural beauty and cultural richness, attracting tourists from around the globe.
This shapefile covers following administrative atolls of maldives listed below:
Alifu Alifu Atoll (North Ari Atoll)
Alifu Dhaalu Atoll (South Ari Atoll)
Baa Atoll
Dhaalu Atoll
Faafu Atoll
Gaafu Alifu Atoll (North Huvadhoo Atoll)
Gaafu Dhaalu Atoll (South Huvadhoo Atoll)
Gnaviyani Atoll (Fuvahmulah)
Haa Alifu Atoll (Thiladhunmathi Uthuruburi)
Haa Dhaalu Atoll (Thiladhunmathi Dhekunuburi)
Kaafu Atoll (Male Atoll)
Laamu Atoll
Lhaviyani Atoll
Meemu Atoll
Noonu Atoll
Raa Atoll
Seenu Atoll (Addu Atoll)
Shaviyani Atoll
Thaa Atoll
Vaavu Atoll
Download Maldives North Male Atoll Shapefile Data
North Malé Atoll is one of the most popular and frequently visited atolls in the Maldives. Located in the northern part of the archipelago, it is situated close to the capital city of Malé, making it easily accessible for tourists.
The capital city of the Maldives is Malé, and it is not specifically located within the North Malé Atoll. However, Malé is situated in close proximity to the atoll and serves as the central hub for transportation, administration, and commerce in the country. It is located on the southern edge of the North Malé Atoll, which makes it easily accessible from the various resorts and islands within the atoll.
Hulhumalé is a reclaimed island located in the Maldives, situated in the southern part of the North Malé Atoll. It is an artificial island developed as a response to the growing population and urbanization pressures faced by the capital city of Malé. Hulhumalé serves as an extension of the greater Malé area and has become a key residential, commercial, and recreational hub.
Disclaimer : If you find any shapefile data of country provided is incorrect do contact us or comment below, so that we will correct the same in our system as well we will try to correct the same in o
For a GIS project, accessing the required data is the first step that determines the further workflow of the project. Online sources either provides the data or provide tools to work with data. There are very few web tools that provides important data and services to work with the data in a single platform. Yes, that is right – MAPOG is one of that kind, where you can find most demanding GIS data in vector formats with a number of tools to carry out analysis and other operations over the GIS data. In the article below we will how to add/upload data and merge polygons. In addition, to merge the feature you can addGIS Data i.e shapefile, kml, kmz, geojson etc.
GIS Data in IGISMap contains administrative boundaries such as country, states, districts, roads, railway lines, and other geographical features such as roads, farmlands, waterbody, etc. IGISMap gis data tool provides you data for 30+ countries, and 51 US states. Also, a few spatial data on a global level are also provided. These data can be directly accessed using Add GIS Data tool from the dashboard or from the map tools. Add GIS Data is also made available in certain IGISMap tools to help users access GIS data directly within the tool itself.
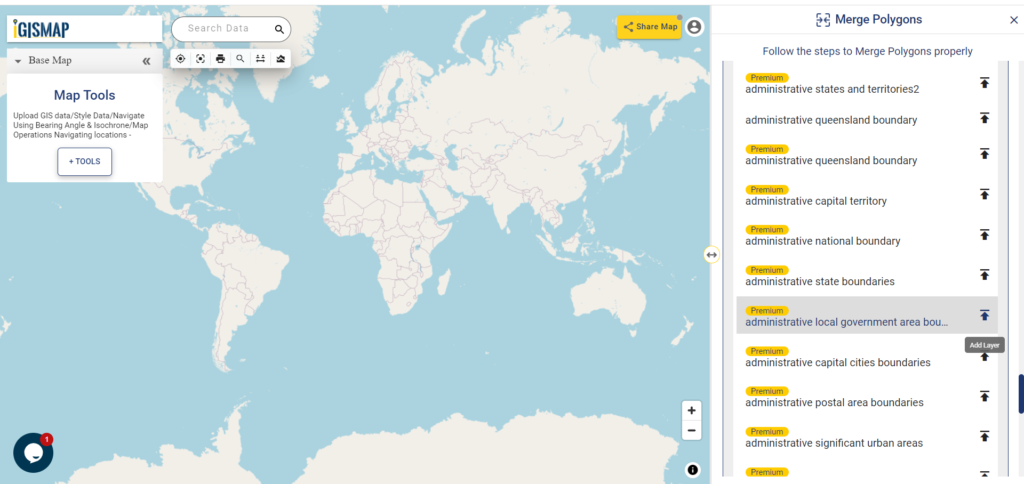
In Merge Polygonstool, Add GIS Data option is provided to access polygon GIS data of various administrative level boundaries of each country. Users can add any polygon data from IGISMap collection and merge the required polygon features. In this article we are going to see how this is done.
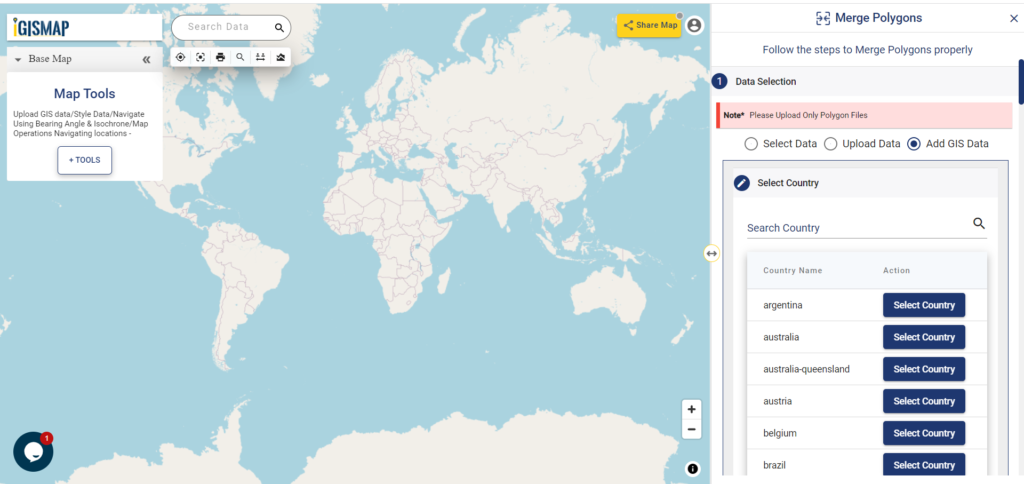
There are multiple options in Merge Polygons tool to add the input data. In this article, we will select Add GIS Data option to add the required data from IGISMap data collection. For demonstration, we will use the GIS data of local government area boundaries of South Australia. Thus we will select Australia from the Select Country list.
Add GIS Data – Select Country
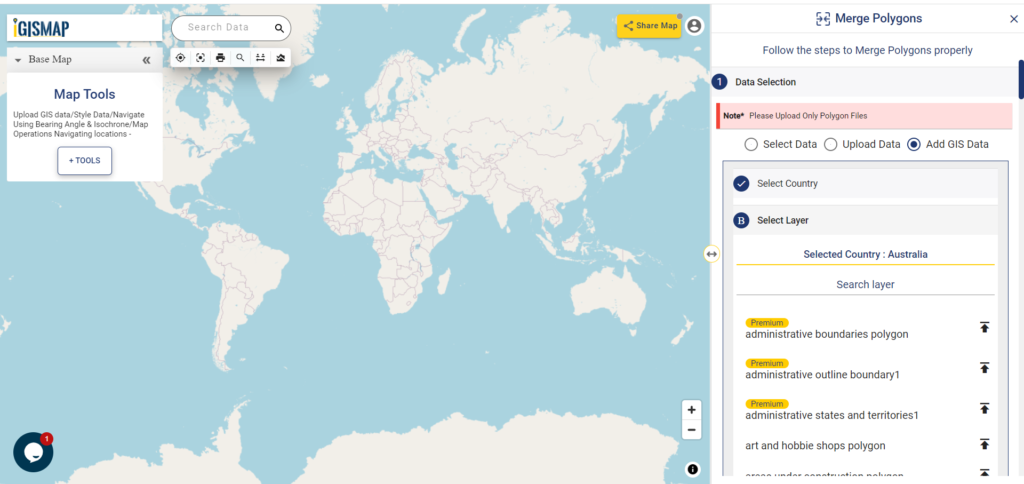
After selecting the country, list of GIS data associated with Australia will open.
Add GIS Data – Select Layer
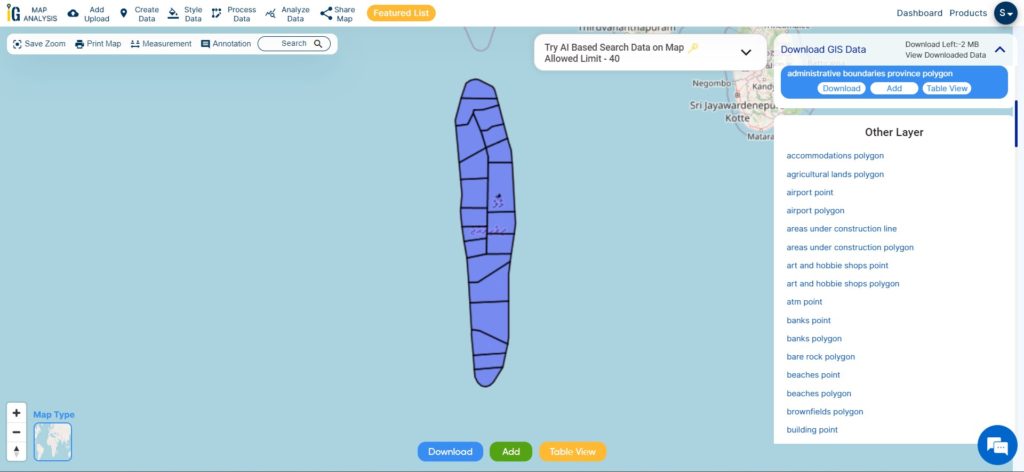
Scroll down or search for local government area in the search bar to filter the list to the required data. Select administrative local government area boundaries data from the list and click Add Layer icon.
Local Government Area Boundaries of Australia
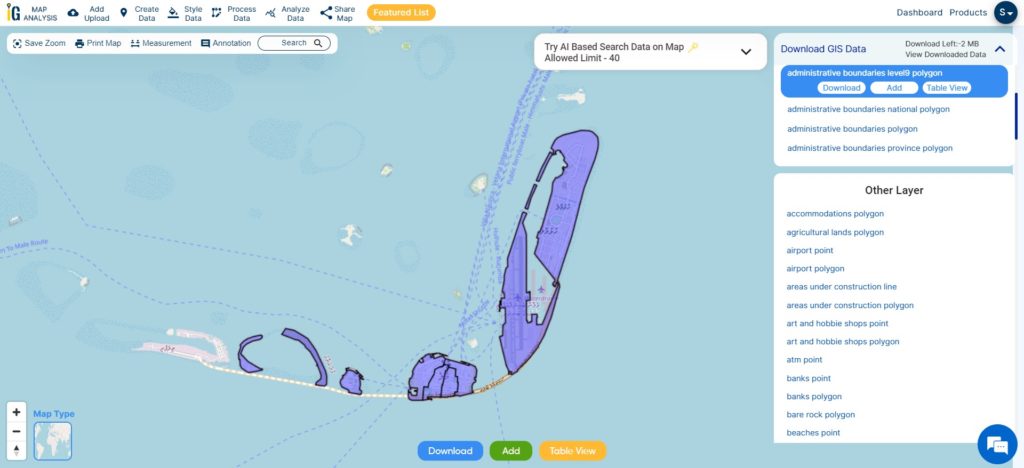
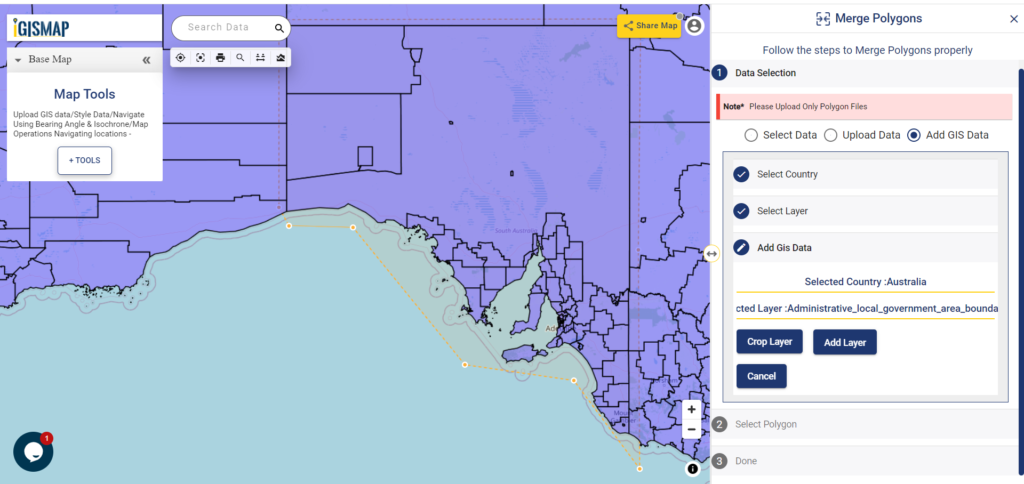
Add Layer will preview the selected layer in the map and the options to crop the layer will be available in the tool. Since we only want the LGA boundaries of South Australia. Thus click the Crop Layer button and start drawing a polygon completely enclosing the LGA polygon features of South Australia and click Add Layer button.
Crop Layer
Add Layer button will publish the cropped LGA boundaries of South Australia on the map and the Select Polygon section of the Merge Polygons tool will open.
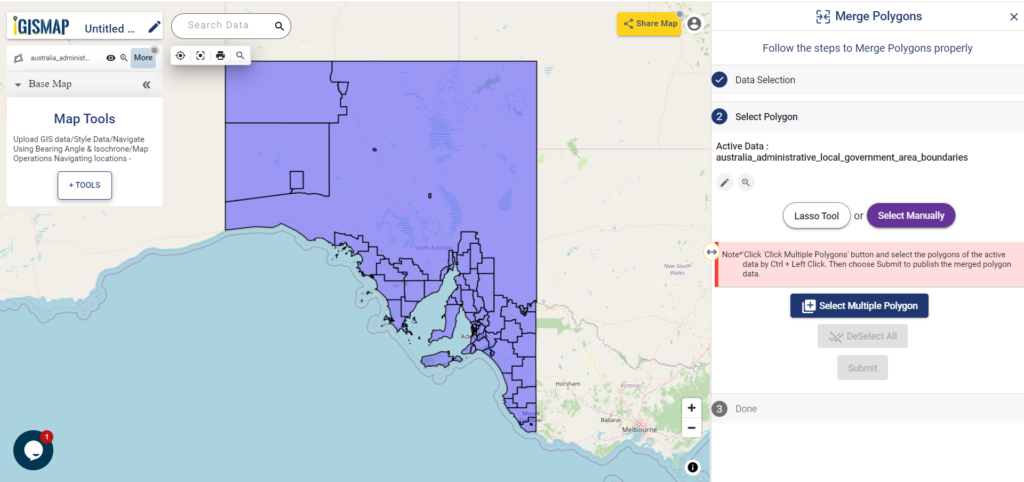
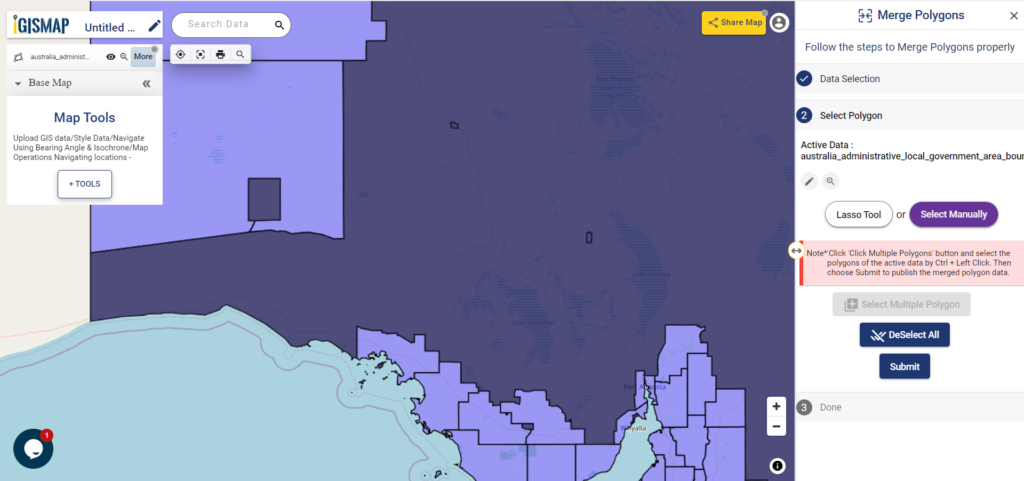
There are two options to select the required polygon features – Lasso Tool and Select Manually. We will use Select Manually option. After selecting Select Manually, click Select Multiple Polygon button. Now select the polygon features of Roxby Downs, Coober Pady, and Unincorporated SA boundaries, which we want to merge the polygons together. After selecting the polygons, click on the Submit button to start the process of merging the selected polygon features.
Select Polygon – Select Manually
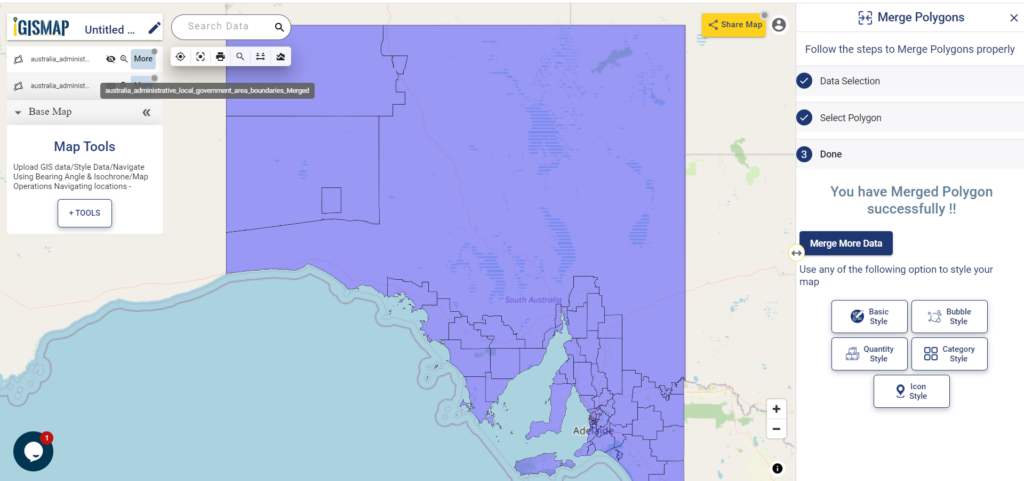
In a few seconds, a new layer of the input GIS data of LGA boundaries gets published. In this layer, the selected polygon features are merged into a single polygon as shown below.
Polygons Merged and Published
Check the article Share your Map to know how to share your map with others using Share Map feature.
“ Wilderness without wildlife is just scenery” -Lois Crisler
The International Union for Conservation of Nature (IUCN) states that endangered species are the species of plant or animal that are seriously at the risk of extinction. In this time of data revolution, data analytics plays a huge role in the field of environmental science and atmospheric studies. Keeping the record of the habitat locations of endangered species and observing the variations in their environmental factors will help the authorities to study the causes that threaten the life of these species. These observations can be further useful to prevent global extinction by rehabilitating their populations and restoring habitats. In the article we create point vector data in GIS tool.
GIS technology is an effective tool for managing, analyzing, and visualizing wildlife data to target areas where monitoring and managing is required. GIS technology helps in tracking the migration patterns, mapping biodiversity, and habitat suitability models which provide analysis for animals to locate their habitat locations in suitable environmental conditions.
Consider that a wildlife conservationist wants to map the habitat locations of endangered animals in India and keep track of the factors such as total strength, temperature, precipitation, food, water, etc. There are a lot of GIS applications available, but only MAPOG meets the requirements creating a map and hosting the map. Create Point Datatool of IGISMap can be used to plot locations and point objects as a point vector data model.
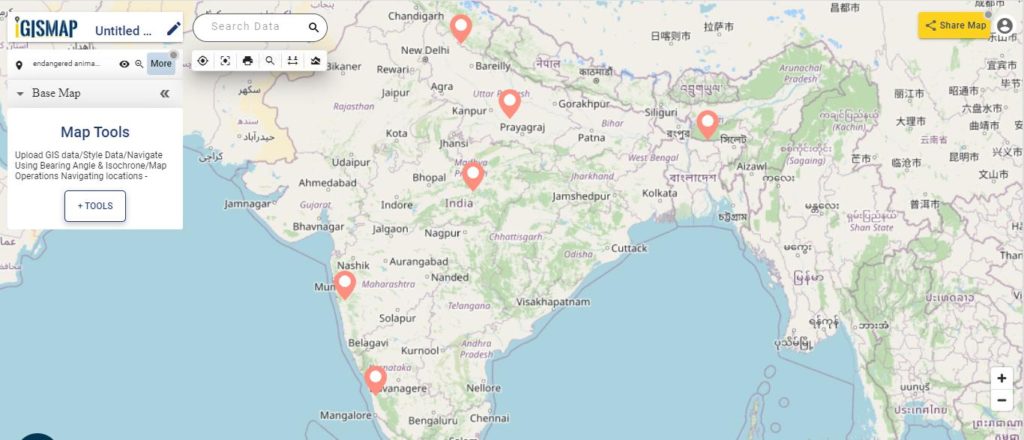
Map habitat locations of endangered species
Users can rely on the Create Point Data tool of IGISMap application to plot the habitat locations of endangered animals as given below.
Final Map of Habitat Locations
GIS data created in IGISMap can be shared via links or embed in websites. More information based on these locations can be added as attributes in the datatable. Attribute information in the datatable can be queried using the Proximity Analysis tool of IGISMap. Let’s look into the steps on how the habitat location map can be created and further used for the protection of endangered animals.
To navigate to the IGISMap Create Point Data tool, click the below link
Adding the points of habitat locations of endangered animals
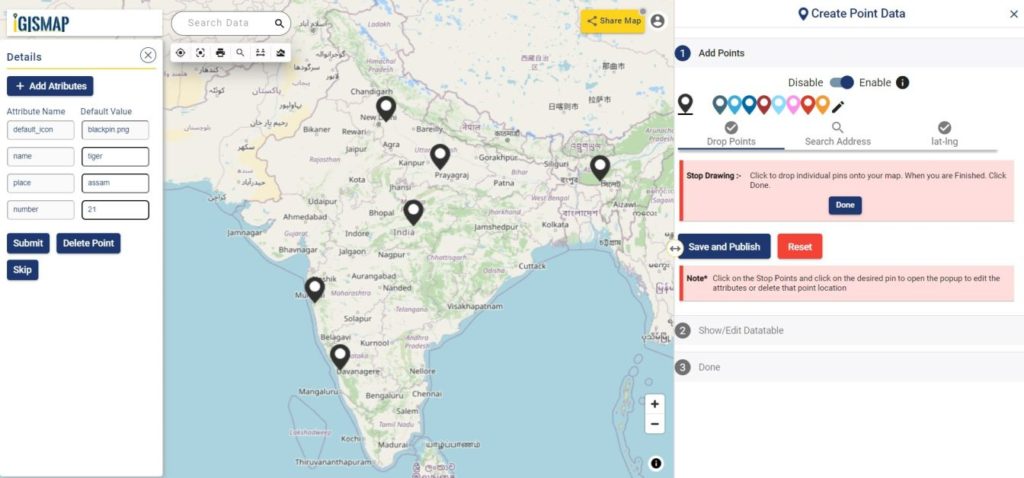
First step is to Add Points, where we can start plotting the habitat locations as points, in the form of pins. IGISMap provides you with three features for plotting points: Drop Points, Search Address, and Lat Lon Values.
Create Point Data tool
Let’s select the Drop Points option and zoom to the location with the desired location to plot a pin in that specific location on the map
Drop Points
Everytime when a point gets plotted, a popup will open to enter the attribute values in each attribute field of the habitat locations. Click the Submit button to Submit and save the attribute entries. You can choose to delete the point you plotted by clicking the Delete Point button. Else you can click Skip to close the popup. You can disable the default opening of this popup using the toggle button.
Search Address option opens a search address box, where you can enter an address and choose the right option from the dropdown list, then click the Plot button to plot a point on that location.
Lat Lon Values will open two boxes to enter latitude and longitude values of the location you want to plot, Plot Location button in this option will plot a pin at the location you have entered.
A plotted point can be moved to a different location by click and drag to the desired location
Note: If the Drop Points option is active for dropping pins, it should be unselected for selecting the plotted pins to open the attribute popup.
After making all the changes, click on the Save and Publish button to publish the GIS data of habitat locations.
Review and Edit the Datatable of the Data
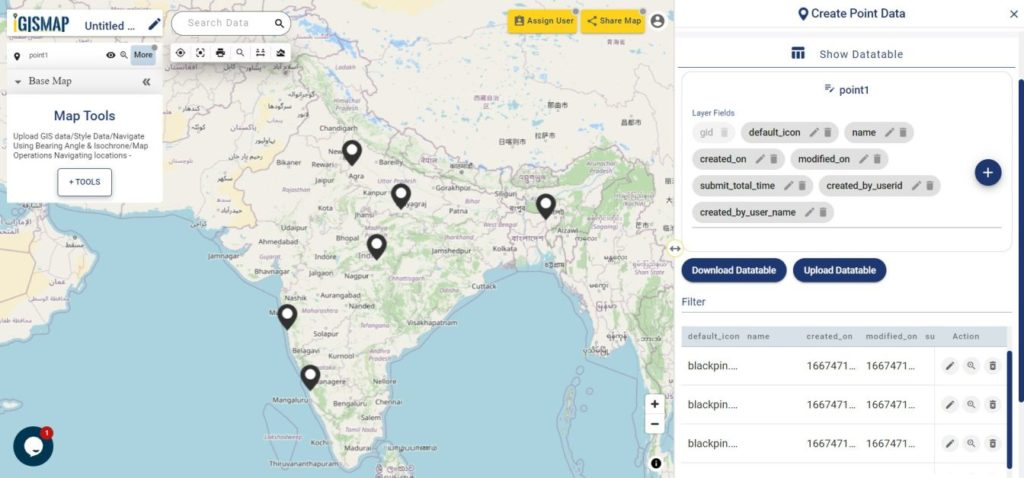
Save and Publish button will publish the point location of endangered animals as point GIS data layer. The default name of the published layer will be point1 that can be edited any time. Show/Edit Datatable section will also open, where attribute fields and attribute values of each location can be edited, updated or deleted.
Option to update the data table as bulk is available in this section. Here the whole datatable can be downloaded in Excel format using Download Datatable button. And to make the changes outside IGISMap, then upload the edited/updated spreadsheet file using Upload Datatable button. Further, integrate with the same point data of habitat locations.
Show/Edit Datatable
Here the Back button is present for going back to the Add Points section to add more points or click Next option to proceed further.
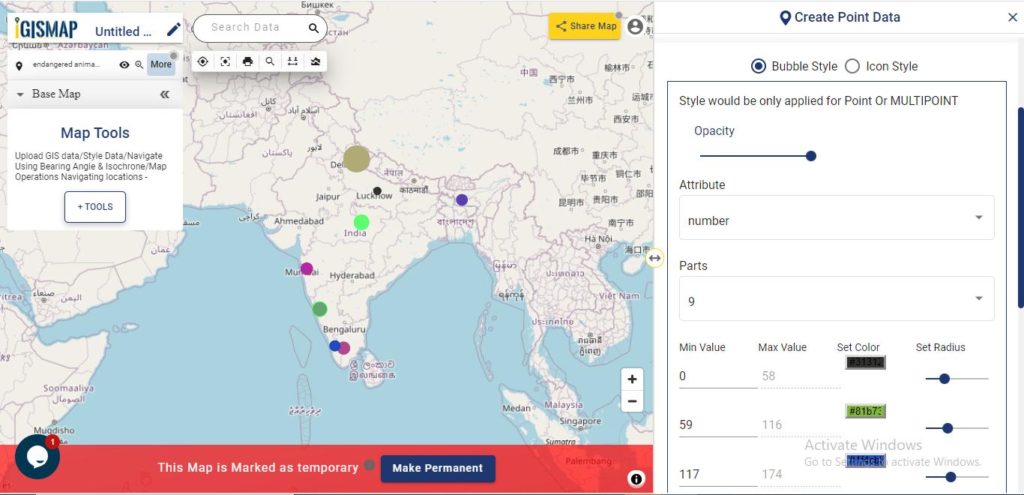
Styling The Habitat Location Points Of Endangered Species
A map will become more meaningful if appropriate icons and colors are used to visualize the features of the map. IGISMap provides – Bubble Style and Icon Style for point GIS data. Icon Styling has two more options – BasicIcon and Category Icon styling.
In basic styling, users can use different styling options for the pin.In Basic Icon styling, user can select any of the icons to represent the point locations.
Here we are going to style our data using Bubble Style. Bubble style is used to visualize the data quantitatively based on the numerical fields in the datatable. We can assign the size and color of the bubble for each class of values.
IGISMap provides direct access to Icon Style and Bubble Style tools from an existing map, where you can style point GIS data published in that map
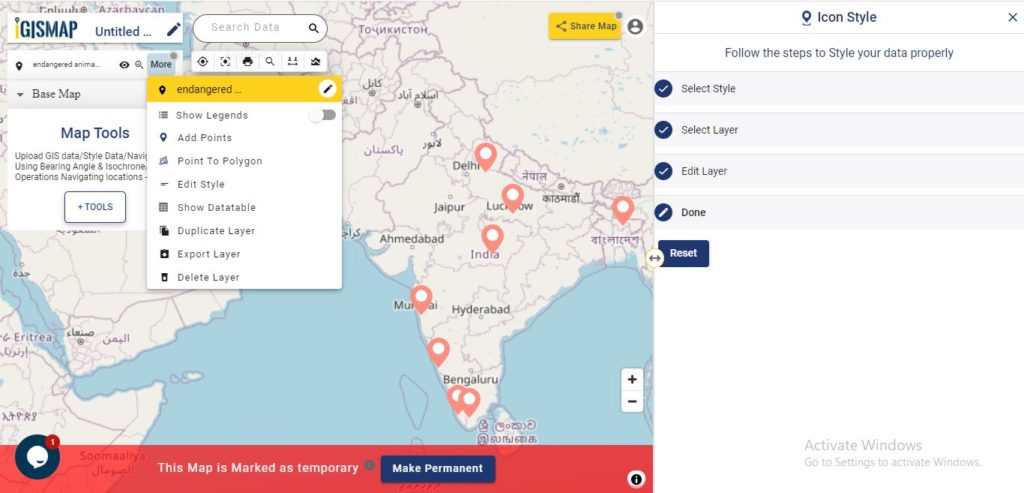
It’s done! Now if the user wants to add more points, click on Create more points on the layer option. If the user wants to create a new layer, select Create New Layer option.
Add Points feature is available in the More section of the layer which will allow to add more points and attribute informations to the data you created.
More options
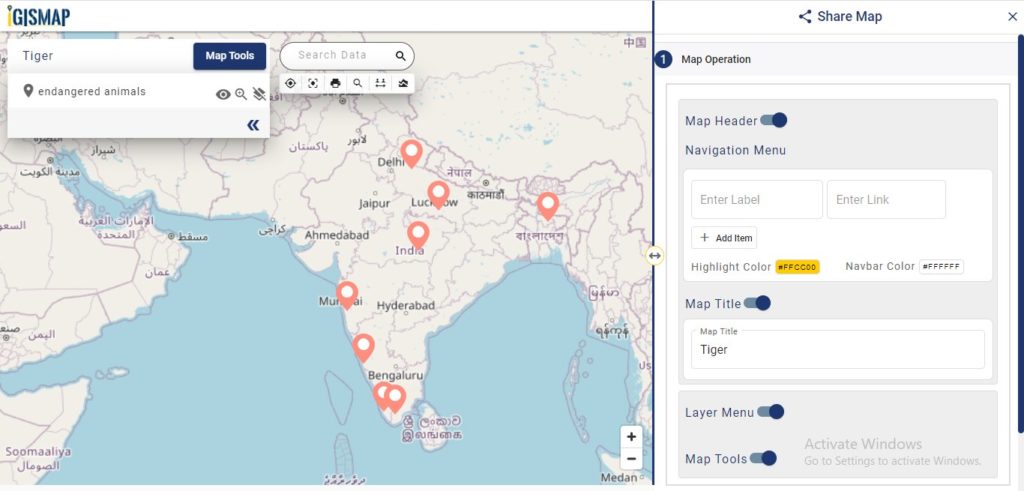
Embedding Map In Your Website
Now lets embed the map of habitat location in a website. For this, click the button at the top right, where you will reach the UI to control the sharing of this map.
Share Map
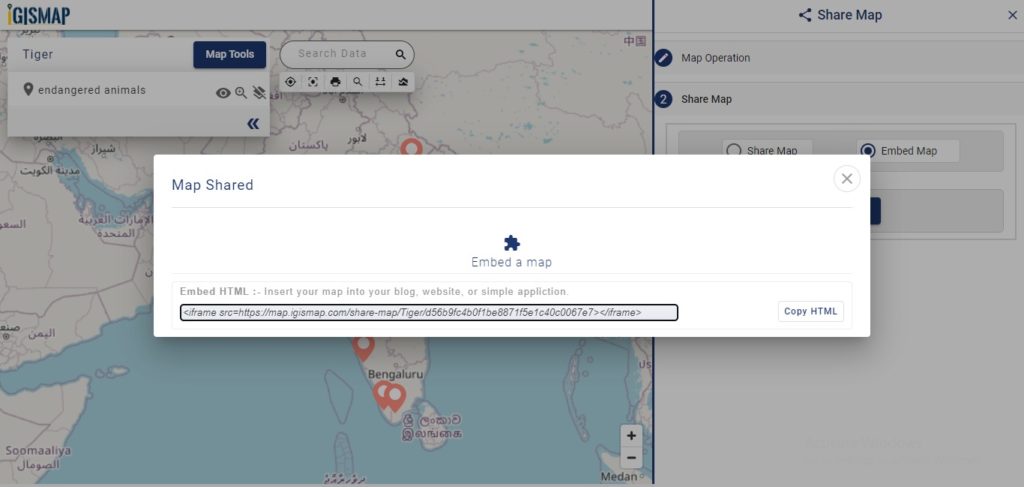
Enable and provide the necessary components of the Share Map and click Next button. Now select the Embed Map option and click Embed Map button.
Consider that you are an engineer working for the technical support team in a bank. And you were asked to host a web map of the ATM locations under your branch. This same map should be later available to dynamically visualize the transactions associated with each ATM in a quantitative representation. In this article, you will learn how to plot atm/shop locations on map and embed it on your website.
There are limited GIS software and online tools where you can do this job. Most of them are limited to any single service, ie., either creating a map and hosting the map on a website, but IGISMap allows you to do both. MAPOG is a GIS based web platform providing multiple GIS applications that are most important in the field of geospatial analytics. The peculiarity of IGISMAP in the GIS Industry is its UI/UX which helps the user to perform effortless geospatial operations. GIS tools of IGISMAP allow you to Add Your Data, Create Your Data, Map Your Data, Style Your Data, Process Your Data, and Analyze Your Data, and additionally, it helps you to share your Data privately or publicly.
How to Plot ATM/shop locations on map
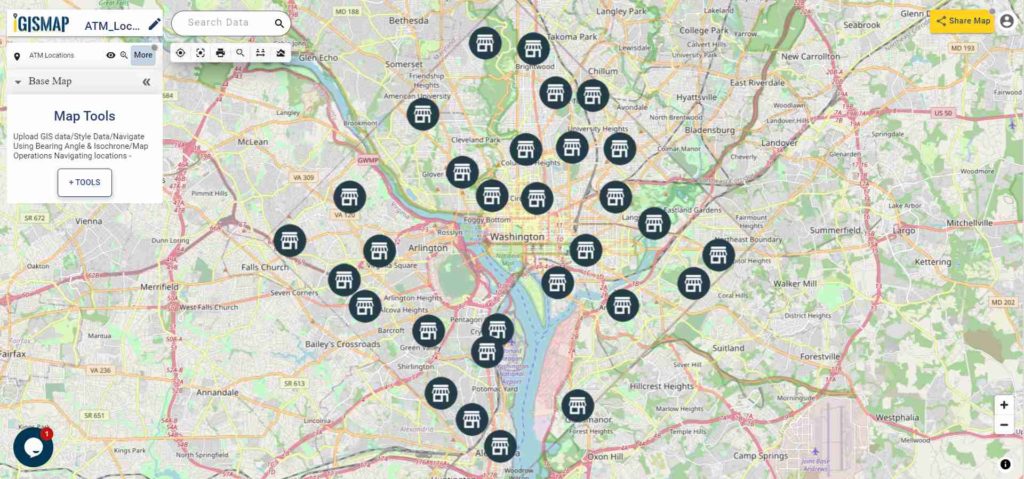
Create Point Data tool of IGISMap is a powerful GIS tool to plot point vector data to represent locations and point objects with single latitude and longitude values. Using Create Point Data tool, we can create an interactive map of ATM locations like the following.
Map of ATM Locations
Lets walk through each step of the Create Point Data tool to create a map like this and share with your team.
First, you need to log in to MAPOG . If you haven’t signed up for IGISMap, click the Sign Up button to create an account.
After Logging In, you will be directed to the dashboard of your IGISMap account.
From the dashboard, click on the Create Point Data tab to open the tool as shown below.
Create Point Data tool
Start Plotting Points for the ATM Locations
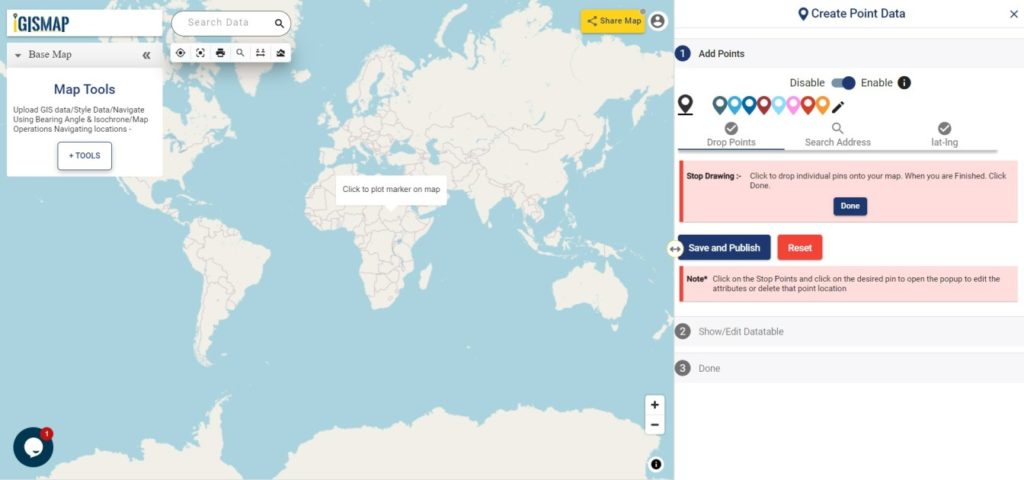
First step is Add Points, where we can start plotting the ATM locations as points, in the form of pins. IGISMap provides you with three features for plotting points: Drop Points, Search Address, and Lat Lon Values.
Let’s select the Drop Points option and zoom to the location with the desired ATM Machine to plot a pin in that specific location on the map
Add Points – Drop Points
Search Address option opens a search address box, where you can enter an address and choose the right option from the dropdown list, then click the Plot button to plot a point on that location.
Lat Lon Values will open two boxes to enter latitude and longitude values of the location you want to plot, Plot Location button in this option will plot a pin at the location you have entered.
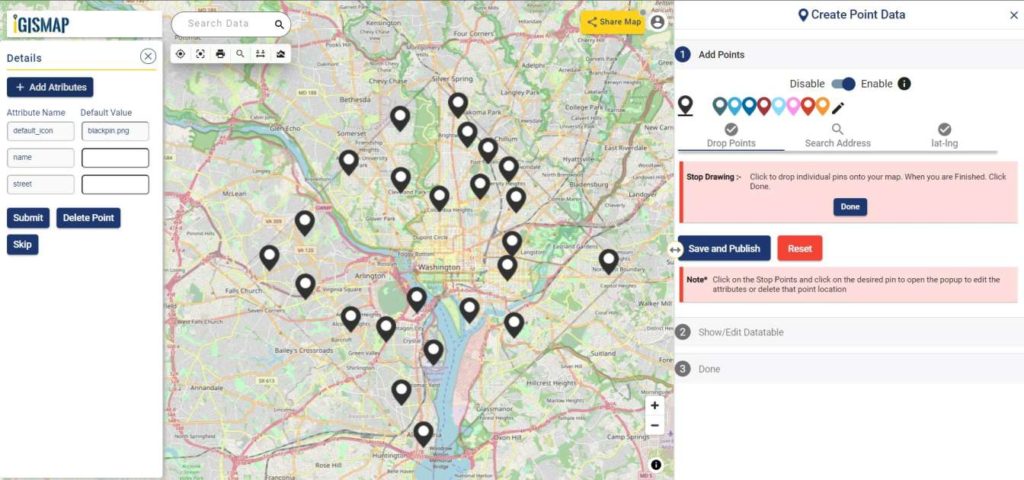
Also, a popup will open for entering attribute values in each attribute field for that atm location when a point is plotting. Click the Submit button to Submit the save the attribute entries. You can choose to delete the point you plotted by clicking the Delete Point button. You can disable the default opening of this popup using the toggle button.
But we can open this popup anytime while plotting, by simply clicking on an existing pin.
Note: If the Drop Points option is active for dropping pins, it should be unselected for selecting the plotted pins to open the attribute popup.
After plotting every desired ATM location for our data, click the Save and Publish button to publish your data in the map.
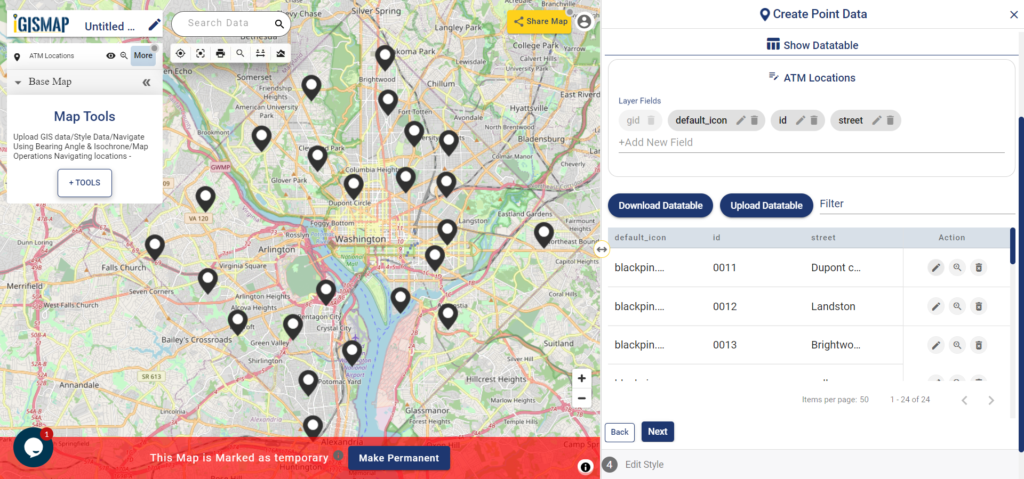
Review and Edit the Datatable
After the atm location is published, Show/Edit Datatable section will be open. Here you can edit the attribute values entered for each point location after clicking the button in the data table along each row in the data table. You can also choose to delete a point by clickingbutton.
Datatable
Options to edit or delete the attribute fields are also available in this step along with the option to add new attribute fields to this data. If you thought of adding more points to the data of ATM Locations, select the Back button to go to the Add Points section, where you can add more points and make changes to the already published data.
Option to update the data table as bulk is available in this section. Where the whole data table can be downloaded in Excel format using Download Datatable button. And to make the changes outside IGISMap, then upload the edited/updated spreadsheet file using Upload Datatable button and integrate with the same point data of ATM locations.
After making all the changes in the datatable, let’s move to the styling section by clicking the Next button to finish plotting.
Style Your ATM Location Points
A map will become more meaningful if appropriate icons and colors are used to visualize the features of the map. In IGISMap styling options, Bubble Style and Icon Style are provided for point GIS data.
Here we are going to style our data using Icon Style. In Icon Styling, IGISMap provides two more options – Basic and Category styling. For now, let’s make it simple by providing an appropriate pin icon for styling the ATM location points. And apply it on the ATM Locations data as follows.
IGISMap provides direct access to Icon Style and Bubble Style tools from an existing map, where you can style point GIS data published in that map
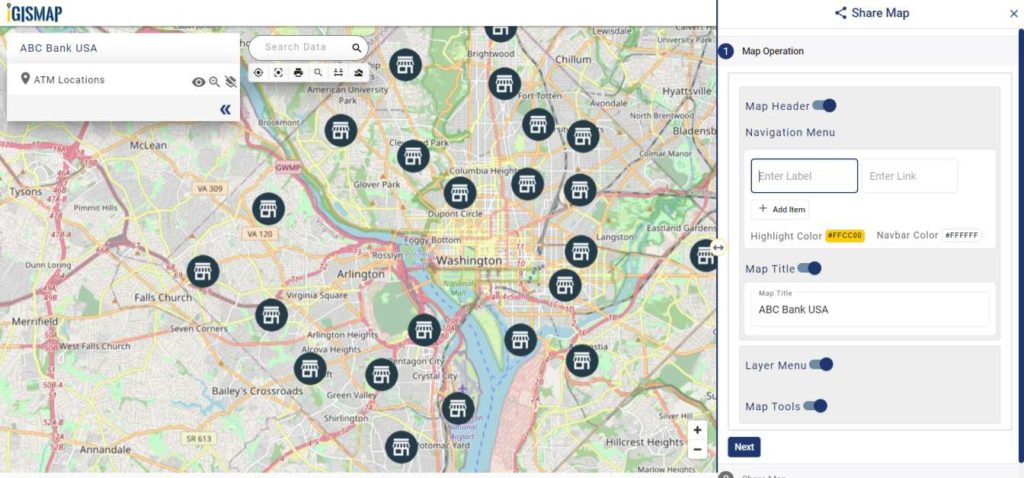
Embed Your ATM Locations Map in a Website
As the data is created completely and styled appropriately, let’s embed the map of ATM Locations in a website. For this, click the button at the top right, where you will reach the UI to control the sharing of this map.
Share Map
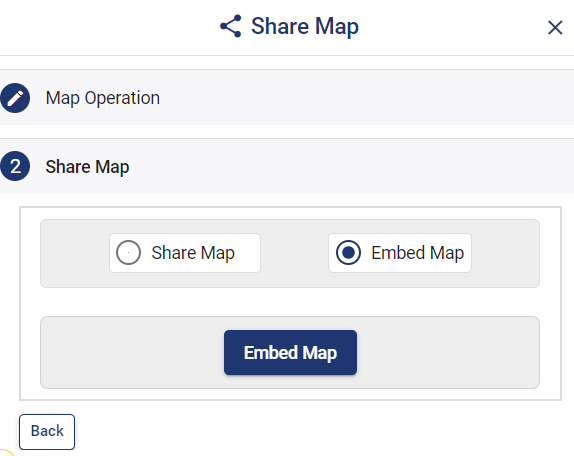
Once the components are enabled and disabled as desired. After that click the Next button to proceed to the step of copying the iframe link to embed in a website.
Share Map – Embed Map
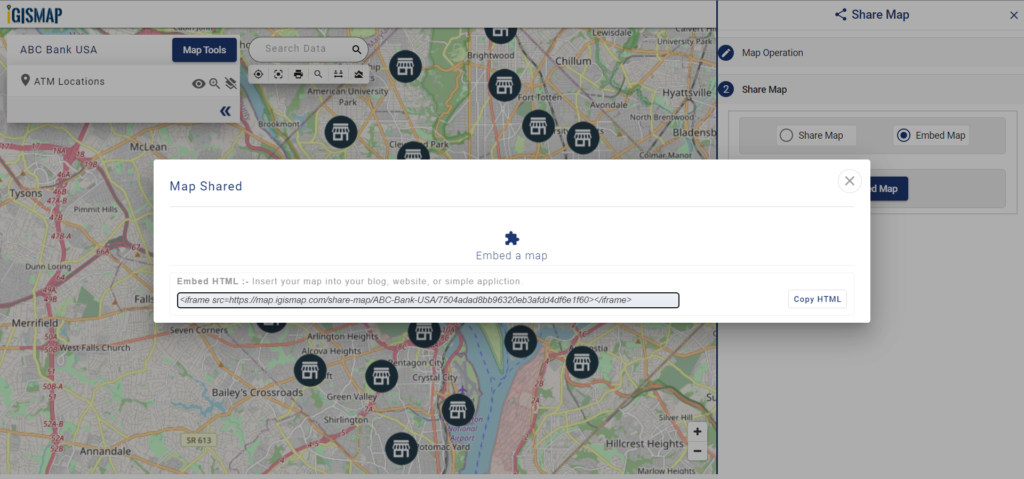
Link to Embed Map
Copy the HTML code link and embed it on your website. Thus the map will be available as interactive as below.
Afterward merge the data table of the ATM Locations with the transaction data of each ATMs. Furthermore, for quantitative visualization, we can use Bubble Style. The style will apply automatically to your website. So with the following steps, you can plot atm/shop locations on a map and embed them on your website.
Article Share your Map will help you understand more about Share Map feature of IGISMap.
GML is used in a geographic information system(GIS) for expressing geographic features as well as an open interchange format for geographic transactions on the Internet. KML is a file format used to display geographic data in an Earth browser such as Google Earth. KML is an international standard maintained by the Open Geospatial Consortium, Inc. (OGC).
You can convert GML to KML as well as other GIS Data Conversion using IGIS Map tool.
IGISMAP to Convert GML to KML
For GML to KML conversion go to MAPOG Tool, after logging in with your registered email and password. If you are a new user, click the Sign Up button in the Login popup and register to IGISMAP by filling the details.
There are three main steps for using GIS Converter:
Upload the data
Choose the format to which it should be converted
Download the converted file.
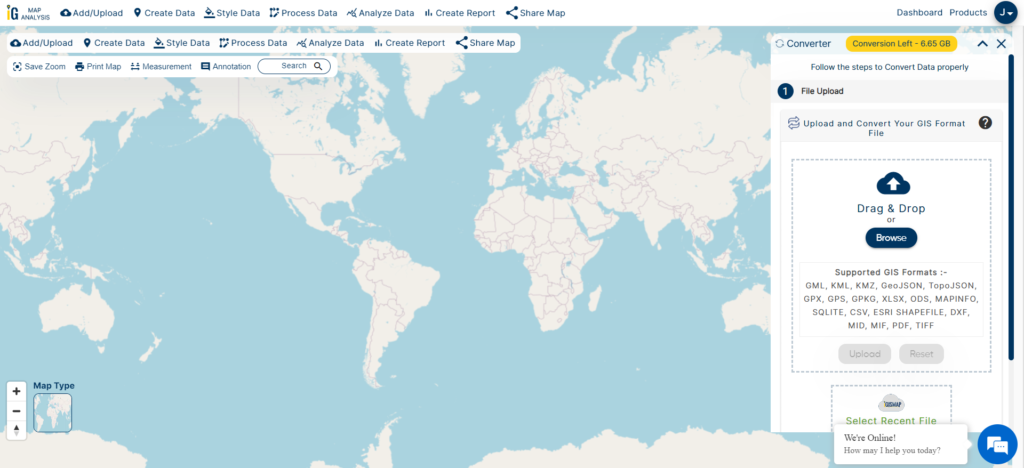
Step one is to upload your GML file which you want to convert. You can upload your file from system or select from the Recent Files.
Upload GML
Step two is to select choose the output format of the converted file, in this case its KML. You can also set the Coordinate Reference System of your preference. As a default CRS will set to WGS 84 (World) [EPSG:4326]. Click on the Convert File.
Select KML as Output Format
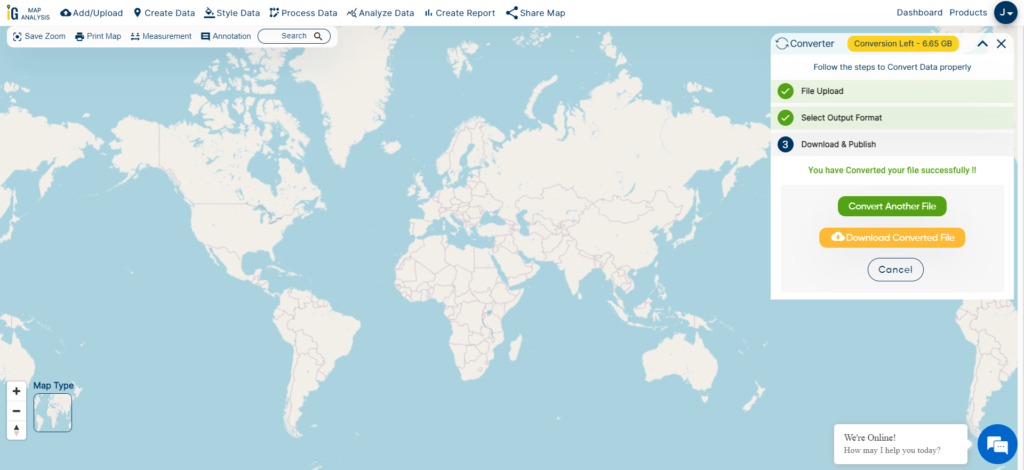
After uploading your GML file, it will undergo conversion to a KML file within a few seconds. Once the conversion is complete, you’ll be able to download the KML file.
Download and Publish KML File
You can also choose to style the layer or continue with further conversion process by clicking the Convert Another File button.
Converted Files section from the dashboard contains the list of the details of all the conversion done in your account, providing both input and output data available for download their corresponding formats.
GeoJSON is an open standard geospatial data interchange format that represents simple geographic features and their non-spatial attributes. It is based on JavaScript Object Notation (JSON) and serves as a format for encoding various geographic data structures.
TIFF, also known as the Tagged Image File Format, is a file format designed for transferring, storing, and displaying raster images. It is commonly used for scanned aerial photography, maps, digital satellite imagery, and other geographic data.
GeoTIFF is a metadata standard that is in the public domain. It enables the embedding of georeferencing information in a TIFF file. This additional information can include projections, coordinate systems, ellipsoids, datums, and all other necessary details to establish the precise spatial reference for the file.
Using MAPOG Tool you can easily convert – GeoJSON to GeoTIFF. You can also do other GIS Data Conversion using this tool.
IGISMAP to Convert GeoJSON to GeoTIFF
For GeoJSON to GeoTIFF conversion, go to MAPOG Tool, after logging in with your registered email and password. If you are a new user, click the Sign Up button in the Login popup and register to MAPOG by filling the details.
IGISMAP
There are four main steps for using GIS Converter:
Click on Tool Converter
Upload the data
Choose the format to which it should be converted
Download the converted file
Step one is to upload your GeoJSON file which you want to convert. You can upload your file from system or select from the Recent Files.
Upload GeoJSON
Here we have uploaded the GeoJSON file of USA.
Step two is to select the output format from the dropdown for the converted file, in this case its GeoTIFF. You can also set the Coordinate Reference System of your preference. As a default CRS will set to WGS 84 (World) [EPSG:4326]. Now Now Click on the Convert File.
Select GeoTIFF as Output Format
Your GeoJSON file will then gets converted to GeoTIFF file after a few seconds and will be available for downloading.
Download GeoTIFF File
You can also choose to style the layer or continue with further conversion process by clicking the Convert Another File button.
Converted Files section from the dashboard contains the list of the details of all the conversion done in your account, providing both input and output data available for download their corresponding formats.
KML, or Keyhole Markup Language, is a geospatial data collection used in Google Earth and other Google services. TIFF, also known as Tagged Image File Format, is a file format for transferring, storing, and displaying raster images. This format is commonly used for scanned aerial photography and maps, as well as digital satellite imagery and other geographic data.
GeoTIFF is a metadata standard in the public domain that enables the embedding of georeferencing information in a TIFF file. This additional information encompasses projections, coordinate systems, ellipsoids, datums, and all other essential elements for establishing the precise spatial reference for the file.
For GeoJSON to GeoTIFF conversion, go to MAPOG Tool , after logging in with your registered email and password. If you are a new user, click the Sign Up button in the Login popup and register to MAPOG by filling the details.
IGISMAP
There are four main steps for using GIS Converter:
Click on Tool Converter
Upload the data
Choose the format to which it should be converted
Download the converted file
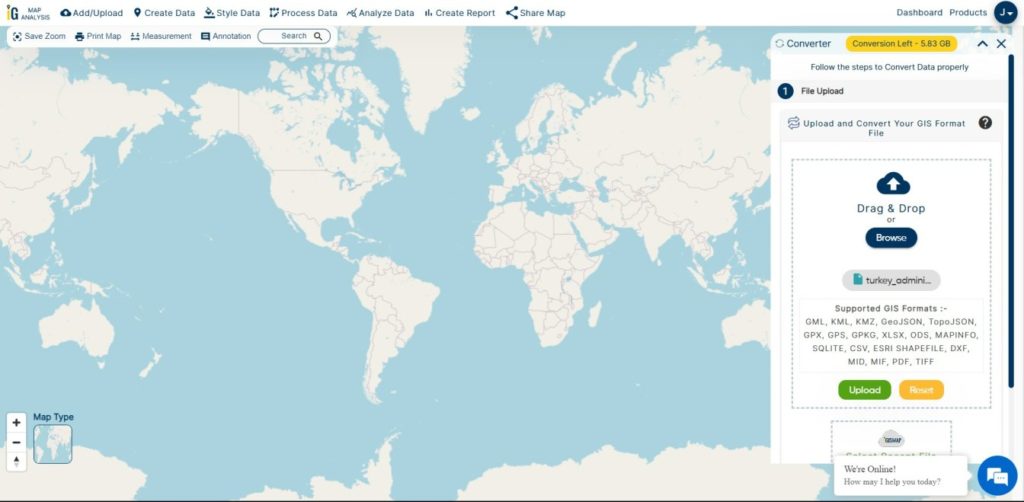
Step one is to upload your KML file which you want to convert. You can upload your file from system or select from the Recent Files.
Upload KML
Here we have uploaded the KML file of Turkey National Boundary.
Step two is to select the output format from the dropdown for the converted file, in this case its GeoTIFF. You can also set the Coordinate Reference System of your preference. As a default CRS will set to WGS 84 (World) [EPSG:4326]. Now Now Click on the Convert File.
Select GeoTIFF as Output Format
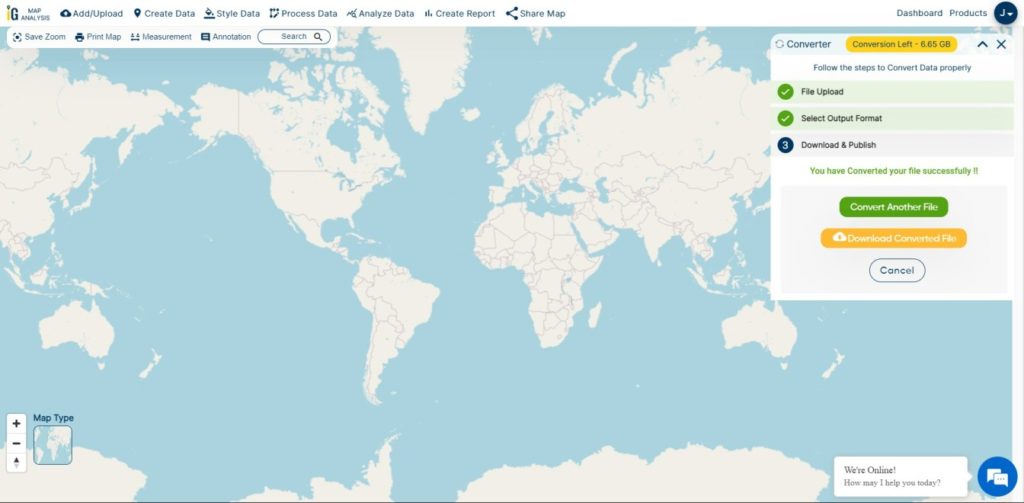
Your KML file will then gets converted to GeoTIFF file after a few seconds and will be available for downloading.
Download GeoTIFF File
You can also choose to style the layer or continue with further conversion process by clicking the Convert Another File button.
Converted Files section from the dashboard contains the list of the details of all the conversion done in your account, providing both input and output data available for download their corresponding formats.
We use cookies to ensure that we give you the best experience on our website. If you continue to use this site we will assume that you are happy with it.