Convert Online GPS to MAPINFO

This guide will walk you through the process of converting GPS files to the MAPINFO format using the Converter Tool in MAPOG. Whether you’re new to the tool or a seasoned user, you’ll find the entire process explained in straightforward steps.

Understanding File Conversion

The Converter Tool in MAPOG is designed to transform data from one format to another effortlessly. Imagine it as a magic wand—input your data in one format, and it emerges in another, ready for your analysis. Additionally, GIS data can be downloaded in any format, making it versatile for various uses.

Online GPS to MAPINFO GIS Converter

Step 1: Upload Your Data

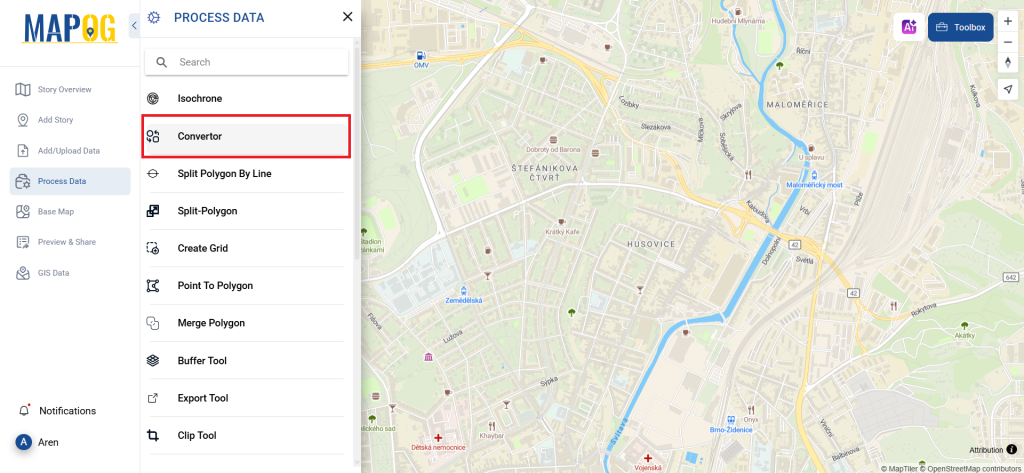
Start by selecting the “Process Data” section, then proceed to the “Converter Tool.”

GPS to MAPINFO

Here, you’ll upload your GPS file, which serves as the starting point for the conversion process.

Step 2: Choose the Output Format

Next, select MAPINFO as your desired output format. While the Converter Tool offers several options for achieving the final result, this guide focuses on converting your file to MAPINFO.

You can also set the CRS to make sure your data aligns perfectly with the needs of your spatial analysis.

Step 3: Execute the Conversion

Now, head to “Convert Files” and let the tool work its magic. It will seamlessly convert your GPS data into the MAPINFO format.

Step 4: Review and Download

Before wrapping up, take a moment to review your newly converted MAPINFO data to ensure accuracy. Once you’re satisfied with the conversion, download the file. This final step is crucial to confirm that all your data has been correctly transformed and is intact.

Step 5: Add Category Style

You can even apply category styles in map analysis to make the map clearer and more understandable at a glance. Just go to the action button of newly converted file and click on edit style to get category style. The provide your layer, provide attribute & save style. Here you get to select icons, choose their style and you can have true & false view for better visualization.

And that’s it! You’ve successfully used the Converter Tool in MAPOG Map Analysis to convert GPS files to MAPINFO. Now, transforming your data is simpler than ever, allowing you to be more productive and efficient in your analysis.

MAPOG has a lot of feature tool. These feature tools allow us to perform a variety of tasks. For example, you can create buffer zones using Buffer Tool, style your numeric data with the quantity style tool, create isochrones on your map using Isochrone tool, and more.

Here are some other blogs you might be interested in:

Convert Online GPS to MIF

In this guide, we’ll walk you through the simple steps to convert GPS files into the MIF format using the MAPOG‘s Converter Tool. Whether you’re new to this or have experience, this guide breaks down the process into straightforward steps, making it easy for anyone to follow.

Understanding File Conversion

The Converter Tool in MAPOG Map Analysis is a powerful feature that allows you to transform data from one format to another seamlessly. It’s as if you input data in one form, and it magically outputs it in another that suits your analysis needs. The beauty of GIS Data lies in its flexibility—once downloaded, it can be adapted for various uses.

Online GPS to MIF GIS Converter

Step 1: Upload Your Data

Begin by selecting your data through “Process Data” and navigating to the “Converter Tool.”

Here, you’ll upload your GPS file, which serves as the foundation for the conversion process.

Step 2: Choose the Conversion Format

Next, select MIF as your output format. The tool offers multiple options, but for this guide, we’re focusing on converting your file to MIF.

During this step, you can also adjust the CRS (Coordinate Reference System) to ensure that your data aligns precisely with your spatial analysis requirements.

Step 3: Execute the Conversion

Now, proceed to ‘Convert Files’ and let the tool work its magic. The Converter Tool will transform your GPS data into the MIF format, preparing it for your next analysis task.

Step 4: Review and Download

After the conversion, take a moment to review your MIF file. This step is crucial to ensure everything has been converted correctly and that all your data remains intact. Once satisfied, download your converted file.

Step 5: Measure Area

You can easily measure the area by using the measurement tools available. To begin, in the upper right corner, you’ll find the toolbox. It offers two options for measuring distances and areas. Simply select the second option, and then draw area you wish to measure. As a result, the area will be displayed in the map interface.

With that, you’ve successfully used the Converter Tool in MAPOG to convert GPS files into MIF. This feature streamlines the process of handling various data formats, making your work both smoother and more efficient. Now, you’re ready to dive into your next analysis with your newly transformed data.

MAPOG has a lot of feature tool. These feature tools allow us to perform a variety of tasks. For example, you can create buffer zones using Buffer Tool, style your numeric data with the quantity style tool, create isochrones on your map using Isochrone tool, and more.

Here are some other blogs you might be interested in:

Converting GPS to MID Online

This guide will walk you through converting GPS file into MID format using the Converter Tool in MAPOG. Whether you’re new to this tool or a seasoned user, this guide will simplify the entire process, ensuring that converting GPS to MID becomes second nature.

Key Concepts in File Conversion

The Converter Tool within MAPOG is designed to effortlessly transform your data from one format to another. In fact, it works like a charm, allowing you to seamlessly input data in one form and receive it in another. Furthermore, this tool is suitable for a variety of analyses. Additionally, GIS Data can be downloaded in any format, thereby providing flexibility for various applications.

Step-by-Step GPS to MID Conversion

Step 1: Upload Your Data

Begin by navigating to “Process Data” and selecting the “Converter Tool.”

Upload your GPS file. This is the first step where you input the data that you wish to convert.

Step 2: Choose the Conversion Format

Next, select MID as your output format. Although the tool offers several conversion options, this guide focuses on converting files to MID.

Additionally, you can adjust the CRS (Coordinate Reference System) to ensure that your data is perfectly aligned with your spatial analysis needs.

Step 3: Execute the Conversion

Proceed to the ‘Convert Files’ section, and let the tool work its magic. The Converter Tool will transform your data from the GPS format to MID.

Step 4: Review and Download

Once the conversion is complete, review your MID data to ensure everything is correct. If you’re satisfied with the results, download the file. This review step is crucial to confirm that the conversion was successful and that your data remains intact.

Step 4: Measure Distance

You can easily measure the distance between two gas stations by using the measurement tools available. To begin, in the upper right corner, you’ll find the toolbox. It offers two options for measuring distances and areas. Simply select the first option, and then drag a line between the two points you wish to measure. As a result, the distance in kilometers will be displayed in the map interface.

And there you have it! You’ve successfully converted your GPS files into MID format using the MAPOG Converter Tool. This feature simplifies the process of working with different data formats, making your tasks more efficient and your work more productive.

MAPOG has a lot of feature tool. These feature tools allow us to perform a variety of tasks. For example, you can create buffer zones using Buffer Tool, style your numeric data with the quantity style tool, create isochrones on your map using Isochrone tool, and more.

Here are some other blogs you might be interested in:

Convert Online GPS to SHP

In this guide, you’ll learn how to easily convert GPS files into SHP format using the Converter Tool within MAPOG feature. Whether you’re new to the tool or a regular user, we’ll walk you through the process step by step, ensuring you understand how to make this conversion seamlessly.

Understanding the Conversion Process

The Converter Tool in MAPOG is designed to help you transform data from one format to another effortlessly. Think of it as a magic wand for your data—you input your GPS information, and out comes a SHP file ready for your analysis. With GIS Data, you can download and shift formats as needed, making it highly adaptable for various uses.

Online GPS to SHP GIS Conversion

Step 1: Upload Your Data

First, you’ll need to upload your GPS file. To begin, select the “Process Data” option from left panel and proceed to the “Converter Tool.”

This is where you will input the GPS file that requires conversion.

Step 2: Choose the Output Format

Next, you’ll select SHP as your desired output format. While the tool offers multiple output options, we’ll focus on converting the file to SHP for this guide.

At this stage, you can also adjust the CRS to ensure your data aligns perfectly with your spatial analysis needs.

Step 3: Execute the Conversion

Once you’ve selected your format, click on “Convert Files” to initiate the process. The Converter Tool will then work to transform your GPS data into SHP format.

Step 4: Review and Download

After the conversion is complete, take a moment to review the SHP data. It’s crucial to ensure that the conversion was successful and that all your data is accurate. Once you’re satisfied, you can download the file.

Step 5: Clip Layer

You can even clip out some of the gas stations using the clip tool option. To clip some gas stations go to the process data from left panel and click on “Clip Layer” option. There provide the layer, draw shape, clip the area you want and click submit.

And that’s all there is to it! You’ve successfully used MAPOG’s Converter Tool to convert your GPS files into SHP format. This streamlined process simplifies handling various data formats, making your analysis more efficient and productive.

MAPOG has a lot of feature tool. These feature tools allow us to perform a variety of tasks. For example, you can create buffer zones using Buffer Tool, style your numeric data with the quantity style tool, create isochrones on your map using Isochrone tool, and more.

Here are some other blogs you might be interested in:

Convert SHP to GPKG Online: A Step by Step Guide

A crucial element of the GIS process is file conversion, which ensures that geospatial data can be easily utilized across different applications. SHP (Shapefile) is a widely recognized format in GIS, representing geographic features such as points, lines, and polygons. Converting SHP to GPKG allows for efficient data storage and better performance in geospatial applications.

What is SHP File?

In GIS, a popular geographic vector data format is a SHP file (Shapefile). For spatial characteristics, it saves the attribute data—descriptive information—and geometry—points, lines, and polygons. SHP files are compatible with applications such as ArcGIS and QGIS, and are frequently used for mapping locations, boundaries, and other geographic data. In order to store associated data, they frequently come with extra files.

ONLINE GIS DATA CONVERTION

Key Concept for Conversion SHP to GPKG:

MAPOG Map Analysis‘s Converter Tool provides a user-friendly platform for converting data between various formats. Its intuitive interface ensures users can complete the conversion process with ease. Here’s a step-by-step guide on converting SHP files to GPKG format using MAPOG.

Step-by-Step Guide to Converting SHP to GPKG

Step 1: Upload the Data
Start by navigating to the Process Data section in MAPOG Map Analysis. Select the “Converter Tool” option. Before uploading your SHP file, make sure it is prepared for conversion.

Upload the Data

Step 2: Select the Format for Conversion
Next, select GPKG as the output format. GPKG is an ideal format for storing large amounts of geospatial data in a single, compact file, making it suitable for a wide range of GIS applications.

Select the Format

Step 3: Choose the Output Coordinate Reference System (CRS)
Select the appropriate CRS if your data includes spatial information. This step is crucial to ensure the accurate representation of geographic features in your GPKG file.

Choose the Output CRS

Step 4: Execute the Conversion
Once you have chosen the GPKG format and set the CRS, initiate the conversion process. The MAPOG tool will accurately convert your SHP file into GPKG format, allowing for efficient data storage and analysis.

Execute the Conversion

Step 5: Review and Download
After the conversion is complete, review the output to ensure that the data was accurately converted. Finally, download the GPKG file, which is now ready for use in various geospatial applications.

Review the Data

Conclusion:


The MAPOG Converter Tool simplifies the process of converting GIS data between different formats, making it an essential resource for GIS professionals. In this case you can just write something like, if you need to download any data file in SHP or in any other formats like KMZ, GEOJSON. visit GIS DATA. Here we have 900+ data layers for 200+ countries.

Feature Tool:
Story by MAPOG:

Story by MAPOG is ideal for those looking to bring their data to life through interactive and visually appealing maps. It allows you to tell long tales using maps, photos, and text. Whether you’re presenting a project, research, or a tour, Story by MAPOG makes it simple to create shareable content.

Here are some other blogs you might be interested in:

Convert SQLITE to PDF: A Complete Guide


This tutorial offers a straightforward walk through for converting an SQLITE file to PDF format using the Converter Tool  in MAPOG Map Analysis. Whether you’re a MAPOG beginner or have some experience, this guide will help you easily convert your SQLITE files into PDF format.

What is SQLITE Data Format:

A file with .sqlite extension is a lightweight SQL database file created with the SQLITE software. It is a database in a file itself and implements a self-contained, full-featured, highly-reliable SQL database engine. SQLITE database files can be used to share rich contents between systems by simple exchanging these files over the network. Almost all mobiles and computers use SQLITE for storing and sharing of data, and is the choice of file format for cross-platform applications. Due to its compact use and easy usability, it comes bundled inside other applications. SQLITE bindings exist for programming languages such as C, C#, C++, Java, PHP, and many others.

                                     Online GIS Data Conversion

Converting SQLITE Data into PDF Format:

MAPOG Map Analysis , Converter Tool simplifies the process of converting data between different formats, tailored to the user’s specific requirements. This functionality enhances the efficiency of adapting data for diverse GIS applications by providing seamless format transformations. For example, when converting SQLITE data to PDF format using MAPOG’s Converter Tool, the data size is minimized while retaining critical geographic attributes. This makes it ideal for web mapping and interactive use, optimizing workflows and boosting the usability of GIS data across various platforms and applications.

                        Steps to Convert SQLITE to PDF:

Step 1: Upload the Data:

  1. Navigate to the header menu, click on “Process Data,” and select the “Converter Tool” option to begin the conversion process.
Choose the converter tool

2.To start the conversion, upload your SQLITE file by selecting the data you want to convert.

Upload your data

Step 2: Select the Output Format:

  1. Choose PDF as the desired output format for your data export. While the Converter Tool offers multiple format options, this guide is specifically focused on converting your SQLITE file to PDF format.
Select the format

2. You can also select the Output Coordinate Reference System (CRS) according to your spatial analysis requirement.

Set the CRS

Step 3: Implement the Conversion:

Go to the ‘Convert Files’ section and let the tool handle the conversion. Simply upload your SQLITE file, and the Converter Tool will efficiently convert it to PDF format, ensuring a smooth and fast process.

Convert the file

Step 4: Verify and Download:

Examine your converted PDF file to ensure everything is accurate. Once you’re satisfied that the conversion has met your expectations and the data is correctly preserved, proceed to download the file. This step is important to confirm the conversion was successful and the data is intact.

Download the file

Consequence:

MAPOG Map Analysis provides a variety of tools designed to optimize your workflow, such as the Clip Tool for refining datasets, the Basic Style Tool for styling numeric data, and the Create Point Tool for adding point features to your maps. Additionally, the Create Grid Tool enables the generation of grids by uploading different types of data, among other useful features.

Story by MAPOG:

MAPOG’s Story Map feature empowers users to create engaging, map-based narratives by combining geospatial data with text, images, and multimedia. This versatile tool can be applied in fields such as urban planning, tourism, education, and environmental conservation. With its customizable and interactive features, Story by MAPOG offers unique insights into locations or themes, making complex spatial data easier to understand and share. Whether for professionals, educators, or students, this tool provides a user-friendly platform for exploring and presenting geographic information in a visually compelling way.

 Other Feature Tools contain:

These Articles may also be informative for you:

SHP to MAPINFO Conversion: Easy GIS Data Transformation for Mapping & Analysis

File conversion is an essential step in the GIS process that ensures the easy use of geographic data in various applications. Converting SHP to SQLITE enhances data organization and improves performance in database-driven geospatial applications.

What is SHP File?

In GIS, a popular geographic vector data format is a SHP file (Shapefile). For spatial characteristics, it saves the attribute data—descriptive information—and geometry—points, lines, and polygons. SHP files are compatible with applications such as ArcGIS and QGIS, and are frequently used for mapping locations, boundaries, and other geographic data. In order to store associated data, they frequently come with extra files.

                                      ONLINE GIS DATA CONVERTION

Key Concept for Conversion SHP to MAPINFO:


MAPOG MapAnalysis‘s Converter Tool provides a user-friendly platform for converting data between various formats. Its intuitive interface ensures users can complete the conversion process with ease. Here’s a step-by-step guide on converting SHP files to MAPINFO format using MAPOG.

Step-by-Step Guide to Converting SHP to MAPINFO

Step 1: Upload the Data
Navigating to the Process Data section in MAPOG MapAnalysis. Select the “Converter Tool” option. Before uploading your SHP file, make sure it is properly prepared for conversion.

Upload the Data

Step 2: Select the Format for Conversion
Next, select MAPINFO as the output format. The MAPINFO format is widely used in mapping and spatial analysis, making it a suitable choice for professionals working with the MapInfo GIS software.

Select the Format

Step 3: Choose the Output Coordinate Reference System (CRS)
Select the appropriate CRS to ensure that the geographic features are accurately represented in the converted MAPINFO file. Proper CRS selection is essential for the correct display and analysis of spatial data.

Choose the Output CRS

Step 4: Execute the Conversion
Once you have chosen the MAPINFO format and set the CRS, initiate the conversion process. The MAPOG tool will accurately convert your SHP file into MAPINFO format, enabling smooth integration into MapInfo software for geospatial analysis and mapping.

Execute the Conversion

Step 5: Review and Download
After the conversion is complete, review the output to ensure that the data was converted accurately. Finally, download the MAPINFO file, which is now ready for use in a wide range of geospatial applications, including mapping and spatial analysis with MapInfo.

Review the Data

Conclusion:


The MAPOG Converter Tool simplifies the process of converting GIS data between different formats, making it an essential resource for GIS professionals. By following these simple steps, you can easily convert SHP files to MAPINFO format, ensuring that your spatial data is prepared for advanced mapping. If you need to download any data file in SHP or in any other formats like GEOJSON, DXF, KML. visit GIS DATA. Here we have 900+ data layers for 200+ countries.

Feature Tool:
Story by MAPOG:

Story by MAPOG is ideal for users who wish to bring their data to life with interactive and visually appealing maps. It allows you to create stunning stories by combining maps with multimedia elements such as images and text. Whether you’re presenting research, highlighting a project, or a tour, Story by MAPOG makes it simple to generate shareable content.

Here are some other blogs you might be interested in:

Convert SHP to GPS Online: A Step by Step Guide

A crucial element of the GIS process is file conversion, ensuring that geospatial data can be easily used across various applications. SHP (Shapefile) is a commonly used format in GIS for representing geographic features such as points, lines, and polygons. Converting SHP to GPS format allows for the seamless integration of GIS data into GPS devices and applications.

What is SHP File?

In GIS, a popular geographic vector data format is a SHP file (Shapefile). For spatial characteristics, it saves the attribute data—descriptive information—and geometry—points, lines, and polygons. SHP files are compatible with applications such as ArcGIS and QGIS, and are frequently used for mapping locations, boundaries, and other geographic data. In order to store associated data, they frequently come with extra files.

ONLINE GIS DATA CONVERTION

Key Concept for Conversion SHP to GPS:

MAPOG MapAnalysis‘s Converter Tool offers a straightforward platform for converting data between different formats. Its user-friendly interface ensures that users can complete the conversion process effortlessly. Here’s a step-by-step guide on converting SHP files to GPS format using MAPOG.

Step-by-Step Guide to Converting SHP to GPS

Step 1: Upload the Data Begin by navigating to the Process Data section in MAPOG MapAnalysis. Select the “Converter Tool” option. Before uploading your SHP file, make sure it is prepared for conversion.

Upload the Data

Step 2: Select the Format for Conversion Next, select GPS as the output format. GPS format is essential for storing and utilizing geospatial data in GPS devices and applications, making it perfect for navigation and tracking tasks.

Select the Format

Step 3: Choose the Output Coordinate Reference System (CRS)
Select the appropriate CRS if your data includes spatial information. This step is crucial to ensure the accurate representation of geographic features in your GPS file.

Choose the Output CRS

Step 4: Execute the Conversion Once you have chosen the GPS format, initiate the conversion process. The MAPOG tool will accurately convert your SHP file into GPS format, ensuring compatibility with a wide range of GPS devices and applications.

Execute the Conversion

Step 5: Review and Download After the conversion is complete, review the output to confirm that the data was accurately converted. Finally, download the GPS file, which is now ready to be used in your GPS-related projects.

Review the Data

Conclusion:

The MAPOG Converter Tool simplifies the process of converting GIS data between various formats, making it a valuable resource for GIS professionals. By following these simple steps, you can easily convert SHP files to GPS format, ensuring your spatial data is ready for navigation and other GPS-based applications. If you need to download any data file in SHP or in any other formats like KML, KMZ. Visit GIS DATA, here we have 900+ data layers for 200+ countries.

Feature Tool:
Story by MAPOG:

For users who wish to create dynamic and eye-catching maps that visually engage, Story by MAPOG is best. By combining maps with multimedia elements like text and photographs, it enables you to create compelling stories. Making shareable content is simple with Story by MAPOG, whether you’re leading a tour or promoting a project.

Here are some other blogs you might be interested in:

Converting MIF to GPX: A Step-by-Step Guide


This guide provides an easy-to-follow method for converting MIF files to GPX format using the Converter Tool available in MAPOG Map Analysis. Whether you’re a novice or have some experience with the platform, this tutorial will guide you through the process of transforming MIF files into GPX with ease.

What is MIF Data Format:

MIF files are also known as MapInfo Interchange Format files, and often end in a .mif suffix. This format — developed and used by MapInfo for the export of maps and data — contains the data necessary for plotting map features (such as points, lines, or polygons) on a map. MIF files are often accompanied by MID files. MID files contain data attributes, but are not a mandatory addition to the MIF file format.

                                              Online GIS Data Conversion

Converting MIF Data into GPX Format:

MAPOG’s Map Analysis features an advanced Converter Tool that allows users to effortlessly convert data between various formats according to their specific requirements. This tool streamlines the data transformation process for multiple GIS applications, providing both flexibility and efficiency in managing different file types. For example, MAPOG’s Converter Tool can convert MIF data into GPX format, optimizing file size while retaining critical geographic information. This conversion enhances the data’s compatibility with web-based mapping and interactive platforms, ultimately improving workflows and significantly boosting the usability of GIS data.

Steps to convert MIF to GPX:

Step 1: Upload Your Data:
1. Begin by navigating to the top menu in MAPOG, selecting “Process Data,” and then clicking on the “Converter Tool” to start the process.

Choose the converter tool

2. To start the conversion, upload your MIF file by selecting the data you want to convert.

Upload the data

Step 2: Select the Output Format:

  1. Choose GPX as the desired export format. Although the Converter Tool supports multiple output formats, this guide specifically directs you to select GPX for converting your data. The tool’s intuitive design ensures that choosing the correct format is quick and straightforward, allowing you to focus on creating the final product.
Select the format

2. You can also Choose the Output Coordinate Reference System (CRS) according to your spatial analysis requirement.

Set the CRS

Step 3: Execute the Conversion:

Navigate to the Convert Files section and let the tool take care of the conversion process. Simply upload your MIF file, and the Converter Tool will efficiently convert it into GPX format, ensuring a smooth and hassle-free experience. The process is quick, allowing you to retrieve your GPX file in just a few clicks.

Convert the file

Step 4: Review and Download:

Carefully review your newly converted GPX file to verify that it meets your expectations and that the data has been accurately preserved. Once you’re satisfied with the conversion, proceed to download the file. This final step ensures the conversion was successful and the GPX file aligns with your project needs.

Download the data

Conclusion:

MAPOG Map Analysis offers an array of powerful tools designed to enhance your workflow. Whether you’re using the Clip Tool to refine datasets, the Basic Style Tool to format numerical data, or the Create Point Tool to add point features to your map, the platform streamlines GIS tasks. Additionally, the Create Grid Tool allows you to generate grids by uploading various data types, among many other versatile functionalities. These tools make MAPOG a comprehensive solution for managing and analyzing spatial data efficiently.

Story by MAPOG:

Story by MAPOG is a dynamic tool designed to help users create immersive, map-based narratives by integrating geospatial data with multimedia elements like text, images, and videos. It offers an intuitive platform for turning complex geographical information into interactive, visually appealing stories. With its flexibility and customization options, Story by MAPOG is ideal for various fields such as tourism, urban development, education, and environmental research. Whether used by professionals, educators, or students, this tool simplifies the process of presenting and sharing geographic data in an engaging and accessible way.

 Other Feature Tools contain:

These blogs may also be useful for you:

Convert MIF to PNG and Other GIS Formats: Step-by-Step Guide

This guide walks you through a straightforward process for converting MIF files to PNG format using the Converter Tool  in MAPOG Map Analysis. Whether you’re a first-time user or have some prior experience with MAPOG, this tutorial will guide you through the conversion of MIF files into PNG with ease.

What is MIF Data Format:

MIF files are also known as MapInfo Interchange Format files, and often end in a .mif suffix. This format — developed and used by MapInfo for the export of maps and data — contains the data necessary for plotting map features (such as points, lines, or polygons) on a map. MIF files are often accompanied by MID files. MID files contain data attributes, but are not a mandatory addition to the MIF file format.

                                         Online GIS Data Conversion

Converting MIF Data into PNG Format:

MAPOG’s Map Analysis features an advanced Converter Tool that allows users to effortlessly convert data between various formats according to their specific requirements. This tool streamlines the data transformation process for multiple GIS applications, providing both flexibility and efficiency in managing different file types. For example, MAPOG’s Converter Tool can convert MIF data into PNG format, optimizing file size while retaining critical geographic information. This conversion enhances the data’s compatibility with web-based mapping and interactive platforms, ultimately improving workflows and significantly boosting the usability of GIS data.

                      Steps to Convert MIF to PNG:

Step 1: Upload Your Data:
 

  1. Navigate to the top menu, click on “Process Data,” and choose the “Converter Tool” option to begin the conversion process.
Choose the converter tool

2. To start the conversion, upload your MIF file by selecting the data you want to convert.

Upload the data

Step 2: Select the Output Format:

1.Choose PNG as your desired output format. Although the Converter Tool offers multiple export options, this guide specifically focuses on converting your MIF file to PNG format for optimal results.

Select the format

2. You can also Choose the Output Coordinate Reference System (CRS) according to your spatial analysis requirement.

Set the CRS

Step 3: Run the Conversion:

Head to the “Convert Files” section and initiate the conversion. Upload your MIF file, and the Converter Tool will efficiently convert it to PNG format, ensuring a fast and seamless process.

Convert the data

Step 4: Review and Download:

Check your converted PNG file to ensure it meets your expectations. After confirming that the conversion is correct and the data is accurately preserved, proceed to download the file. This step ensures the conversion was successful and that the file aligns with your requirements.

Review and download

Conclusion:

MAPOG Map Analysis provides a variety of tools to improve your workflow, such as the Clip Tool for cutting down datasets, the Basic Style Tool for formatting numerical information, and the Create Point Tool for adding point features to your map. Furthermore, the Create Grid Tool enables you to create grids by uploading different types of data, among other functionalities.

Story by MAPOG:

Story by MAPOG feature allows users to build engaging, map-based stories by combining geospatial data with text, images, and multimedia elements. This versatile tool finds applications in various fields, such as urban planning, tourism, education, and environmental conservation. With its customizable and interactive features, Story by MAPOG offers valuable insights into specific locations or themes, simplifying the presentation of complex spatial information. Whether for professionals, educators, or students, this user-friendly platform provides an intuitive way to explore, present, and share geographic data in a visually compelling and accessible manner.

 Other Feature Tools contain:

These blogs may also be useful for you:

Exit mobile version
%%footer%%