Do you have all road data with you and want to creating routing from that according to your algorithm? Needs an alternative to Google Map API, when having your own road datasets? PGrouting with PostGresSql can help you out by doing that. Here in this post we will look for PGRouting PostGreSql implementation steps by steps and finding the direction with PGRouting. Connection between PostGres and QGIS and query data and see the result in QGIS Desktop.
Prerequisite for PGrouting PostGIS Postgresql:
- Installed QGIS and installed PostGreSql
- Basic Knowledge of PostGreSQL
- Basic knowledge with QGIS Desktop
- Road Map Shapefile
Here we will consider Road Map Shapefile, on which we will query and get the routing. In this article we will see how we can query the road network shapefile to find out the shortest path. The results can be seen in QGIS Desktop software. Here postGIS is used to generate road network. In this tutorial we have id of each route, which is used to query the shortest route. You will understand more easily once you read this article throughly. Here PGrouting has used to find out the shortest path.
Install Postgresql PostGIS PGRouting:
Its installation is simple process include few steps (written an article for linux based system). Here are few points for installing postgresql PGRouting:
# Create the file /etc/apt/sources.list.d/pgdg.list, and add a line for the repository
--> sudo sh -c 'echo "deb http://apt.postgresql.org/pub/repos/apt/ CODENAME-pgdg main" > /etc/apt/sources.list.d/pgdg.list'The codename can find by using given command
--> lsb_release -csOutput:
Codename xanialThen replace this codename in command.
# Import the repository key, update the package lists
--> sudo apt-get install wget ca-certificates
 --> wget --quiet -O - https://www.postgresql.org/media/keys/ACCC4CF8.asc | sudo apt-key add -
 --> sudo apt-get update
# Install PGrouting based on your postgresql Installation:
--> sudo apt-get install postgresql-9.6-pgroutingTo be up to date with changes and improvements follow the given command
--> sudo apt-get update & sudo apt-get upgradePGRouting PostGreSql PostGIS Shortest Path Steps:
In this article we are using postgres 9.6, PostGIS 2.4.2 and Pgrouting 2.5.2. It is better to check versions for all required software as query syntax change with version. Firstly create a database.
1. Create database in PostGreSql for PGRouting:
You can create a database in Ubuntu terminal. For that you need to follow the given command-
--> sudo -u postgres createdb -O DATABASE_USER DATABASE_NAME
where -U username, Createdb is command which create new postgresql database, -O output file name, last two options are Database user-name and name for database. For more option in psql visit https://www.postgresql.org/docs/9.0/static/app-psql.html link.
2. Add shape file in postgresql pgrouting database:
If you are using pgAdmin3 then you can open the database by providing user name and password.
In Database you can add shapefile by clicking option PostGIS shape file and DBF loader. Here first off define the user-name with proper password and database name. Then add shape file and import it.
You can use this link to import or upload Shapefile in PostGreSql database.
Now refresh the database and expand public-> tables option you see the shape file’s attribute table.
3. Add Source and target column in attribute table:
The given command will add column in attribute table, named as source and target with integer data type. Here roads_table is the attribute table or imported shape file.
--> ALTER TABLE roads_table ADD COLUMN "source" integer;
--> ALTER TABLE roads_table ADD COLUMN "target" integer;
4. Create topology – PGRouting:
Here you must be aware of what is topology when working with spatial system. Topology is a set of rules and behaviours that model how points, lines, and polygons share coincident geometry.
Here creating topology means attaching nodes to every end point of route. This is done using method from pgrouting that is pgr_createTopology().
This takes table name, tolerance, geom field name and id as inputs.
--> SELECT pgr_createTopology('roads_table', 0.001, 'the_geom', 'id')
More detailed explanation is given below:
The topology creation function accepts the following parameters:
-> edge_table:
Text Network table name. (may contain the schema name AS well)
-> tolerance:
Float8 Snapping tolerance of disconnected edges. (in projection unit)
-> the_geom:
Text Geometry column name of the network table. Default value is the_geom.
-> Id:
Text Primary key column name of the network table. Default value is id.
-> Source:
Text Source column name of the network table. Default value is source.
-> Target:
Text Target column name of the network table. Default value is target.
-> rows_where:
Text Condition to SELECT a subset or rows. Default value is true to indicate all rows that where source or target have a null value, otherwise the condition is used.
-> Clean:
Boolean Clean any previous topology. Default value is false.
For more details: http://docs.pgrouting.org/2.2/en/src/topology/doc/pgr_createTopology.html
5. Create network table – PGrouting PostGIS Postgresql:
This table contains all information such as gid, length of routes, name of roads, source and target. Here source and target is taken from node table where as other information from attribute table. For this first we need to create node table.
In node table you have source as a start_id and target as end_id.
CREATE TABLE node AS
 SELECT row_number() OVER (ORDER BY foo.p)::integer AS id,
 foo.p AS the_geom
 FROM (
 SELECT DISTINCT roads_table.source AS p FROM roads_table
 UNION
 SELECT DISTINCT roads_table.target AS p FROM roads_table
 ) foo
 GROUP BY foo.p;
This explains that distinct values of source and target from roads_table table is selected and union operation has performed. Then number of rows are selected from this union table and saved them in node table.
CREATE TABLE network AS
 SELECT a.*, b.id as start_id, c.id as end_id
 FROM roads_table AS a
 JOIN node AS b ON a.source = b.the_geom
 JOIN node AS c ON a.target = c.the_geom;
This query explains that in network table b.id is named as start_id and c.id as end_id.
Now we will use pgr_dijkstra method from PGrouting PostGIS Postgresql
The minimal syntax is given
pgr_dijkstra(TEXT edges_sql, BIGINT start_vid, BIGINT end_vid)
 RETURNS SET OF (seq, path_seq, node, edge, cost, agg_cost) or EMPTY SET
This returns seq, path sequence, node, edge, cost, agg_cost fields.
Select seq, node, edge,cost, geom from pgr_dijkstra(
 'Select gid as id, source, target, st_length(geom) as cost from network', 3566,20051, false) as di
 JOIN network pt
 ON di.edge = pt.gid ;
Here we have joined network table to select geometry field. This all command would be running in SQL window in DB manager option in QGIS.
You can create a shape file as a result for query. For that you need to click on load as new layer option then provide geom as geometry option and edge as column with unique values and click load. The result layer will be added to canvas of QGIS.
PgRouting PostGIS PostGreSql using Latitude Longitude for source and destination:
You just need to change the last command in SQL window of QGIS software.
Select seq, node, edge,cost, geom, agg_cost from pgr_dijkstra(
 'Select gid as id, source, target, st_length(geom::geography)/1000 as cost from network',(SELECT source FROM network
 ORDER BY geom <-> ST_SetSRID(ST_Point
 (74.862413,24.476381),4326) LIMIT 1),
 (SELECT source FROM network
 ORDER BY geom <-> ST_SetSRID(ST_Point
 (75.857734,22.719588),4326) limit 1), false) as di
 JOIN network pt
 ON (di.edge = pt.gid);
This query explains that we are using pgr_dijkstra from pgrouting which takes sql_text,integer start_id, integer end_id and boolean type for directed route. If route is directed, give input as true otherwise false. Here in this article we have undirected route. As now in place of we want to give latitude and longitude so for that given query has executed.
SELECT source FROM network ORDER BY geom <-> ST_SetSRID(ST_Point (75.857734,22.719588),4326) limit 1This part is little interesting, first of all we need to understand that always we provide latitude longitude of point(place), not of any line (road). So this point can be restaurant, stops, hotels or hospitals etc.
Now the very first task is to find out the nearest path from these points. For that we used <-> from postgis.
<-> — Returns the distance between two points.
Now we may have 2 or more path from selected point. So the shortest one should be selected from these path, For that we used order by command which arranges these path in ascending order and after that limit 1 command selects top most 1 row, which his nothing but the shortest path from source to path. Similar concept is applied on end point also.
Syntax of postgresql:
double precision <->( geometry A , geometry B );The <-> operator returns the 2D distance between two geometries. Used in the “ORDER BY” clause provides index-assisted nearest-neighbor result sets. For PostgreSQL below 9.5 only gives centroid distance of bounding boxes and for PostgreSQL 9.5+, does true KNN (K nearest neighbor) distance search giving true distance between geometries, and distance sphere for geographies.
Syntax of postgresql:
geometry ST_SetSRID(geometry geom, integer srid);
geometry ST_Point(float x_lon, float y_lat);
In ST_Point we give source and destination latitude longitude. Using ST_SetSRID Set the SRID on a geometry to a particular integer value. Here EPSG 4326 is used which is WGS84 datum. EPSG stands for European Petroleum Survey Group, They publish a database of coordinate system information. SELECT source FROM network this returns source id. Similarly got source id of end point. Then cost is set as length of route in kilometers. All these provided to pgr_dijsktra method and join network table to take geometry as output to show result in QGIS.
Output of PGrouting PostGIS Postgresql – No need for Google routing
Here is the output of route which is rendered with QGIS Desktop, where green color indicates the road network and red color display the shortest distance we get from A and B.
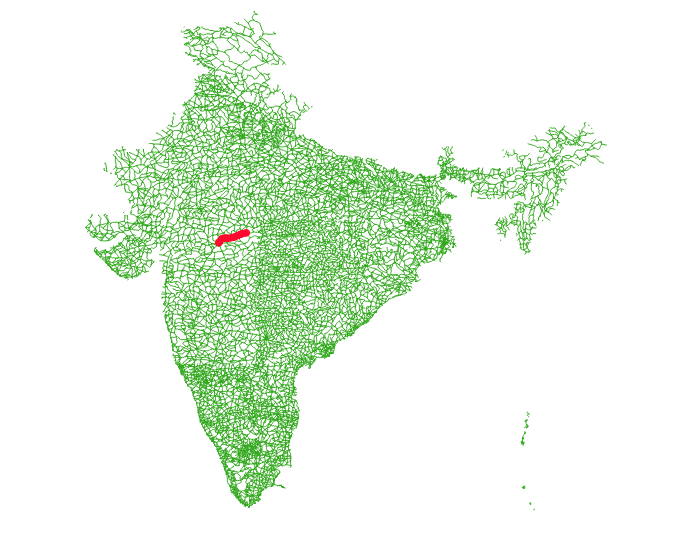
We got good results as distance from A to B is calculated as 368Km and on Google map it is 361 km. Similarly many points have tested and result vary from 6 to 8Km.
Did you tried PGRouting postgis postgresql? If you are facing any issue, do let us know by commenting below with the solution.
hi
i follwed the toturial step by step but i still have errors when excuting the pgr_dijkstara (ERROR: syntax error at or near “pgr_dijkstra”
LINE 1: …, VERBOSE off, COSTS on, BUFFERS off, TIMING off )pgr_dijkst…
^
********** Error **********)
note: i create new database in postgresql and aded the pgrouting extension and started the tutorial
thank you